Using BoldGrid Staging
In this tutorial:
One of the more unique features of BoldGrid is the ability to create a Staging Site. Using this feature allows you to install another BoldGrid Inspiration, modify, and/or develop a new, indepedent website. While your Staging Site is initially launched privately, your Active Site remains online. You can deploy your staging site to replace your active site when you are ready to go live with it. In the guide below are the steps to use the Staging feature of BoldGrid to build another website.
How to Install a Staging Site
In order to utilize the Staging site feature of BoldGrid, you must install a new Inspiration as the Staging site version. Follow the steps below to install a new Inspiration as your Staging site.
 Log into your BoldGrid Administrative Dashboard.
 In the menu to the left, click on Inspirations.
-

You can scroll to browse the many Inspirations available to install. You can also click on an Inspiration to view a larger preview. Either way, once you find your favorite one, click on the Select button to proceed.
-

Select the content options you want to install for your selected Inspiration, then click Next.
-

Modify the fields under the Contact tab to customize your website's information. Click Next to proceed.
-

Select the radio button next to the option Make this new Inspiration my Staging website. Click Install this website!.
How to Customize Your Staging Site
Once you have your Staging site installed, you can edit its Pages, or you can use the Customizer tool to modify your website further.
-

Hover over Customize from the menu on the left, then click on Staged Site. This will open the Customizer tool to begin modifying your Staging Site.
-

The pages of a Staging site can be edited through the Page Editor. Simply click on Pages in the menu to the left, then click on the page title of the development group labeled Staging.
How to View Your Staging Site
Since a Staging site is not live, you can only access it via your BoldGrid Administrative Dashboard. Follow the steps below to view your Staging site.
-
Log into your BoldGrid Administrative Dashboard.
-
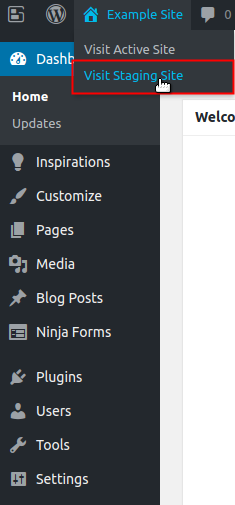
Simply hover over the website title (ie: Example Site) in the Administrative Menu at the top. Then click on Visit Staging Site. This will open up the Staging site so that you can view your website's new appearance.
How to Deploy Your Staging Site
Once you have installed, modified, and previewed your Staging site, it's time to deploy it. Deploying your Staging site will launch the Staging version of your website and take down your Active site. Follow the steps below to deploy your Staging site with basic options.
NOTE: If you want to deploy your site with advanced options, follow the steps in our guide here.
- Log into your BoldGrid Administrative Dashboard.
-

Hover over Customize in the menu to the left, then click on Deploy Staging.
-

A summary of the changes to be made will be displayed. Read over the changes, to ensure you understand the process that will occur. Then simply click the Launch Staging! button.
Did you find this article helpful?
Tweet
Category
Getting Started with BoldGrid
Help Center Login
Getting Started with BoldGrid
Related Questions
Here are a few questions related to this article that our customers have asked:
Ooops! It looks like there are no questions about this page.
Would you like to ask a question about this page? If so, click the button below!

We value your feedback!
There is a step or detail missing from the instructions.
The information is incorrect or out-of-date.
It does not resolve the question/problem I have.
new! - Enter your name and email address above and we will post your feedback in the comments on this page!