Adding Auto-Nav in Concrete5
The previous guide in our adding navigation to Concrete5 series covered adding auto-nav. In this tutorial we will guide you through adding the Auto-Nav option in Concrete 5. This can assist visitors in navigating your website, by creating links for easily moving between pages.
Add Auto-Nav:
- After logging into your dashboard, in the site menu select the page that you want to add content to. For this example I am selecting the Test page.

- On the top left, roll your mouse over edit and select edit this page from the menu. This will allow the fields in the page to be edited.

- Now, highlight and click the area you would like to add content to, and select add block from the list.

- On the add block menu select Auto-Nav, this will bring up the add video player menu.
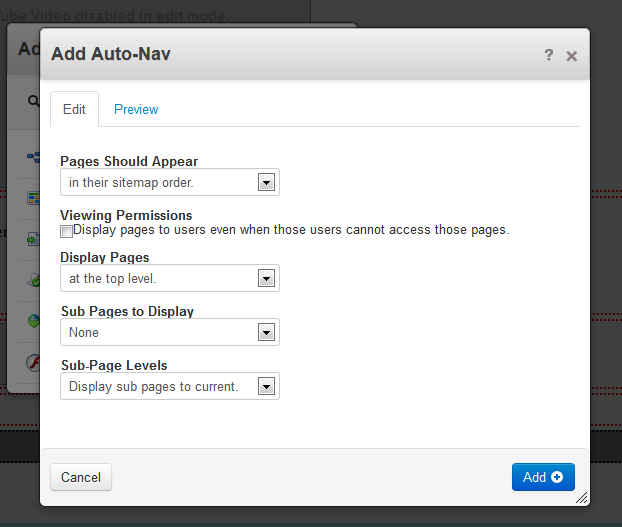
- On the add auto-nav menu, make your preferred selections
When you are satisfied with your settings, click Add to add the auto nav to your page.Option Description Pages should appear
Specify what order you want the navigation options in. Viewing permissions
Check the box if you want to show all pages, even if innaccessible. Display pages
This lets you choose the page level to display, the sitemap may be hlpful with determining this. Sub pages to display
No sub pages - displays the the top page (no subpages).
Relevant sub-pages - displays pages related to the page you are on.
Display breadcrumb trail - shows you the previous pages you navigated from.
Display all sub-pages - shows all subpages.
Sub-Page levels
Display sub pages to current - displays previous subpages you viewed.
Display sub pages to current +1 - displays previous subpages you viewed, and the next subpage below the current one.
Display all - displays all subpages.
Display a custom amount - allows you to specify how many subpages to display.
- Roll your mouse over editing, and select publish my edits to save what you have done.

Congratulations, you have successfully added Auto-Nav to your website!

Continue to the next tutorial which will cover adding Next and Previous nav in Concrete5.
Did you find this article helpful?
Tweet
Help Center Login
Adding Navigation in Concrete5
| 1. | Adding Auto-Nav in Concrete5 |
| 2. | Adding Next & Previous Nav in Concrete5 |
| 3. | Adding Date Navigations in Concrete5 |
Related Questions
Here are a few questions related to this article that our customers have asked:
Ooops! It looks like there are no questions about this page.
Would you like to ask a question about this page? If so, click the button below!

We value your feedback!
There is a step or detail missing from the instructions.
The information is incorrect or out-of-date.
It does not resolve the question/problem I have.
new! - Enter your name and email address above and we will post your feedback in the comments on this page!