Smart IP Banning in Concrete5
The previoous guide covered blocking an IP address in Concrete5. In this tutorial we will show you how to work with Smart IP banning option in Concrete5. This is useful in preventing people from attempting to gain access to Concrete5, by trying every password until one works. It can also stop a misconfigured crawler from affecting your sites resources.
Working with the Smart IP Banning Option:
- Login to your concrete5 Dashboard.
- Roll your mouse over the Dashboard button on top, and select System & Settings. This will bring up the System & Settings menu.
- Under the Permissions & Access section, select IP Blacklist. This will bring up the IP Address blacklist menu.
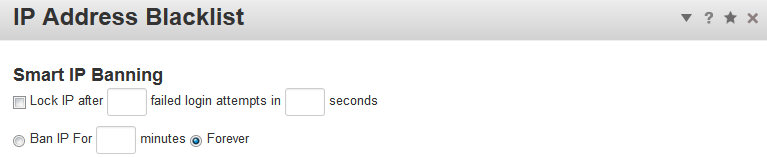
Option Description Lock IP after With this option you can set how many times an individual IP can try to login and fail within a certain amount of time (in seconds) before they are banned. Ban IP For Once selected, this option sets how low the IP will be banned for, before they can try to login again. You can set the time in minutes, or just ban the IP forever.
Once you have made your selections, click the blue Save button on the bottom right. A message will be displayed stating "IP Blacklist settings saved." After an IP address has been banned, it will be listed under the Automatically Banned IP Addresses section.
How to unblock an automatically banned IP address:
- Under the Automatically Banned IP Addresses section, click the box to the left of the IP address you want to unblock.
- Click the drop-down box titled Make Ban Permanent, and select Remove Ban.
- Click the Go button to the right. A message will come up stating "IP Blacklist settings saved."

Congratulations, now you know how to work with smart IP banning in Concrete5! The next guide in our working with groups and permissions in concrete5 series, we will show you how to view PHP errors.
Did you find this article helpful?
Tweet
« Prev
Block an IP in Concrete5
Comments


Staff 1,198 Points
|
2015-03-09 5:28 am
Hello Robert,
Can you please explain your problem so we may try to address it. Best Regards, TJ Edens |
Help Center Login
Working with Groups and Permissions in Concrete5
Related Questions
Here are a few questions related to this article that our customers have asked:
Ooops! It looks like there are no questions about this page.
Would you like to ask a question about this page? If so, click the button below!

We value your feedback!
There is a step or detail missing from the instructions.
The information is incorrect or out-of-date.
It does not resolve the question/problem I have.
new! - Enter your name and email address above and we will post your feedback in the comments on this page!