Using a Google Web Font for the Title in Builder
One of the frustrating items that affect Plesk Premium Builder sites is the use of a barely readable font that is part of the banner. Fortunately, this font can be changed. Google provides FREE web fonts that can be easily integrated into the website produced by the builder for this purpose. The following article will explain how the Google Web font is added to published Builder Web site in order to alter the tiny subtitle text.
The instructions in this article provide changes to a PUBLISHED Premium Builder site. If the Builder site is re-published from the Builder, these changes will be overwritten. It is therefore important to backup the files that are being changed in a folder NOT located in the same publishing location as the Builder website. A good reference for making backups in Web Hosting Hub is How Do I Create a Backup Using FTP?
Using Google Web Fonts in the Builder Website Title
The font that you will see as part of the "slogan" for the Banner is often a very tiny, and hard to read font. You can see it when you a template in step 2 of the Builder website building process - labeled in the Builder as DESIGN. Here are a few screenshots showing the section in question:
Preparing to Edit the Files
- Publish your Builder Website. Click here for more information on Publishing your Builder Website.
- Make a backup of your website. We are going to be modifying a few of the files in the website, so even though the website is easily re-published from the Builder, it's good to get in the habit of making backups of your files before altering them. You can see how to backup you site here: Creating a Website Backup in your Cpanel or Creating a Backup using an FTP client.
- Login to the Cpanel. Open the directory where your website files have been published. We will be using the editors available in the Cpanel File Manager for this tutorial. Click on Using the Cpanel File Manager to learn more about using the File Manager to edit files.
- We will be modifying two files in the published website: INDEX.PHP and STYLES.CSS. The INDEX.PHP file will be in the root of your published website. The STYLES.CSS will be in a sub-folder published with your Builder website files called CSS. For now, we will simply open both files into the editors in preparation for the necessary changes. Click on the INDEX.PHP file and then select CODE EDITOR in the top of the menu bar of the File Manager. Remember that you can only make changes to files that are showing in the right pane of the File Manager.
- Open another tab/window and then open file manager once more. Click on the CSS folder to see its contents. You should see the STYLES.CSS file in the folder. Click on the file to select it, then click on CODE EDITOR in the top of the file manager.
Obtaining the Google Font Code
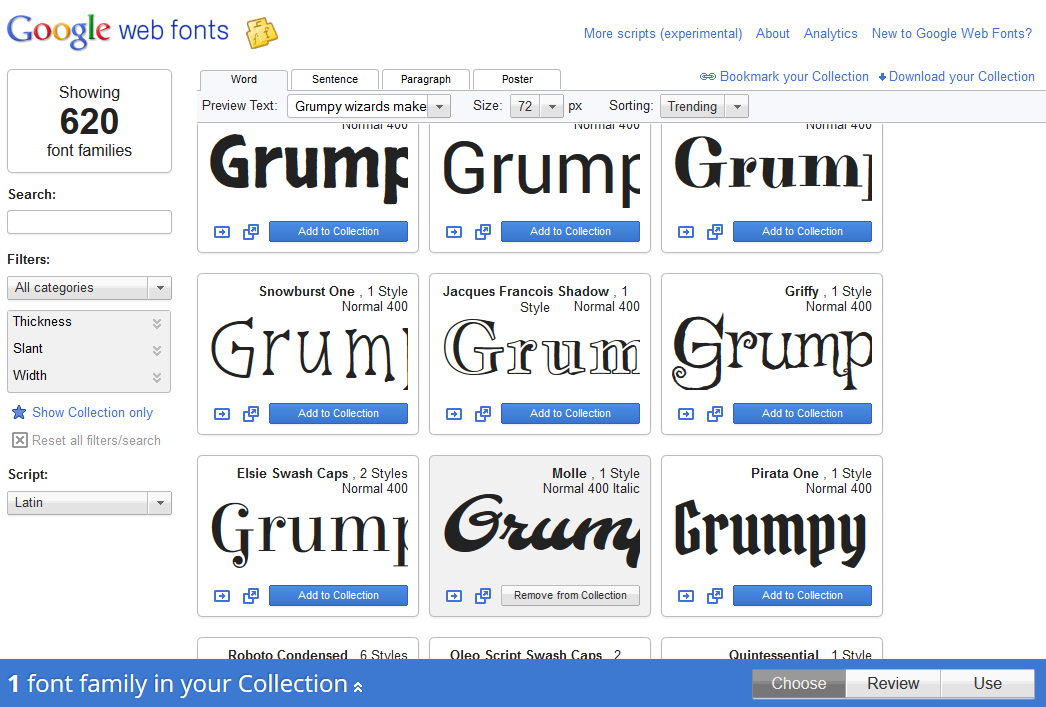 Open a separate Web Browser window and then go to Google Web Fonts. Note the bottom right side of the interface. should see three buttons that say CHOOSE, REVIEW, USE. Scroll through the list of fonts presented by Google Web Fonts and then click on the blue ADD TO COLLECTION button at right.
 After you have selected the font(s), you want to use, click on REVIEW. Scroll through the different sizes of the font to make sure that the font is appropriate for your needs.
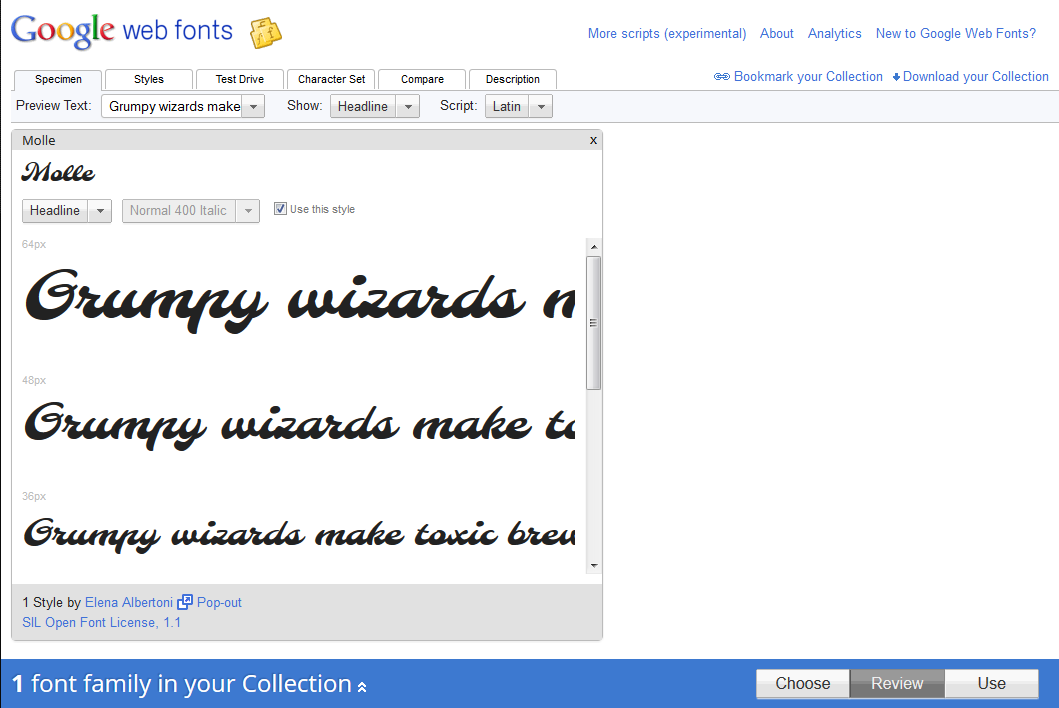
 After you finish reviewing the font(s), click on USE button in the bottom right hand corner. When you click on USE, you will be presented with several numbered items starting "Choose the styles you want". You will also see a PAGE LOAD graphic. This graphic will show you if there is any appreciable impact on the load time when using the font on your web page.
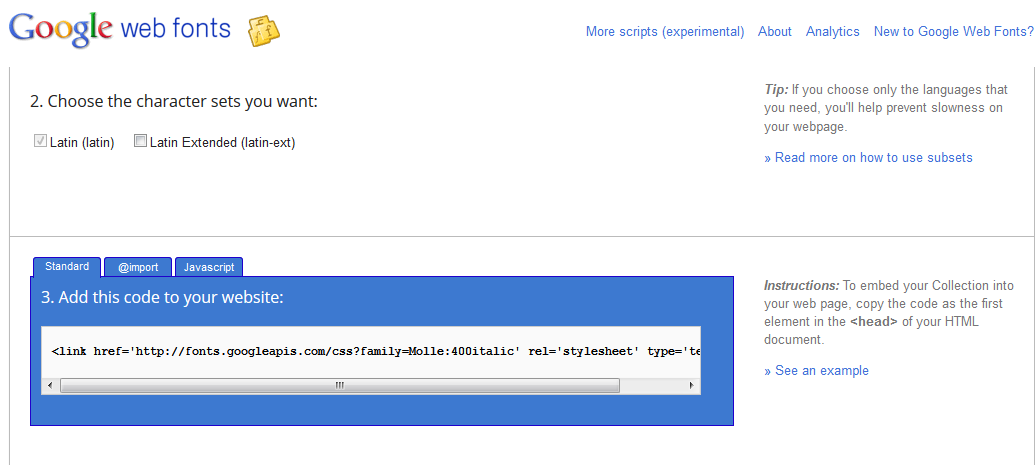
- Scroll down until you get to item #2 - "Choose the character sets you want:". If you need to use an extended character set, then you will be able to choose it here if it is available. Click on the checkbox to add a character set. Otherwise, leave this option set to the default.
- Scroll down until you item #3. This section has 3 tabs: Standard, @import, and Javascript. For the purpose of this tutorial we will only need to use the code in the STANDARD tab. Click on the code provided in screen and copy the code.
- Go to the Code Edit window that you have open for the INDEX.PHP. As per the instructions on the Google page, look for the first <head> tag in your web page and then paste the code immediately after the tag.
 Scroll down to the fourth section labeled "Integrate the fonts into your CSS:" . Copy the CSS code listed at the bottom of the page.
 Paste the code into the STYLES.CSS file that you have open in the code editor. When you paste code into the STYLES.CSS file, make sure that you add it into the section labeled ".slogan" - refer to the screenshot for further details.
- Save the altered INDEX.PHP and STYLES.CSS file.
The use of different fonts can be easily added using code. Google Web Fonts has gone a step further and provided hundreds of free fonts along with the process to easily add it to your web pages. Here's a screenshot of the website showing the before and after with the added font:
| Before | Altered |
|---|---|
 |
 |
Did you find this article helpful?
Tweet
Help Center Login
Customize Your Site
Related Questions
Here are a few questions related to this article that our customers have asked:
Ooops! It looks like there are no questions about this page.
Would you like to ask a question about this page? If so, click the button below!

We value your feedback!
There is a step or detail missing from the instructions.
The information is incorrect or out-of-date.
It does not resolve the question/problem I have.
new! - Enter your name and email address above and we will post your feedback in the comments on this page!