Adding a Shop in MultiStore for PrestaShop 1.5
The multistore option from Prestashop is a new feature that allows the management of multiple stores in a single interface. The need for multiple presences on the web can range from having to cover regional, customer, or product requirements. For example, a business might have the need to have multiple store fronts to accommodate different multicultural customer groups. Or, they may want to separate multilingual stores that will have graphics or a design differences. The following tutorial explains how to add a shop in PrestaShop 1.5 with the multistore option enabled.
How to Setup a Shop in PrestaShop 1.5 with the MultiStore Enabled
- Login to the Administrator Dashboard as an Administrator
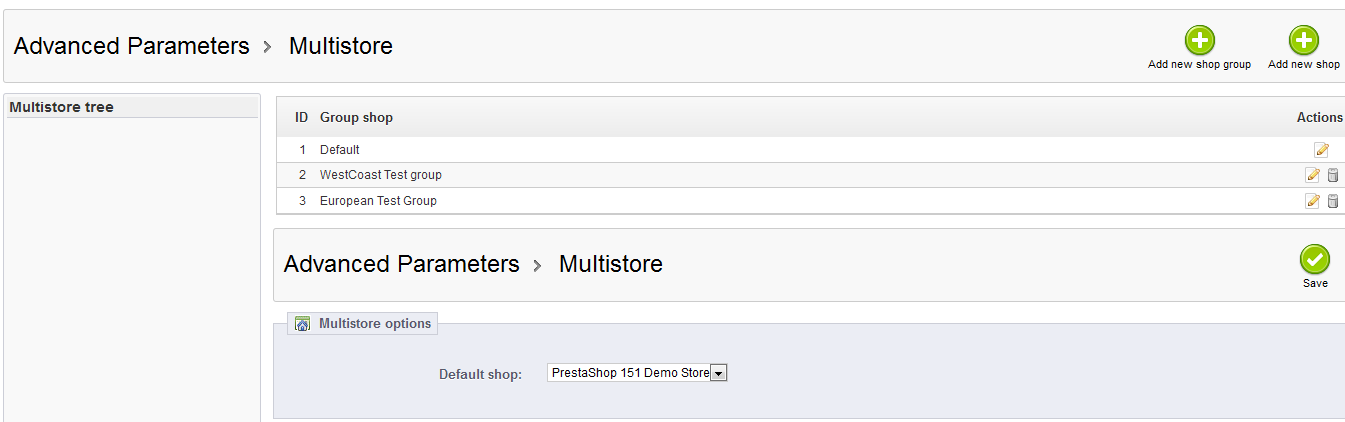
- Go to the menu bar and click or hover on ADVANCED PARAMETERS. Then when the drop-down menu appears select MULTISTORE. The example screenshot below shows the MULTISTORE parameters with 2 other groups already created:
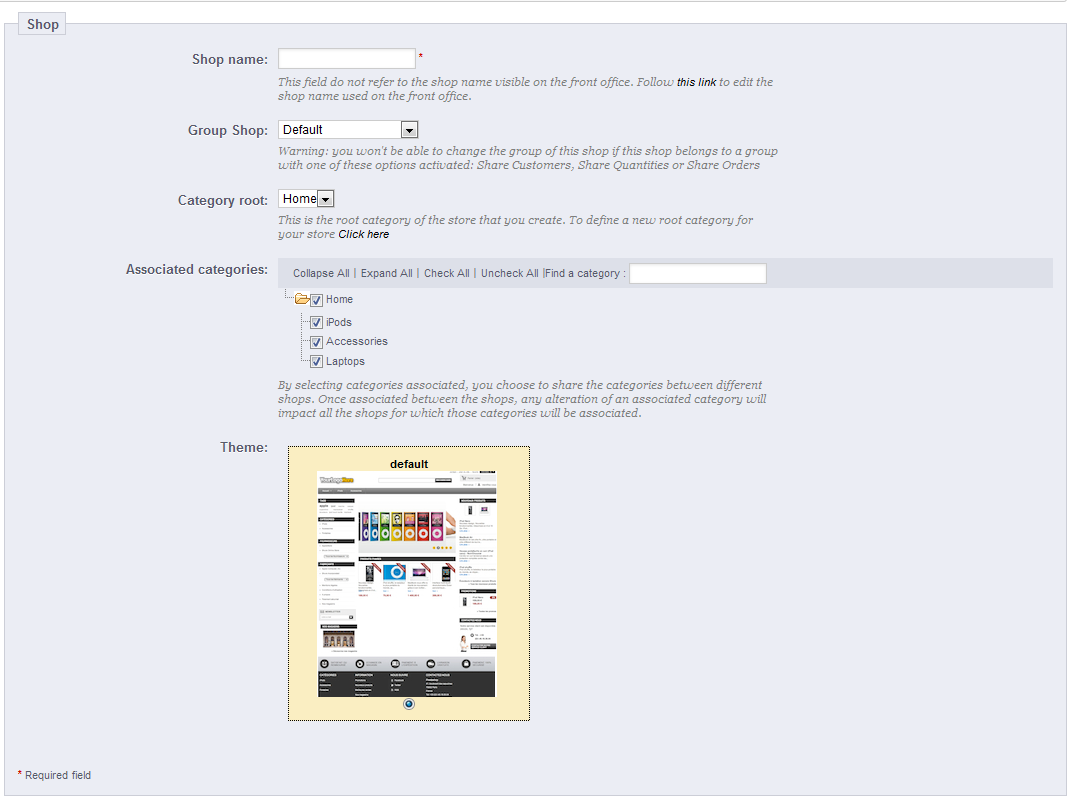
- Fill in the shop name field by clicking on it, then typing the name in.
- The next two fields - Group Shop and Category Root - have a drop down menu. Select the required setting for each by clicking through the drop down menus.
- The Associated Categories are the categories shared between the shops. Click on the checkboxes to select the categories that will be shared between the shops.
- The next option is to choose a THEME for the shop. This can vary if you have multiple THEMES loaded in your installation. If you have more than one theme, then you can select the theme you wish to use by clicking on the radial button at the bottom thumbnail pic of the theme.
- The next step may or may not be required depending on the shop that you are adding to your multistore configuration. Scroll down the screen until you see the following:
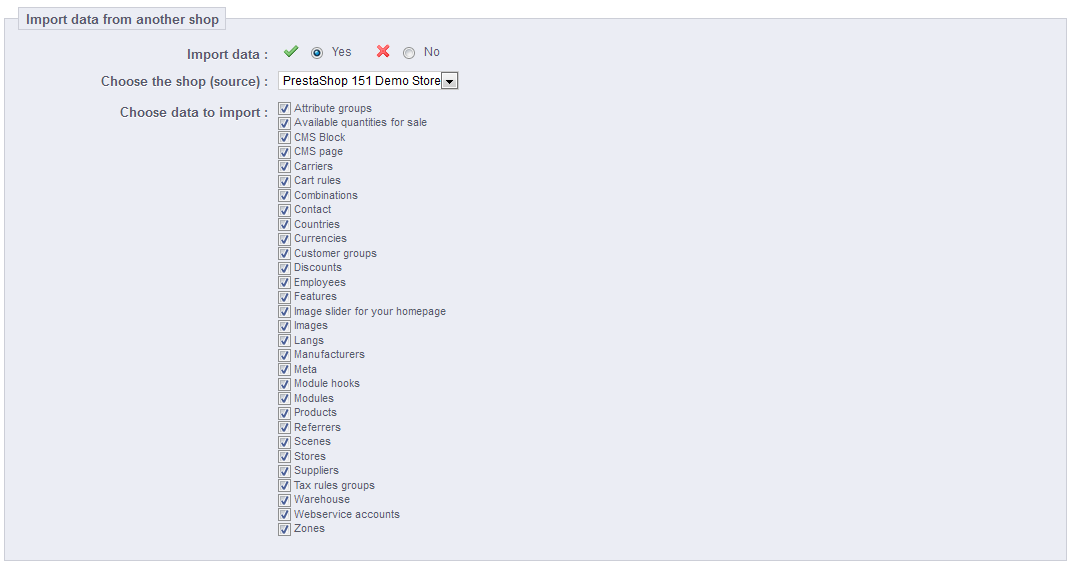
Enable the transfer of data by clicking on the YES or NO radial button. If you intend to transfer data, you will need to choose the source shop from where the data is coming. And then check off the specific data you wish to transfer. Once you have finished selecting the data to import, select the SAVE AND STAY option to initiate the data transfer. - Click on the SAVE button in the top right hand corner to save the added shop.
The screen for multistore include the table with the groups listed includes ID, Group Shop (name) and ACTIONS. Then underneath that table there is the option to set the Default shop. To the left, there is a blank area called the MULTISTORE TREE. We unfortunately were not able to get that area to show stores (most likely in a tree-style format). We believe that this will be available in future updates. The main options available here are the ADD NEW SHOP GROUP and ADD NEW SHOP options. Click on ADD NEW SHOP.
| Shop Name | Name of the shop being added; mandatory to save the new shoprrrr |
|---|---|
| Group Shop | default Group shop the shop will part of |
| Category Root | root category of the shop |
| Associated Categories | Shared categories with shops |
| Theme | Theme used for shop |
The next step in the process of adding a store is to set it's web address. Go to Adding Shop URLs in PrestaShop 1.5 Multistore Installations for further information.
When a shop is added, you will see a summary list such as the one below:
Did you find this article helpful?
Tweet
Help Center Login
Setting up a MultiStore in PrestaShop 1.5
| 1. | Configuring Multistore Groups in PrestaShop 1.5 |
| 2. | Enabling Multistore in PrestaShop 1.5 |
| 3. | Adding a Shop in MultiStore for PrestaShop 1.5 |
| 4. | Adding Shop URLs for PrestaShop 1.5 Multistore |
Related Questions
Here are a few questions related to this article that our customers have asked:
Ooops! It looks like there are no questions about this page.
Would you like to ask a question about this page? If so, click the button below!

We value your feedback!
There is a step or detail missing from the instructions.
The information is incorrect or out-of-date.
It does not resolve the question/problem I have.
new! - Enter your name and email address above and we will post your feedback in the comments on this page!