Manage Comments for a WordPress Post or Page
In this tutorial:
In a previous tutorial in our basic Wordpress features series, we showed you how to change the comment settings in WordPress for new Pages and Posts. But what if you have content you've already published which you need to disable or enable comments for? Fortunately, WordPress allows you to enable and disable comments for each Page or Post. This is a great feature which allows you to go back and change the comments settings on previously published Pages and Posts and also makes it possible to close comments for some content while keeping comments open on other content.
Access Pages / Posts
- Begin by logging into your WordPress dashboard.
- In the menu on the left, click on either Pages or Posts, depending on which type of content you want to change comments for.
- Follow the instructions below for either disabling comments on a single Post or Page or disabling comments on multiple Posts or Pages.
Enable or Disable Comments on a Single Post or Page
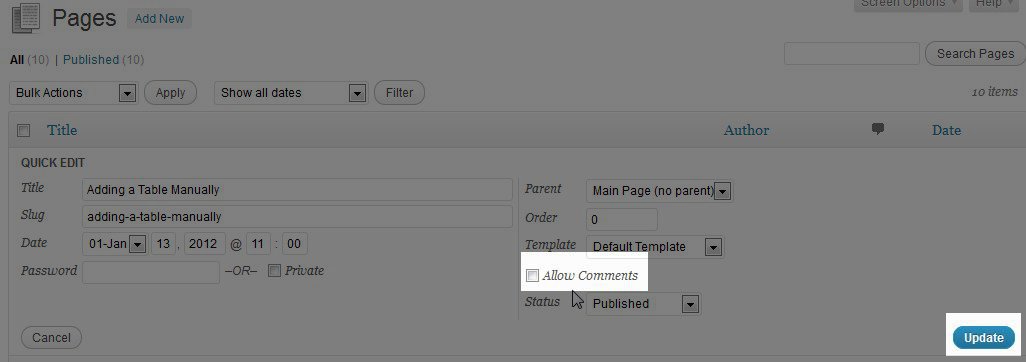
- If you only want to change comments for one Page or Post, click on the Quick Editlink that appears when you hover over the name of the Page or Post.
- In the Quick Edit menu that appears, select or deselect Allow Comments and click the Updatebutton.
Comments will now be disabled or enabled for that specific Post or Page. This will have no change on the "global" settings you have set under Settings > Discussion in your WordPress dashboard.
Enable or Disable Comments on Multiple Pages or Posts
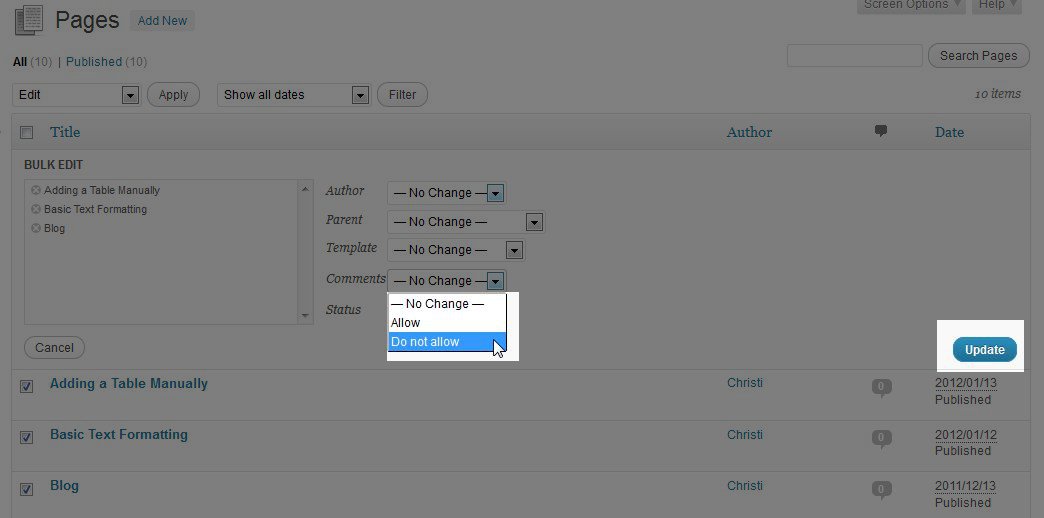
- Beginning from the Pages or Posts menu, select each Page or Post you want to make changes to.
- Select Edit from the drop down near the top of the page and click Apply.
- From the Comments drop down menu, select either Allow or Do not allow and click Update.
Comments are now disabled or enabled for the Pages or Posts you made the change to. Once again, this will have no change on the "global" settings you have set under Settings > Discussion in your WordPress dashboard.
In the next tutorial we will show you how to set up permalinks in WordPress.
Did you find this article helpful?
Tweet
Next »
How to set up Permalinks
Category
Basic WordPress Features
Comments
|
n/a Points
|
2014-10-18 8:51 am
Great tips and very easy to understand. This will definitely be very useful for me when I get a chance to start my blog. |
|
n/a Points
|
2017-08-10 8:34 am
Excellent post! This is really helpful to useful. I absolutely like this post. This is very informative post. It just made my work easier.
Thanks. |
Help Center Login
Basic WordPress Features
Related Questions
Here are a few questions related to this article that our customers have asked:
Ooops! It looks like there are no questions about this page.
Would you like to ask a question about this page? If so, click the button below!


We value your feedback!
There is a step or detail missing from the instructions.
The information is incorrect or out-of-date.
It does not resolve the question/problem I have.
new! - Enter your name and email address above and we will post your feedback in the comments on this page!