Adding Product Price in PrestaShop 1.6
The price of a product in your store is set in this tab. You will see the pre-tax wholesale price, pre-tax retail price, applied tax rules, and unit prices for packs of the product. You can also set specific prices based on quantity or other conditions. These specific prices can also be given priorities if multiple price rules apply to a customer. The Prices tab can selected when you are editing an existing product. You will be given a warning if you click on the Prices tab before you save a new product. The following article will describe each option and provide the steps for their use.
Video on using the Prices Tab
The video tutorial describes the three main sections of the Prices tab. These same sections are then detailed in the listed steps below.
Working with the Product Price
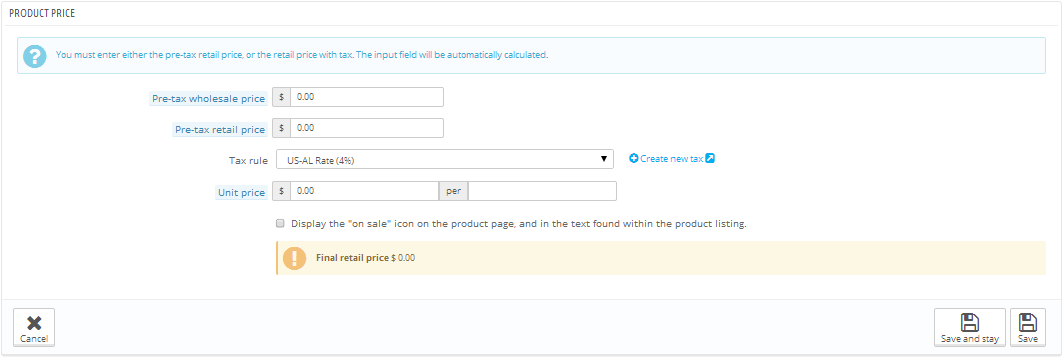
Pre-tax wholesale price - This is the amount that you paid for the product not including the tax.
Pre-tax retail price - This is the price that you are charging for the product not including the tax. It is suggested that this price be higher than your pre-tax wholesale price. The difference between the wholesale and retail price is the margin of profit that you make for selling the product.
Tax rule - The tax rule is defined elsewhere within PrestaShop. A link is provided here if you wish to create a new tax.
Unit Price - If your product is sold in multiple numbers, this option allows you to set a price per pack.
On sale icon - This option allows you to display an "on sale" icon on the product page. Their will also be text indicating the item is on sale in the product listing.
Setting the price in the Prices Tab
- Login to the PrestaShop 1.6 administrator
- Hover over Catalog in the menu at left, then click on Products in the menu that pops up. The Products screen will appear.
- When adding a new product, first save the product, then click on the Prices tab under the Information tab. If you are editing a product, select your product from the product list and click on the Edit in the column on the far right of the screen, then click on the Prices tab.
- Click on the Pre-tax wholesale price field and type in the wholesale price of the product without tax.
- Click on the Pre-tax retail price field and type in the price that customer will pay for the product. Again, this price does not include tax.
- Select the applicable Tax rule. If needed, click on the Create new tax link in order to create a new tax rule.
- If your product is sold in packs, then set the unit price per the number of products.
- If you want the product to be on sale, then click on the checkbox to display the "on sale" icon and text for this product.
- Before you save, you should see the final retail price displayed for the product. If you are satisfied with that price, then click on either the Save and stay button or the Save button to save your entries. If you wish to cancel the price, then click on the Cancel button at the far left.
Specific Prices
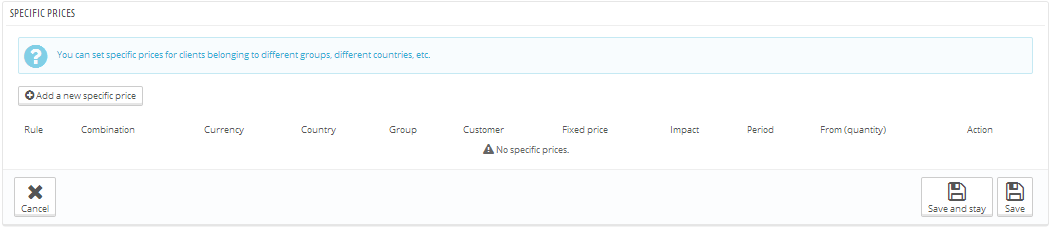
A specific price might be set for a country or group depending on the needs of your store. For example, if you want to provide a sale price on a product for all visitors, then you could set a price here and specify the group who can see the price as visitors. Any visitor who sees that product will see the price you have assigned. When you add a specific price, you are creating a price rule. Each rule is then listed in a table in the Specific Prices section.
How to Add a Specific Price
- Login to the PrestaShop 1.6 administrator if you have not already done so.
- Hover over Catalog in the menu at left, then click on Products in the menu that pops up. The Products screen will appear.
- When *** link ***adding a new product, first save the product, then click on the Prices tab under the Information tab. If you are editing a product, select your product from the product list and click on the Edit in the column on the far right of the screen, then click on the Prices tab.
- Scroll down to the section labeled Specific Prices. Note that you may need to set the Product Price if you intend to use the base price when determining the Specific Price. Click on the button labeled Add a new specific price.
- The specific price rule that you are creating starts with the Currency. Click on the drop-down menu that is set to All currencies by default in order to select a specific currency.
- Next, select the countries affected by the rule. If you don't want to use the default value of All countries, then click on the drop-down menu to select a specific country.
- The last item on the line with currencies and countries is groups. The default setting is All groups. Click on the drop-down menu in order to select a specific group.
- You can also narrow down the rule to apply to specific customers. By default, the setting is set to All customers. Click on the field and type in a customer's name in order to search for and select a specific customer.
- Each rule can be limited by a calendar date and time. You set a start date by clicking on the from field and the select the to field for the ending date and/or time. Each field allows you to select a month, day, and set a specific time as needed. Set your price rule's start and end date.
- The next option starts with the label "Starting at" followed by a field labeled units. This option lets you set the price rule to take effect after a certain number of units have been sold. By default, the unit value starts at "1" which means that all products are affected. Click in the field to change the unit number. The price rule will take effect when it reaches that unit number. For example, if the unit is set to 10, then the price rule takes effect on the tenth unit sold.
- The last two settings of the price rule set the price of the product. By default, the option to Leave base price is checked. The base price is the same as Product price defined above. Click on the checkbox to uncheck the option in order to change the base price. Once you have cleared the checkmark, you can click on the Product price field immediately above it, and type in a different price for the product.
- If you wish to set a discount for the price rule, then you can do so here as either a percentage or currency unit. Click on field following Apply a discount of, then type in the discount you want to apply. The next field is a drop-down menu that lets you select if the discount will be in currency units or a percentage. Note that the discount applies after the tax.
- Click on one of the Save options in the bottom right corner to save your entries. Clicking on Cancel will return you to the product list.
Priority Management for your Price rules

The final section of the Prices tab is called Priority management. This option is used when you have a customer who falls under multiple price rules. For example, you may have a rule that applies to visitors giving them a 10% discount. You may also have another price rule that gives a 15% discount for Canadian customers. You can use the priority management option to set which discount has priority for customers who meet both the visitor and country criteria.
Setting Priority Management
- Login to the PrestaShop 1.6 administrator if you have not already done so.
- Hover over Catalog in the menu at left, then click on Products in the menu that pops up. The Products screen will appear.
- When adding a new product, first save the product, then click on the Prices tab under the Information tab. If you are editing a product, select your product from the product list and click on the Edit in the column on the far right of the screen, then click on the Prices tab.
- Scroll to the bottom of the screen and you will see a series of four drop-down menus. This row of options is labeled Priorities. The price rule can be applied to the following: Shop, Currency, Country, and Group. You can set these 4 options in any order. Use the drop-down for each option in order to set the order of priority.
- You an click on the checkbox next to the option which is labeled Apply to all products. This will set the price rule for all of the products within your inventory. You would use this option if you were to have a large sale where you are providing discounts for all of your products.
- Click on one of the SAVE options in order to save your entries. Clicking on the cancel button will return you to the Products list page.
Did you find this article helpful?
Tweet
Category
PrestaShop 1.6
Help Center Login
Related Questions
Here are a few questions related to this article that our customers have asked:
Ooops! It looks like there are no questions about this page.
Would you like to ask a question about this page? If so, click the button below!

We value your feedback!
There is a step or detail missing from the instructions.
The information is incorrect or out-of-date.
It does not resolve the question/problem I have.
new! - Enter your name and email address above and we will post your feedback in the comments on this page!