Adding a Product in Zen Cart
In this tutorial we will guide you in adding a new product to your Zen Cart eshop. This is one of the most important steps in setting up your e-commerce store, since you must add a product in order for people to purchase it.
This can be accomplished from the Admin section of Zen Cart quite easily.
How to Add a Product:
- Login to the Zen Cart Admin panel.
- Roll your mouse over the Catalog option in the menu, and select Categories/Products.
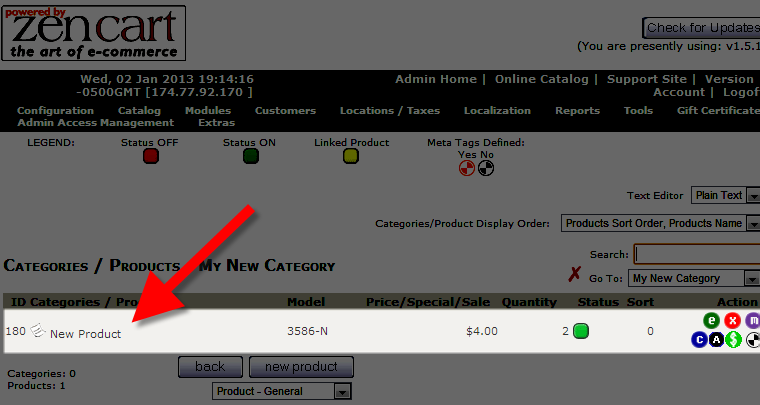
- Select the category from the list that you want the product placed within. In my tests, I am selecting My New Category, which is the category I created in the previous tutorial.
- Click the New Product button.
You will be presented with various fields / choices.
Option Description Products Status: Choose In Stock to make this product available, or Out of Stock to disable this product. Date Available: Select a date for this product to be available. Products Manufacturer: Choose your manufacturer from the drop-down menu. Products Name: Enter a name for your product here. Product is Free: Select Yes if this product is free, and No if it is not. Product is Call for price: Select Yes if want to require customers to call for the price, and No if you want the price displayed on the site.. Product Priced by Attributes:
Choose if you want products priced by attributes, such as color, which can be setup in the Admin Panel of Zen Cart. Tax Class: Select None if this product is tax free, or Taxable Goods to charge tax. Products Price (Net) Enter the price before any taxes. Products Price (Gross): Enter the price after taxes. Product is Virtual: If a product is virtual, such as a file download select: Yes, Skip Shipping Address. If it is not a virtual product, choose: No, Shipping Address Required. Always Free Shipping: Choose Yes if shipping is free, No for normal shipping prices, and Special if it requires a download, and item shipping. Products Quantity Box Shows: Choose Yes if you want customers to see how many of this product you have available for sale, and No if you do not want visitors to see this. Product Qty Minimum: Enter how many of this product people must purchase in order to checkout. The default value is 1. Product Qty Maximum: If you want to set a limit to how many of this product visitors can buy, enter the limit number in this field. Product Qty Units: Enter how many units are included with this 1 product. For example 3 in a box. Product Qty Min/Unit Mix: You can enter a minimum number of products that have to be purchased at once in this field. For example if you set this to 2, they can purchase this product and a different product in order to meet the minimum 2. Products Description: Describe your product in this field. Products Quantity: Enter how many of this product you have available in this field. Products Model: Enter the model number of the product in this field. Products Image: You can click the Choose File button here to upload an image for this product. Overwrite Existing Image on Server: Choose yes to replace an existing image for this product. Or, select an existing image file from server, filename: You can enter the path of an existing image on your server in this field. Products URL: You can enter the URL address of this product's website (without the http://) in this field to provide more information to customers. Products Shipping Weight: Enter the shipping weight of this product in this field. Sort Order: You can modify the order this product displays on your site here, lower number will appear higher on the list.
After making your selections click the Preview button, you will see a notification stating "This product was added to our catalog on Wednesday XX January, 20XX." (It will display the actual date.) - Click the Insert button to save this new product. You will then see the new product listed.
Congratulations, now you know how to add a new product to your Zen Cart eshop!
Did you find this article helpful?
Tweet
Help Center Login
Working with Products in Zen Cart
| 1. | Creating a New Zen Cart Category |
| 2. | Adding a Product in Zen Cart |
| 3. | How to Remove a Product or Category in Zen Cart |
Related Questions
Here are a few questions related to this article that our customers have asked:
Ooops! It looks like there are no questions about this page.
Would you like to ask a question about this page? If so, click the button below!

We value your feedback!
There is a step or detail missing from the instructions.
The information is incorrect or out-of-date.
It does not resolve the question/problem I have.
new! - Enter your name and email address above and we will post your feedback in the comments on this page!