Connecting to Your Server With SSH (for Mac users)
Introduction
SSH Hosting, or Secure Shell, is now available for Web Hosting Hub customers. This means you can now use SSH to access your server directly instead of going through a graphical interface, like cPanel. Instead of clicking through graphics you can use simple text-based commands to navigate your account and configure your server settings.
Before you can connect you will need to generate a private and public key. I will show you how to do this in the next section. And later, you will read how to use the Terminal app on your Mac to make the SSH connection
Keep in mind, SSH is typically intended for advanced users. However, it can pose a unique challenge for beginners who want to learn more about Linux server management.
Generate Key for Shell Access
-

Login to the cPanel and click on the SSH/Shell Access icon in the Security section.
-

Click on the button labeled Manage SSH Keys
-

Click on the button labeled Generate a new key
-

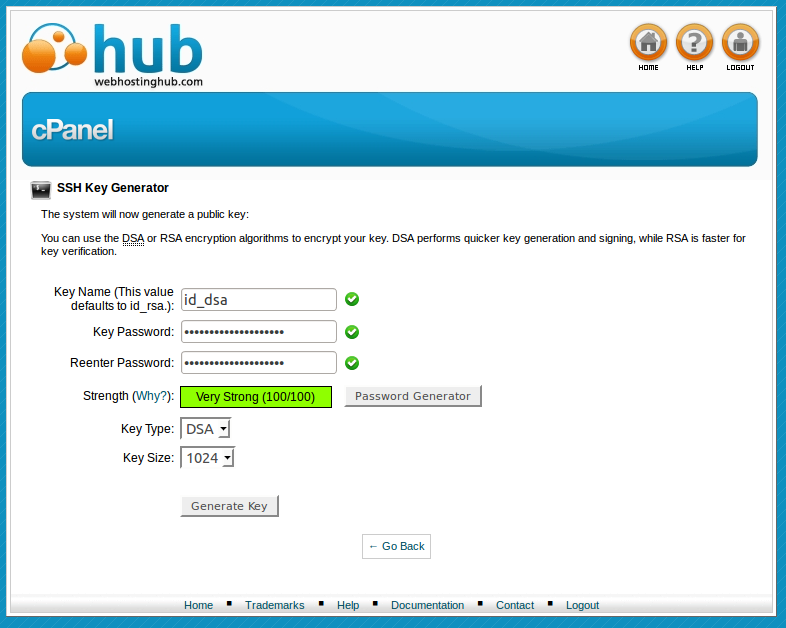
Type in a password (do NOT use the password generator), then confirm it. Make sure to write down the password you used. Leave the key type at DSA and key size at 1024.
- Click the Generate Key button.
- You should then see a confirmation that the key was generated. Then you can return to the Manage SSH Keys screen.
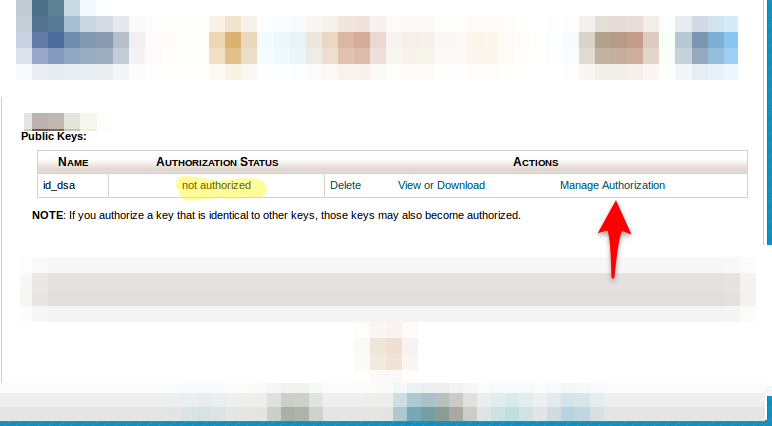
- You should see the Public key AND the Private key generated with the name "id_dsa". Click on View/Download for the PRIVATE key. This is the key that you will need to load onto your Mac.
- Download the file to your Mac client. To make it simple for this tutorial, copy the file to your desktop.
-

Before we move to the Mac side of things, you should check to see if the PUBLIC key has an authorization status of NOT AUTHORIZED. Click on the Manage Authorization link. This will authorize the key for you! NOTE: If you don't authorize this key, it doesn't matter what you do on the Mac side, you won't be able to login.
The next portion of the process requires that you login to your Mac as an administrator. We will be using the default Terminal program in order to login to SSH using the key that we generated above.
Use Apple Terminal Program to Connect to SSH
- Login to your Terminal program. If you don't know how to do this, go the magnifying glass in the OS toolbar (usually at the top right - this is Spotlight) and type in "terminal". You should see Terminal appear as an application. Select it and it will launch. (Note that if you are not logged into your Mac as the administrator you will not be able to make these changes.)
- Go to your desktop where you copied the ID_DSA file. The terminal command is: cd desktop
Make sure that the ID_DSA file is already on your desktop. Then type the following into your terminal:
cp -frp id_dsa ~/.ssh
This will copy the key into the .ssh folder.
- Next run the following command to add the identity to your computer:
-
Type in the password you used to generate the key in cPanel.
ssh-add --apple-use-keychain id_dsa
You should see a confirmation that the identity has been added to your Mac. When this is complete, you will be able to use the SSH command to login to the server. The cPanel user name will need to be used along with the server name. The command will look like this:
ssh -p 2222
This email address is being protected from spambots. You need JavaScript enabled to view it.
If this is the first time you have connected the server, you may see a message stating that it can't identity the server. Just click on "YES" to proceed (just make you're connecting to the right server). The password should automatically work and you should see the terminal connect.
This completes the tutorial for creating a new SSH key to connect your Mac terminal program to your shared server SSH. For best security practices, make sure to keep your key private and don't share the password unless necessary.
Comments
|
n/a Points
|
2017-07-28 6:26 am
Note the instructions above - download and add the "PRIVATE" key, not the public one - otherwise you'll get 'bad passphrase' errors and waste 30 minutes figuring it out!!! |

We value your feedback!
There is a step or detail missing from the instructions.
The information is incorrect or out-of-date.
It does not resolve the question/problem I have.
new! - Enter your name and email address above and we will post your feedback in the comments on this page!