Configuring Multistore Groups in PrestaShop 1.5
The Multistore option in PrestaShop 1.5 is a great option for those who have multiple store presences that need to be managed from one application. In their ongoing effort to update how PrestaShop can manage multiple shops, they created an option in the multistore interface called shop groups. Shop groups allows you have to have a set of stores that may (or may not) share customers, inventory and and orders. The following article explains how multistore shop groups can be configured in PrestaShop 1.5.
Adding Multistore Shop Groups in PrestaShop 1.5
- Login to the Administrator Dashboard as an Administrator
- Go to the menu bar and click or hover on ADVANCED PARAMETERS. Then when the drop-down menu appears select MULTISTORE. The example screenshot below shows the MULTISTORE parameters with 2 other groups already created:
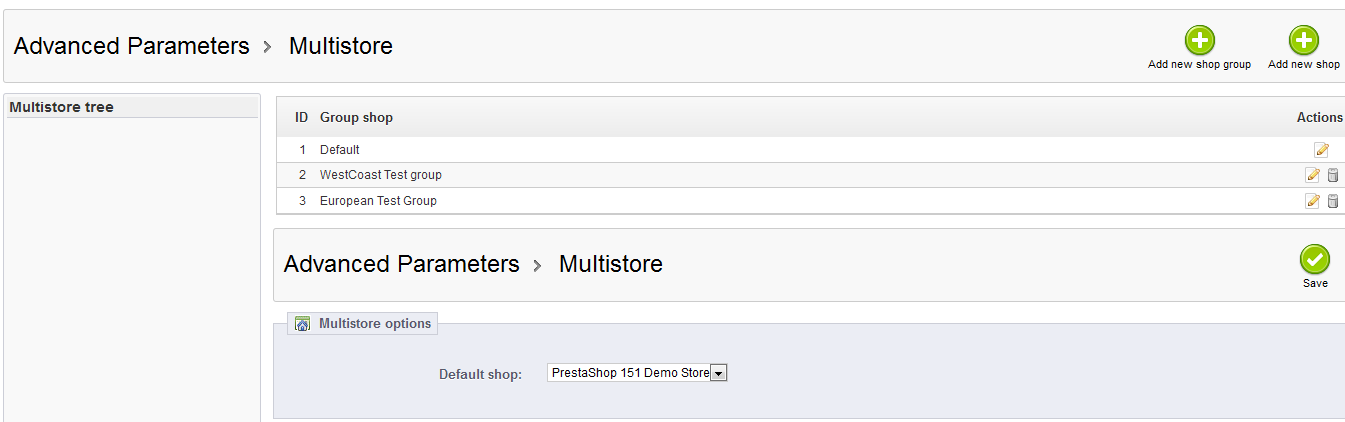
Notice the three areas created by PrestaShop. the table with the groups listed includes ID, Group Shop (name) and ACTIONS. Then underneath that table there is the option to set the Default shop. To the left, there is a blank area called the MULTISTORE TREE. We unfortunately were not able to get that area to show stores (most likely in a tree-style format). We believe that this will be available in future updates. - When working with multistore groups, you will need to select the store that will be your default shop. This is the store that will be the shop that will be the model for your group. In the section labeled MULTISTORE OPTIONS (as per the screenshot above), click on the drop-down menu labeled DEFAULT SHOP and select the shop that will be your default shop.
- The four main actions that you can perform in the Advanced Parameters> Multistore page is the ability to ADD NEW SHOP GROUPS, ADD NEW SHOPS, and set the DEFAULT SHOP. You can also use the actions column of the listed stores in order to edit their information. Note that the DEFAULT shop group is there (by default) and cannot be deleted. Click on the ADD NEW SHOP GROUP option and you will see the screen below:
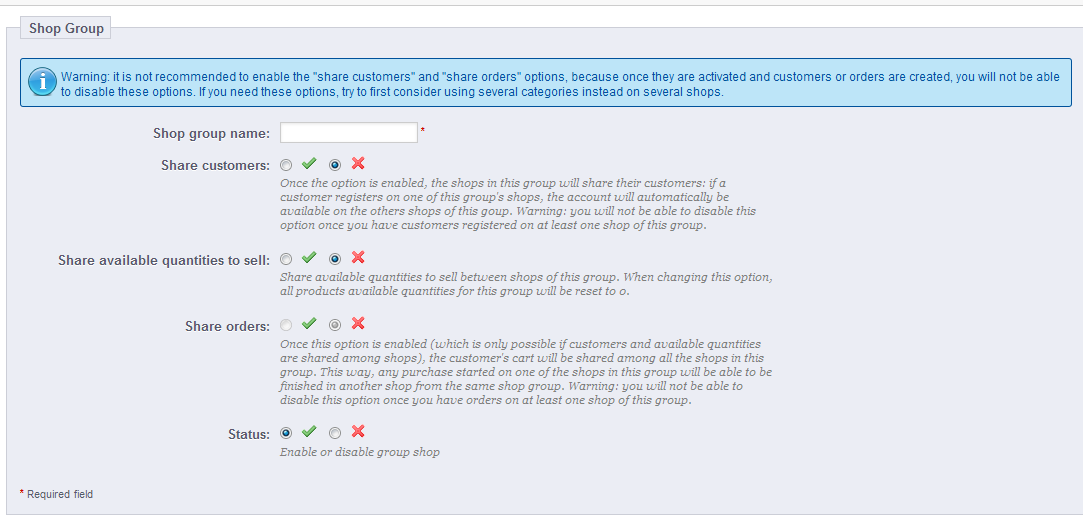
- The items for the SHOP GROUP are very important in that they determine if data is saved together or apart. If you need to share customers, inventory numbers, and customer orders, then there must be an understanding of this requirement from the beginning. The following table explains the different options listed for the group:
Shop group name Mandatory in order to save shop group name Share Customers Select to enable to share customers between shop. Share available quantities to sell Share available quantities inventory between shops in the group. NOTE: If this option is changed, then available quantities is reset to 0 Share Orders Orders are shared which enables customers to complete orders between stores (cannot be disabled if order exist) Status Enable or disable the shop group
The main issue to remember about these settings is that you should do them BEFORE the stores are active and accepting orders. The warnings by PrestaShop all warn that once data is shared and flowing, you will not be able to turn off these options. Fill in the shop name and select the radial buttons for each of the next four options. - Click on SAVE in the top right hand corner in order to save your SHOP GROUP.
The shop group is a way to unify data between multiple stores being managed by PrestaShop 1.5. It is important to set this option up before the stores start operating in order to accurately account for all data being shared between the stores, including inventory, sales data and customer data. When the group is formed there is no overt difference to the stores as the changes are primarily internal. An administrator would see a list like the following:
In order to add multiple stores, go to Using the Multistore Option in PrestaShop 1.5.
Did you find this article helpful?
Tweet
Help Center Login
Setting up a MultiStore in PrestaShop 1.5
| 1. | Configuring Multistore Groups in PrestaShop 1.5 |
| 2. | Enabling Multistore in PrestaShop 1.5 |
| 3. | Adding a Shop in MultiStore for PrestaShop 1.5 |
| 4. | Adding Shop URLs for PrestaShop 1.5 Multistore |
Related Questions
Here are a few questions related to this article that our customers have asked:
Ooops! It looks like there are no questions about this page.
Would you like to ask a question about this page? If so, click the button below!

We value your feedback!
There is a step or detail missing from the instructions.
The information is incorrect or out-of-date.
It does not resolve the question/problem I have.
new! - Enter your name and email address above and we will post your feedback in the comments on this page!