Using Paypal with osCommerce
In this tutorial we will guide you through installing and configuring the Paypal module in osCommerce. This allows you to accept Paypal payments, which is one of the most common tools for online banking and accepting money, with millions of users. This module does not require users to have a paypal account to check out, and it will allow you to accept major credit cards.
First, we will install the PayPal Website Payments Standard module, then we will view / edit the settings for this module. The official osCommerce documentation states that this module supports these paypal features:
- Sandbox server to perform test transactions
- Authorization and Sale transaction methods
- Encrypted Web Payments
- Instant Payment Notification
This module requires that you have a Paypal Seller account.
Install the Paypal Module:
- Login to the osCommerce Admin panel.
- Click the Modules menu option, then select the Payment option.
- Click the +Install Module button, you will see the available modules listed. Select PayPal Website Payments Standard module option, then select the +Install Module button.
Configure the Paypal Module:
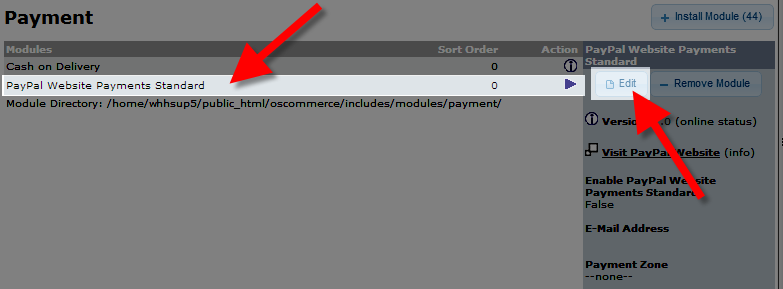
- The PayPal Website Payments Standard will now be listed under payment modules, select it, then click the Edit button.

You will then be presented with various fields, enter your preferred settings:
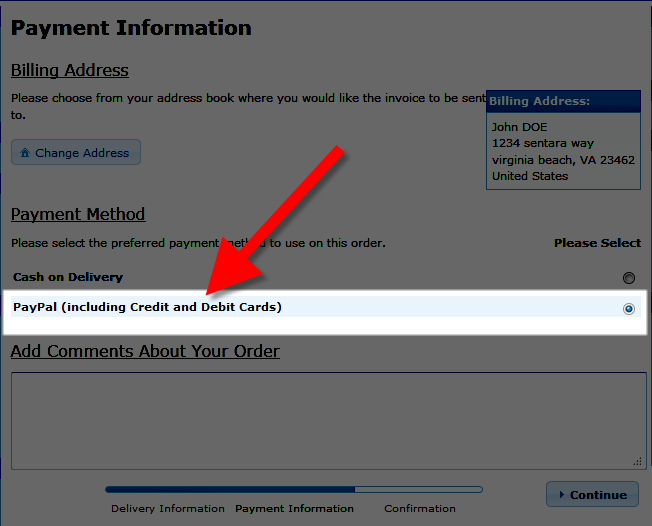
After entering your settings, click the Save button. Paypal will now be available as a payment option when customers checkout.Option Description Enable PayPal Website Payments Standard
True enables, this shipping option. If you select False, this shipping option will not be available. E-Mail Address Enter your paypal seller email address. Payment Zone You can select a zone from this drop-down menu, if you do, this setting will only apply to that zone. Set Preparing Order Status Select the setting from this list that you want the Status to be set to, it will stay at this setting until the customer completes the payment process with Paypal. Set Paypal Acknowledged Order Status Select from the drop-down menu. When Paypal receives the payment successfully, the order will be set to this option. Gateway Server Select Live to make this payment option available, and Sandbox for this to just be a testable payment options. Transaction Method The Sale option will process the payment immediately, while the authorization method allows the customer 30 days to complete the payment. Page Style Enter your page style, this is setup at in your paypal account. Debug E-mail Address If you have an invalid order, the information regarding the order will be sent to this address. Sort order of display The number you enter here will affect where this option will display on the modules list. Zero will be at the top of the list, and higher numbers will be further down the list. Enable Encrypted Web Payments If you set this to True, the information sent to Paypal will be encrypted, while the transaction goes through. False will disable this option. Your Private Key Enter the name and location of your private key. Your Public Certificate Enter the name and location of your public cert. Paypals Public Certificate Ener the location and name of your paypal public cert. Your Paypal Public Certificate ID Enter the paypal public certificate ID. This is setup in your paypal account. Working Directory Enter the directory location for temporary files, they are removed after use. OpenSSL Location Enter: /usr/bin/openssl 
Congratulations, now you know how to install and configure Paypal for use with your osCommerce eshop! Continue to the next class in our osCommerce EDU Channel, it will cover Using Authorize.net as a payment gateway.
Did you find this article helpful?
Tweet
Help Center Login
Configure Payment Gateways in osCommerce
| 1. | Using Paypal with osCommerce |
| 2. | Using Authorize.net with osCommerce |
Related Questions
Here are a few questions related to this article that our customers have asked:
Ooops! It looks like there are no questions about this page.
Would you like to ask a question about this page? If so, click the button below!

We value your feedback!
There is a step or detail missing from the instructions.
The information is incorrect or out-of-date.
It does not resolve the question/problem I have.
new! - Enter your name and email address above and we will post your feedback in the comments on this page!