Creating an image link in the Premium Website Builder
When creating your site with the Premium Website Builder tool, there are times when you will enter links to other pages or sites. Most of these are simple text links and are easily created. Howevver, you may want to make your site more navigable with by making some of the images links as well. While this is not difficult, it is not as intuitive as text linking. This article is a guide to creating image links in your Premium Website Builder pages.
How to create image links in the Premium Website Builder tool
- First, log into your Premium Website Builder tool.
 Select the fourth step, which is the Edit step. This is done either from the main page, or from the upper right corner toolbar.
- This leads you to the Edit screen where you can select the page you want to work with from the left hand menu.
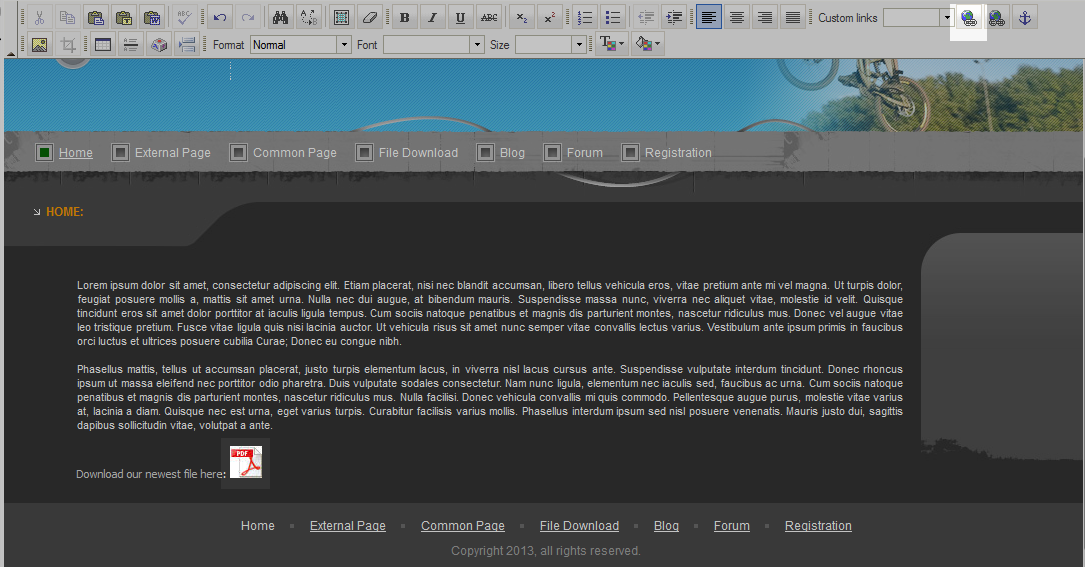 After the page appears in the right hand panel, it is time to insert the image you want to turn into a link. This can be a full photo or something small like an icon. We will be turning an Adobe pdf icon into a link as it will link to a pdf file. Move your cursor to the spot on the page you want to insert the image. From there follow our instructions on inserting an image.
- Inserting the image was just the first step. Now, we are going to convert the image into a link. To begin, click on the image and then locate the link icon from the upper toolbar and click that to open the link settings box.
- With the link settings box open, click the Browse Server button.
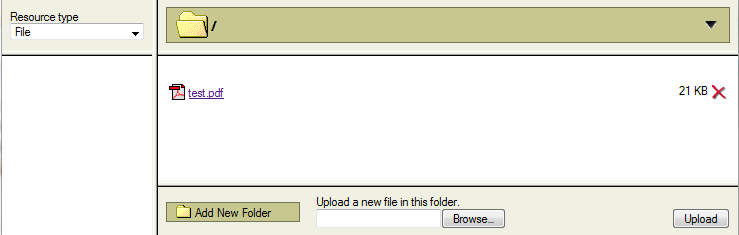 From the server browser, select the file you want to link to. You can also upload the folder by choosing the Browse button. From there, you will select the file from your local machine. Once selected, you will see the path in the URL field. Click the Uploadbutton to upload it to the server and place it into the list above. Once you find the file you want to link to, simply click the file name to continue.
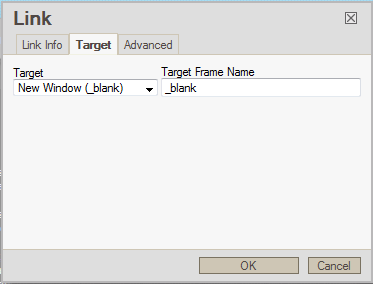 This brings you back to the link settings box. You will see the settings have changed and the URL is pointing to your file on the builder server. You may want to also make the link open into a new window so your visitors will stay on the original page as well. To do this, click on the Target tab and select New Window (_blank) from the dropdown. Once you are happy with your link settings, click on the OK button to finish.
- Your image link is now inserted into your site on the builder server. You will need to publish the site up to your hosting server for the image link to go live, however.
Did you find this article helpful?
Tweet
Category
Premium Website Builder
Help Center Login
Related Questions
Here are a few questions related to this article that our customers have asked:
Ooops! It looks like there are no questions about this page.
Would you like to ask a question about this page? If so, click the button below!

We value your feedback!
There is a step or detail missing from the instructions.
The information is incorrect or out-of-date.
It does not resolve the question/problem I have.
new! - Enter your name and email address above and we will post your feedback in the comments on this page!