Configuring Front End Settings in Contao
In order to provide a way for the website URL to be modified, Contao created several options within the Front End settings. The Front End configuration settings also include the caching settings for the website. The following article explains how to navigate to the front end configuration settings and make changes using the Contao Back end.
How to Use the Front End Settings
Changing the URL
There are several ways to change the URL through Contao. You can generate URLs that only show the website name, include the language of the website and display a folder-like format among the many options. The following steps show how to change these settings.
- Login to the Contao Back end.
 Scroll down the left hand side of the screen in the Back end modules until you find SYSTEM. In this section, click on SETTINGS.
- The following table summarizes the available settings that affect Contao URLs.
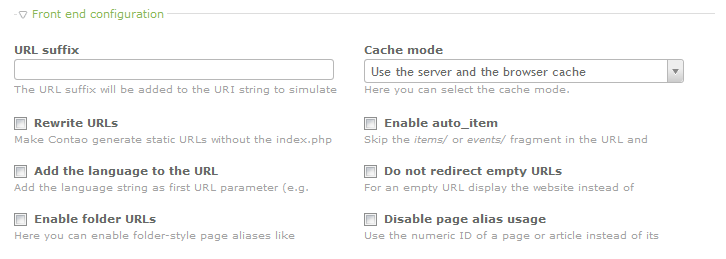
URL option Description of URL setting URL suffix Suffix is added to the URI path Rewrite URLs Enable this option to generate static URLs without the index.php; requires mod_rewrite and using the Contao provided htaccess file. Add the language to the URL Adds the language string to the URL. For example http://domain.com/en Enable folder URLs Enables folder-style page aliases. For example, instead of http://domain.com/folder-article-image, it would be http://domain.com/folder/article/image Enable auto_item Enables the use of auto_item to find a particular item - items/ or events/ fragment are removed from the URL. Do not redirect empty URLs If the URL is empty display the main website instead of re-directing to the language root. (not recommended) - used when language string is being used Disable page alias usage Displays the the numeric ID of a page/article instead of the alias
Enable the option that best meets your needs by clicking on the checkbox. If you are setting a URL suffix, you will need to click on the field below the label URL suffix. - Save your changes by scrolling to the bottom of the page and clicking on SAVE or the SAVE AND CLOSE options.
Setting the Cache Mode
Caching allows the server/browser to save a page into memory so that it loads quicker the next time a request for the page is requested. Contao has settings for the use of server-only, browser-only, server and browser caching.
- Login to the Contao Back end.
- Scroll down the left hand side of the screen in the Back end modules until you find SYSTEM. In this section, click on SETTINGS.
- The caching settings for the Front end configuration will appear as follows:

The caching settings will appear as a drop-down menu as per the screenshot above. Click on the drop-down menu and then click on the caching option you wish to use. If you chose DISABLE CACHING, remember that this means that this forces the browser to reload the page from the server anew for each request to see the page. - Scroll down to the bottom of the page and click on SAVE or SAVE AND CLOSE in order to save your choice.
Bear in mind that caching is used to help provide a faster browsing experience for the visitors to your website. Information for clearing server cache can be found Purging the Cache in Contao. You can also find information on clear a browser's cacher here: Clearing Your Browser Cache.

We value your feedback!
There is a step or detail missing from the instructions.
The information is incorrect or out-of-date.
It does not resolve the question/problem I have.
new! - Enter your name and email address above and we will post your feedback in the comments on this page!