Uploading a File to the Contao CMS
One of the more common tasks for any Content Management System (CMS) is uploading files to the installation. These added files can be media files (audio/video/graphics), text files, or web files related to the site being maintained in the CMS. Contao has a simple interface that requires you first place the file, then upload it into the server hosting Contao. The following tutorial explains the process of adding a file into the Contao CMS backend and then describes the other functions of the file manager interface used.
Managing files in the Contao CMS
- Login to the Contao Back End interface.
- Scroll down the Back End modules in the column on the left until you see FILE MANAGER in the System section. Click on FILE MANAGER to select it and you will see a screen similar to the following:

Note that Contao uses a tree-style view to list the files that are already loaded. Here's a table explaining the options at the top of the interface above:
New Folder Allows you to create a new folder container File Upload Select a file to update from your computer Synchronize Synchronize the existing file changes with the database Toggle All Expand or Contract all tree structures Edit Multiple Edit multiple records at in a single screen
Click on FILE UPLOAD to proceed. - As per the introduction, Contao's procedure for uploading files involves two parts: positioning the file, then selecting and uploading the file. Here's the screenshot of the interface that you may see:
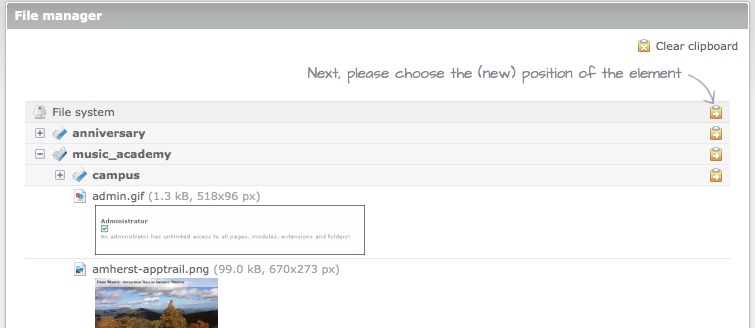
The directions at the top of the screen allow you to "choose the (new) position of the element" - select a clipboard with the arrow pointing to the right in order to select the location. Click on CLEAR CLIPBOARD in order to cancel the operation and return to the previous state. Click on one of the clipboard icons (with the arrow pointing right) to position for your file. The folders containing the files will generally be named to correspond with the site structures in the website. - After you have selected the location of the file, it will automatically jump to the FILE UPLOAD interface as per below:
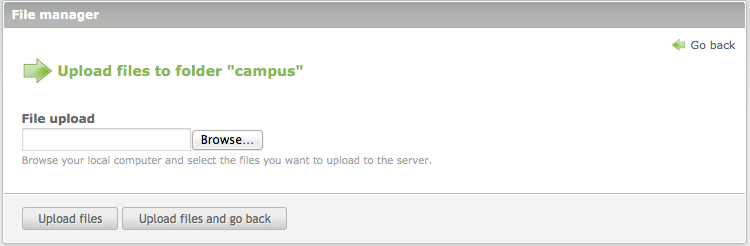
This interface allows you to click on BROWSE so that you can select the file from your computer. Once you have selected the file you wish to upload, click on one of the upload options: UPLOAD FILES or UPLOAD FILES AND GO BACK. Select your file and then click on UPLOAD FILES AND GO BACK to return to the previous menu. - When the file upload is complete, you will see your uploaded file in the list under the location you have chosen. At this point you may want to update the file title, add a link, or a caption. Additionally, you can add a language for the information given for the file. This will create a second entry screen for text involving the additional language.
- Click on SAVE after you have made your entries - this option is typically at the bottom of the screen.
Other File Manager Functions
Edit Multiple
Click on EDIT MULTIPLE in the top right of the screen after you have saved your most recent entries. When you first click on EDIT MULTIPLE, you will see checkboxes appear next to all of the files in the list. Click on the checkboxes to select multiple files, then scroll down and click on EDIT at the bottom of the screen. Note that there is a DELETE option there as well. If you need to delete multiple files, this is a quick way to do that. After you have clicked on EDIT, you will see something similar to the following: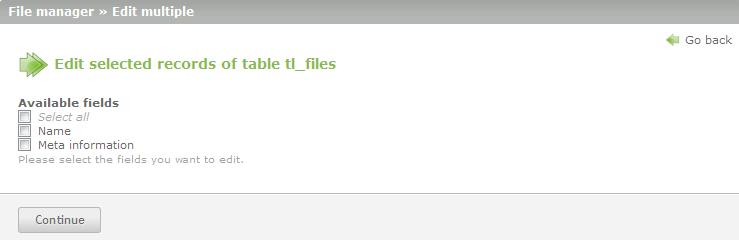
Note that the above field shows what you can change. If you have selected the fields (or used the SELECT ALL option) then fields for each file will appear so that you can edit them after clicking on CONTINUE at the bottom of the screen. Make any necessary changes, then click on SAVE AND CLOSE to save your changes.
Additional Editing Functions in File Manager
The icons for each file listed in the File Manager have several important functions. Here's a screenshot of the icons that can be used:![]()
Each of the functions of the icons are listed below:
| Click on this icon to edit the file | |
| |
Click on this icon to duplicate the file |
| |
Click on this icon to move the file to another location |
| |
This icon is either colored or grayed out so you able to select it. Click on this icon in order to edit the file; used to edit text or web files (e.g. CSS, html, etc.); Editor will appear for editing text in file when selected. |
| |
Click on this icon in order to delete this specific file. |
When the file has been added to your Contao server, the additonal functions provided in the file manager can provide solutions for further file management requirements.
Did you find this article helpful?
Tweet
« Prev
Pagemounts in Contao
Category
Creating Content with Contao
Help Center Login
Creating Content with Contao
Related Questions
Here are a few questions related to this article that our customers have asked:
Ooops! It looks like there are no questions about this page.
Would you like to ask a question about this page? If so, click the button below!

We value your feedback!
There is a step or detail missing from the instructions.
The information is incorrect or out-of-date.
It does not resolve the question/problem I have.
new! - Enter your name and email address above and we will post your feedback in the comments on this page!