Creating New Content Elements in the Contao CMS
Creating a new article is completed after adding the actual content using the different element options within the Contao CMS. The article can be a single publication of text or it may include many pages and use various HTML, graphic, audio-visual elements. The following article shows how to add new content elements using the Contao CMS back end interface.
Part II: Adding New Content Elements
Creating New Content Elements
After you have finished adding the article ID information, you will see something similar to the following screenshot:

At this point, you have basically created a header that identifies the article (and much more - see Creating a New Article ID in Contao for further information). However, the article ID does not provide the content. In order to add the actual content that will provide the information for the viewers of your website please review the following steps:
- In the Contao Back end interface, click on the icon that resembles a pencil in the interface as per the screenshot below:

- Note that if you hover over the pencil icon, you will see a pop-up that identifies the article ID saying "EDIT ARTICLE ID ##" - where the ## is the number of the article ID. After you click on the EDIT icon you will see the following screen:
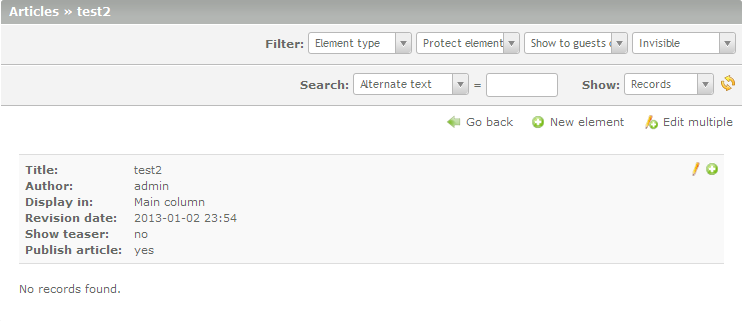
Note that for a new article, you will see NO RECORDS FOUND at the bottom of the screen. You will also see the following options:

The Go back icon will send you back to the previousl screen listing all of the articles 
The New element icon will bring up a screen that will allow you to position the new article before adding the text. 
The Edit multiple icon allows you to edit multiple records at once. This allows you add or remove options for the article(s) based on a checklist 
Edit the article ID information 
Add the article to the top of the list. In contrast to the New element icon above, it opens the new element window and places the article directly at the top without asking for placement information first
Click on the NEW ELEMENT icon to continue. - The New element icon allows you to place the article, but only if you have more than article already in the list. Otherwise, it's placed at the top automatically. Hovering over the clipboard icon (highlighted on the right side of the screenshot) will display pop-up text indicating where the article will be positioned.
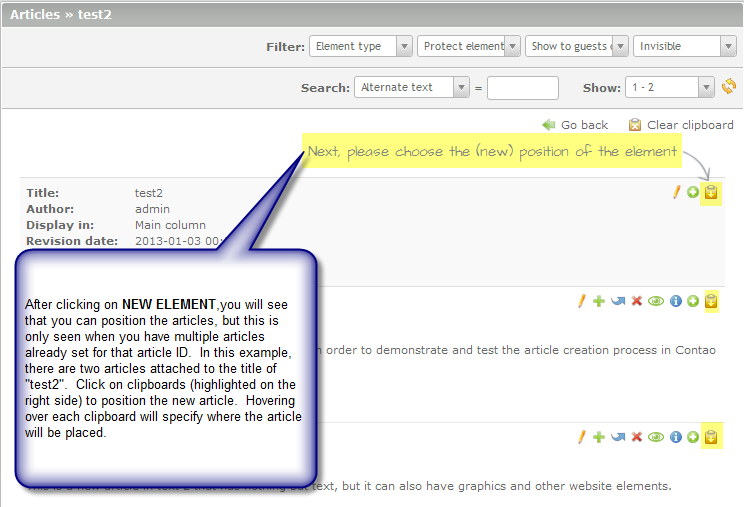
The 3 icons that you will see for a NEW ELEMENT allow you to edit the article ID information (the pencil icon), place the element immediately at the top with no placement options (green circle with plus sign) and paste at top option (clipboard icon). In this group of 3 icons, click on the clipboard icon to continue. - The page that opens is divided into sections (by green text - which is the typical format for all forms within Contao). Each section is broken down below:
Element Type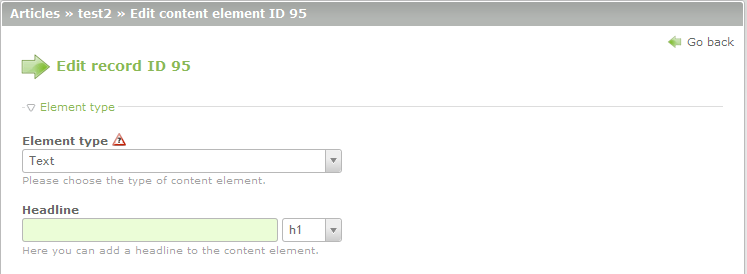
There are two options in the Element Type section: Element Type and Headline. To learn more about using the different Element types, go to Element Types in Contao. Select the Element type and fill in the appropriate sections as per the element type you have selected. - The next section of the form (depending on the element type that you have selected) will typically be the ACCESS PROTECTION. Click on the check box to protect the element in use.
- Expert Settings- this section is used to set the option Show Guests Only, set a CSS ID/class, and create spacing in the displayed element(s). This section will appear as follows:
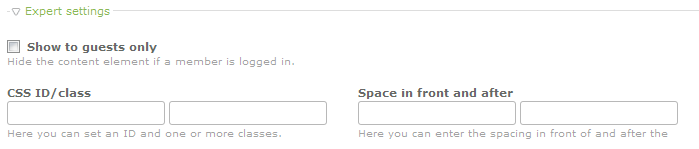
Click on the checkbox to set the option for the element to be displayed only for guests. Then select a CSS ID/class or set up spacing for the article to more clearly see the displayed element. - The last section is called VISIBILITY and is used to hide elements on the Website. Click on the checkbox labeled INVISIBLE in order to hide the website element. You can also set a date and time that the element will be displayed.
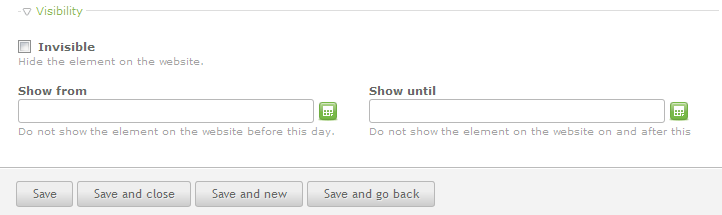
Click on the check box in order to hide the element, or fill in a time and date range to use in displaying the element. - Once you have completed all of your entries, click on a SAVE option a the bottom of the screen to save your changes.
After completing these steps, you will have completed placing and creating an article within the Contao CMS. Make sure to properly assign the article to specific groups if you have created the article for only a segment of your users. If you were mistaken and the article is not ready, you also have the option to un-publish it using the green eyeball icon in the tree view listing the articles in Contao. As you become more familiar with the Contao interface, you will find that creating articles with Contao is very quick and flexible as there are many options and elements with which you can provide your users.
Did you find this article helpful?
Tweet
Next »
Pagemounts in Contao
Category
Creating Content with Contao
Help Center Login
Creating Content with Contao
Related Questions
Here are a few questions related to this article that our customers have asked:
Ooops! It looks like there are no questions about this page.
Would you like to ask a question about this page? If so, click the button below!

We value your feedback!
There is a step or detail missing from the instructions.
The information is incorrect or out-of-date.
It does not resolve the question/problem I have.
new! - Enter your name and email address above and we will post your feedback in the comments on this page!