How to add products to your online store - eshop
After you have added the special page eShop to your site, it's now time to begin adding products. If you have not already, log into your Premium Builder, and access "step 4 - Pages". In order to return to the previous course, please click on How to add an online store - eShop.
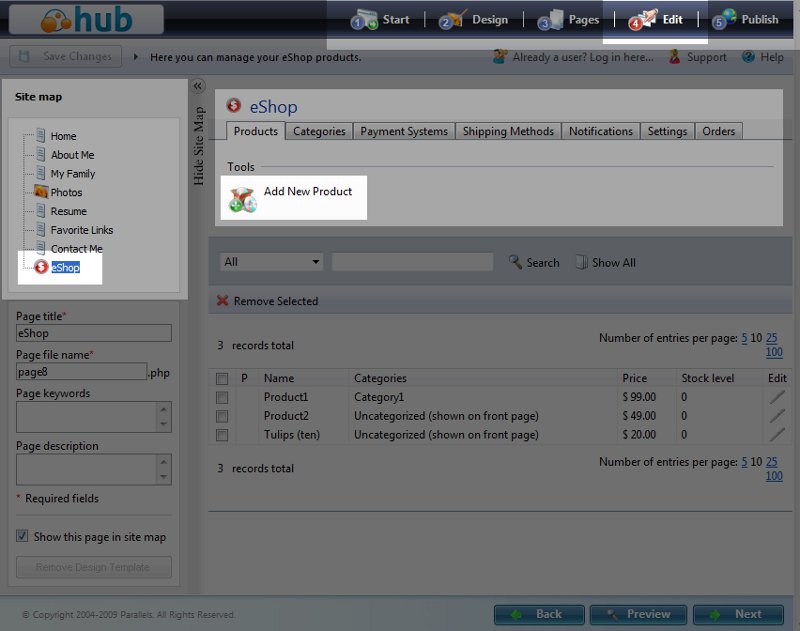
- Once you're in "step 4 - Pages", click "eShop" under your "Site map" in the left.
- Click "Add New Product", which is underneath the "Tools" heading.
- After clicking "Add New Product", you should see another window pop up, labeled "Add New Product".
There are many options you can configure for your new product. Let's go over them now.
Main Properties

Name
In the field labeled Name, enter the name of the product as you would like it displayed on your site.
Price
In the Price field, enter the price for your product. You'll later choose a currency and format for your eShop, and the price will be displayed using those.
Stock Level
Using the stock level, you can keep track of the amount of stock of this product you have on hand. Simply enter the current stock level you have of the product.
Stock level is setup by default. If you don't want to have it enabled, you can disable it within the "Settings" tab by unchecking the "Enable stock level tracking" check box.
How does stock level work?
When your customers buy products from your store, the product stock level is updated automatically when you change the order's status to either "Processed" or "Completed". If you do have to update the status of the order, for example you have to set it to either "Failed" or "Cancelled", the stock level is updated accordingly. Stock level is for your use only. It will not be shown to the customer, and even if the quantity of a product is "0", your online customers can still purchase the product.
Advertise Only
Selecting the Advertise Only check box allows you to display your product as an advertisement. This will show the item and description of the product to customers, but will not yet allow them to puchase it.
New image
If you would like to upload an image for your product:
- Click the "Browse" button and select the image on your computer.
- Click the "Upload" button to upload the image to the server.
Your image will be displayed as a thumbnail in most parts of your store, and is shown full size once your visitors click the thumbnail.
Brief Description
The brief description is shown on either the main catalog page or on the category page the product belongs to.
Full Description
The full description is shown when a user clicks on a particular product to view more information about it.
Colors

If you sell products that are available in different colors, you can offer your customers their choice of color by configuring it within the "Colors" tab.
- Start off by clicking the "Colors" tab, which is between the "Main Properties" and "Options" tabs.
- In the "Color name" field, type the name you would like this color referenced as.
- For "Color value", click the paint bucket icon to the right and choose the color that most resembles this color.
- If you have a picture that better shows this color, you can upload it in the "Product image" area. Click "Browse", select the file on your computer, and then click "Upload". If you'd like to remove the color image at any time, you just need to click the "Reset to default image" link.
If you'd like to add a new color, click the "Add New Color" button and follow the same steps above.
- You can remove a color by clicking the red X icon to the right of it.
- You can change the order in which the colors are shown to your customers by arranging the colors using the up and down arrows to the right of each color.
Options

If your product comes in several different options, such as shoe sizes, you can configure these options within the "Options" tab. This is located between the "Colors" and the "Categories" tabs. A few common options are already available, such as Apparel size and Shoe size.
If you need to add customer options:
- Within the "Options" tab, choose "Custom option" from the drop down menu and click "Add New Option".
- As the "Name in catalog" field, enter the option name as you would like your users to see it.
- The "Name in RSS feed" is used by third party services that can import your catalog for display in their services. If you leave this blank, the Premium Builder will fill it in with a Google Base RSS 2.0 value for you (for use if you were going to upload your catalog to the Google Base service). If you have another service you'll be submitting your Product RSS feed, they may ask that you enter in a specific value here.
- You can remove product options by clicking the red X to the right of them
- You can change the order the options are displayed to your customers by clicking the up and down arrows to move each option either higher or lower in the list.
Categories

You can place each product into one or more categories. This is done within the last tab, "Categories". Once there, all you need to do is put a check in each category that you would like to add the product to.
eShop comes standard with two generic categories, "Category1" and "Category2". We'll show you later how you can add / remove categories.
When you finish adding your new product, click "OK" at the bottom to save the product.
Now that you have completed the course, click on How to arrange your products into categories - eShop. To see a list of all the classes in this course go to 203: Setting up an Online Store - eShop.
Did you find this article helpful?
Tweet
Category
Setting up an Online Store - eShop
Help Center Login
Setting up an Online Store - eShop
Related Questions
Here are a few questions related to this article that our customers have asked:
Ooops! It looks like there are no questions about this page.
Would you like to ask a question about this page? If so, click the button below!

We value your feedback!
There is a step or detail missing from the instructions.
The information is incorrect or out-of-date.
It does not resolve the question/problem I have.
new! - Enter your name and email address above and we will post your feedback in the comments on this page!