Adding a Picture to your Modx Website
The Modx website can use any type of media as it is designed to be a Content Management System. The following guide will walk you through uploading and then adding a graphic or picture into the Modx files. This is a basic introduction to the process of adding files and graphics to the Modx Administrator interface and will only use a small portion of the power that the Modx architecture provides for its users.
Inserting a Picture into a Modx Website
- Login to the Modx as Adminsitrator
- We will be working with the Home page that is part of your Modx installation. In the Resource navigator, left-click on HOME.
- If you have finished the previous tutorial -Creating your first Modx document- then you should have the following code in the CONTENT field (at the bottom of the page) saved to your HOME page:
<h1>My Simple Website</h1>
If you do not have the code in your home page, you can copy the above or replace the text per your needs. After you have finished adding the text, please go to navigator and click on FILES.
<br /><br />
<p>
A simple web site <br />
Bits of words and pictures make<br />
Something with nothing <br />
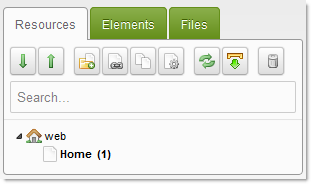
</p> - The resource tree window or resource navigator allows you to add files and also navigate to a specific resource very quickly. In this case we need to add a sample file. I'll be adding the following graphic:


Click on the folder labeled MEDIA, click on the icon labeled UPLOAD FILES as per the screenshot above. - When you click on the UPLOAD FILES icon you will see the following screen:
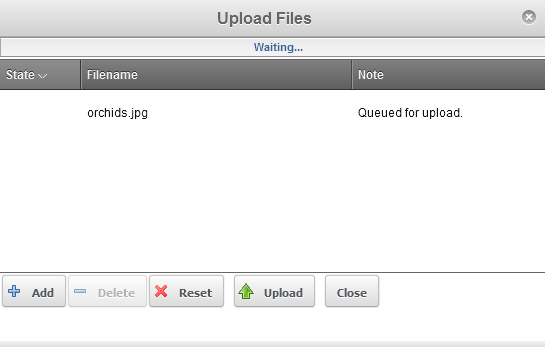
Click on ADD as per the screen above in order to search for the file that you wish to upload. You can add your own file(s). The screen above shows that I have selected the orchids.jpg file and it is ready for upload. - Click on the UPLOAD button in order to upload the file(s).
- When the upload is complete the UPLOAD window will remain open until you click on CLOSE. Click on the CLOSE button in order close the upload interface. When you look at the resource tree window, you will see the following:

- Return to your HOME document by clicking RESOURCES and then clicking on the HOME page once again.
- Scroll down to the CONTENT field where you should see the code from step 3 (or something similar). The code that you add will appear as follows:
<h1>My Simple Website</h1>
<br />
<img src="/help/orchids.jpg" alt="Orchids" width="327" height="327">
<p>
A simple web site <br />
Bits of words and pictures make<br />
Something with nothing <br />
</p>
The code added is <img src="/help/orchids.jpg" alt="Orchids" width="327" height="327">
Note that HTML code is used to insert the image, but the image must be uploaded if it is being displayed directly from the MODx website. The typical HTML code for images is: <img src="/help/filename" alt"alt text" width="size" height="size in pixels">. Note that code determines the size of the graphic limiting it to 327 pixels wide by 327 pixels high. This option of the HTML code allows you to take large images and fit them to the page.
This example again demonstrates how HTML is an integral part of creating websites within the Modx Revolution interface. The code is parsed by Modx and then displayed as a typical web page. Here's how it will look per the code set above: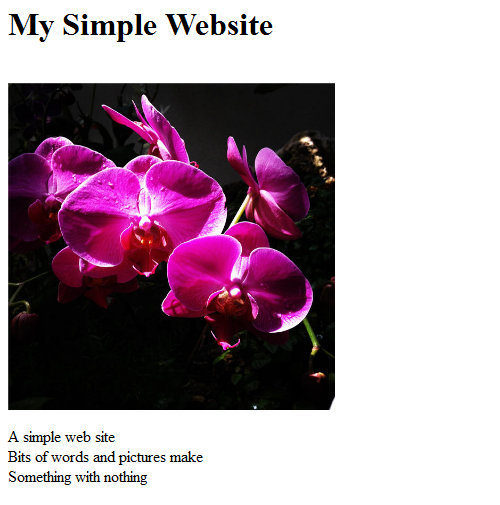
Did you find this article helpful?
Tweet
Category
Creating Content in Modx
Help Center Login
Creating Content in Modx
Related Questions
Here are a few questions related to this article that our customers have asked:
Ooops! It looks like there are no questions about this page.
Would you like to ask a question about this page? If so, click the button below!

We value your feedback!
There is a step or detail missing from the instructions.
The information is incorrect or out-of-date.
It does not resolve the question/problem I have.
new! - Enter your name and email address above and we will post your feedback in the comments on this page!