Managing Supply Order Status Labels in PrestaShop 1.5
Tracking Supply Order status in PrestaShop requires using status messages to label the progress of supply orders that you make with your supplier. Often, the default messages are not enough to meet your needs. Fortunately, Prestashop provides the flexibility to allow you to create additional status messages. The tracking is a necessity and you will be continually be updating supply order statuses, so it is important that you match order statuses with you warehouse or inventory requirements. The following article shows how to add or edit supply order status messages in Prestashop 1.5.
Configuring Supply Order Status Messages in PrestaShop 1.5
- Log in to the Administrator Dashboard as an Administrator
- Hover over the right end of the menu bar where it is labeled STOCK and then click on the last item on the drop-down menu labeled CONFIGURATION. You will see the following screen or something similar:

The supply order types are colorfully indicated above. The following table explains the different states marked in the columns above:
Name Name of the supply order state Editable Allows the supply order to be edited; if the order is editable, it cannot be forwarded to the supplier for fulfillment Delivery note available Provides a PDF copy of the delivery note Is a Pending receipt state? Warehouse is waiting for the product delivery which will generate a delivery receipt Is a Delivery state? Indicates if the order is incomplete or completed. Also indicates if product is part of the warehouse inventory Is an enclosed order state? Either the order has been canceled or completed - which allows for actions to be performed on the actual order; stock inventory where the order is partially or fully canceled Actions The icon that appears is the  - click on this icon to edit the supply order status
The two major actions that can be performed on the supply order states is to ADD (using the large green ADD NEW button in the top right hand corner) or the EDIT icon appearing in the table as per above. - Click on ADD NEW in order to see the following screenshot:
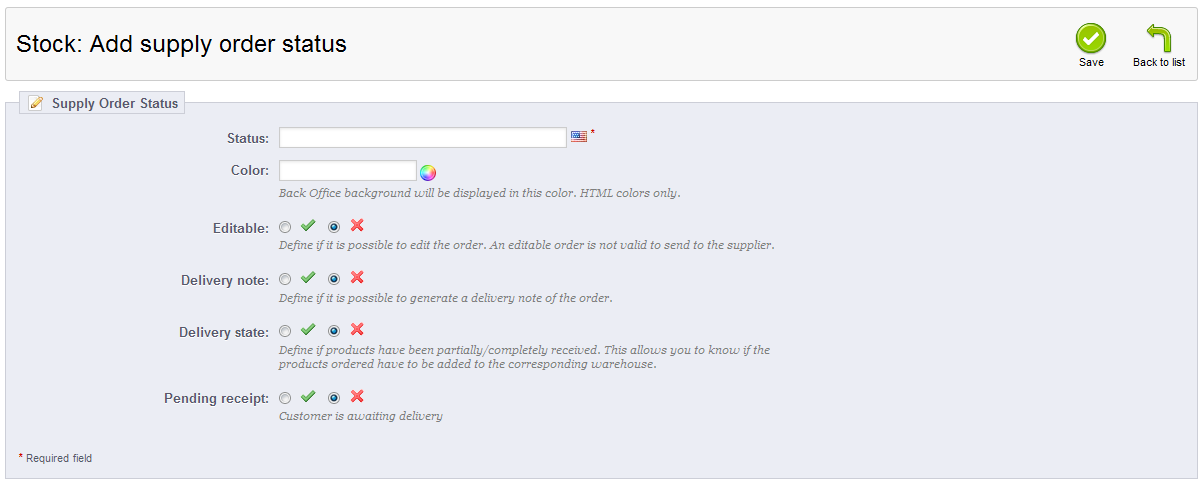
The fields here match the table definitions in step 2. Name the status and click on the field for Color. When you click on Color, you will see a color selection field as per the below screenshot: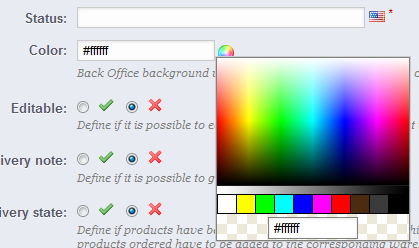
Simply click on the color you wish to use and the color will be selected - this is the background of the supply order status that you define. Once you have completed selecting the color, select the appropriate supply order status option(s). - After completing the supply order status options, click on SAVE in order to save your entries. Note that clicking on the EDIT icon for an existing supply order status will bring the same screen as the ADD NEW, except that status name, color and supply order options will already be filled or selected. EDIT allows you to change the values as you see fit.
The following screenshot shows an example of two custom status messages which have been added: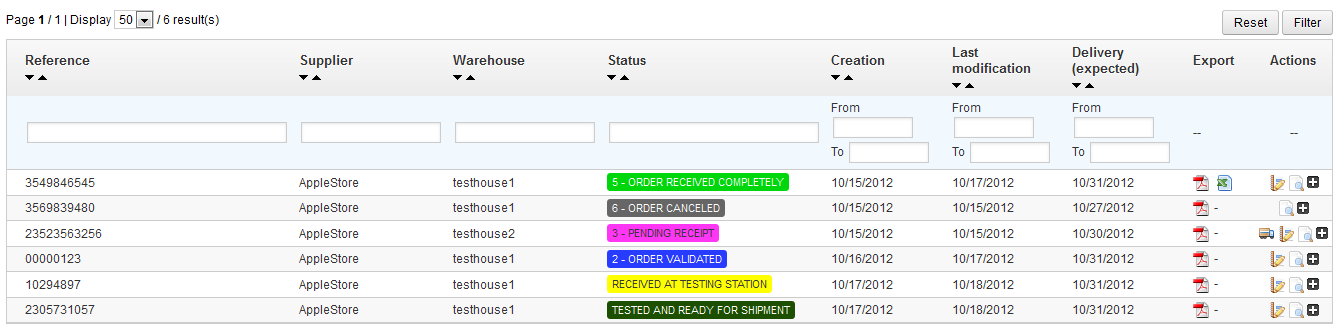
These custom statuses ("received at testing station" and "tested and ready for shipment") are added because the warehouse has a policy of testing the product before shipping it. Since the default status messages did not have these options, they were added. This is an example of how you can add custom status messages for supply orders.
Supply order status allows you visibly mark a supply order status from a supplier or warehouse. It allows you to define the order of the status by color, or as you see fit to match your supply order process. Make sure you are properly documenting this process for purposes of your inventory as well obeying any necessary regional requirements. See Creating Supply Orders in PrestaShop 1.5 for further information on making supply orders to your suppliers or warehouses.
Did you find this article helpful?
Tweet
Help Center Login
Configuring Supply Orders in PrestaShop 1.5
Related Questions
Here are a few questions related to this article that our customers have asked:
Ooops! It looks like there are no questions about this page.
Would you like to ask a question about this page? If so, click the button below!

We value your feedback!
There is a step or detail missing from the instructions.
The information is incorrect or out-of-date.
It does not resolve the question/problem I have.
new! - Enter your name and email address above and we will post your feedback in the comments on this page!