Setting up Taxes in Zen Cart
 In this tutorial we will guide you in setting up your taxes in Zen Cart, which allows you to assign different rates based on the location. Zen cart simplifies this process, by allowing taxes to be setup in the Administration area.
We will first walk you through defining a Zone for a different region or area. We will then show you how to set the rates based on the zones you create.
I am setting up taxes for the United Kingdom (only as an example). Be sure to research the tax laws based on state, country, and region, since they are being updated and modified at the time this article was written and can differ.
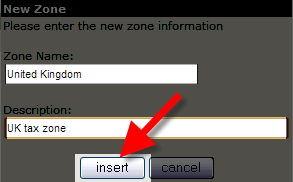
How to Define a Zone:
- Login the the Zen Cart Admin Panel.
- In the navigation menu, roll your mouse over Locations / Taxes, and select Zones Definition.
- You will see the existing zones listed, click the insert button. In the New Zone menu there will be a couple available fields, enter a name and description, then click the insert button.
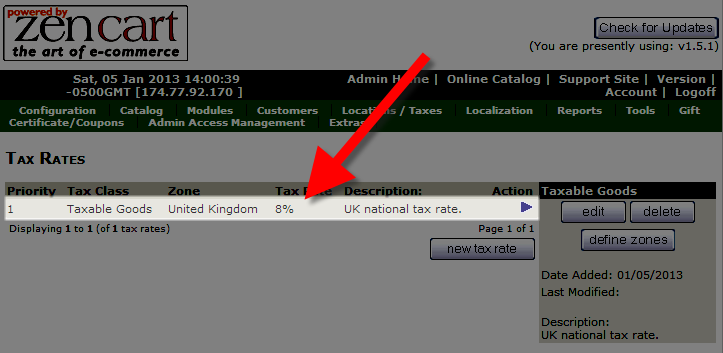
How to Set Up Tax Rates:
- Login to the Admin panel for Zen Cart.
- Roll your mouse over the Locations / Taxes option in the menu, and select Tax Rates.
- Click the new tax rate button. You will see the New Tax Rate menu and several available fields.
After making your selections, click the Insert button to record your changes.Option Description Tax Class Title: Select the tax class from the drop-down menu, most likely the only option will be Taxable Goods. Zone: Choose your new zone from this drop-down menu. Tax Rate (%): Enter the tax rate without the percentage sign in this field. Description: Enter an optional description in this field. Priority: For the Priority field, if 2 taxes with the same priority apply to the customer, the the taxes will be applied to the total before tax, then added together. If they are set with different priorities they will be compounded, the first tax (with the lower priority number) will be added to the total, then that sum will be taxed with the next tax (this only applies to a small population of the world). 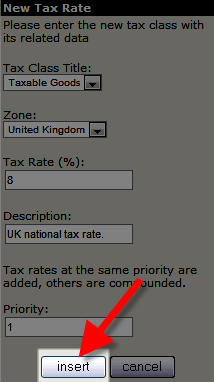
You will now see your new tax rate listed. Congratulations, now you know how to setup taxes in your Zen Cart powered eshop!
Did you find this article helpful?
Tweet
Help Center Login
Configuring Taxes / Shipping in Zen Cart
Related Questions
Here are a few questions related to this article that our customers have asked:
Ooops! It looks like there are no questions about this page.
Would you like to ask a question about this page? If so, click the button below!

We value your feedback!
There is a step or detail missing from the instructions.
The information is incorrect or out-of-date.
It does not resolve the question/problem I have.
new! - Enter your name and email address above and we will post your feedback in the comments on this page!