Changing the Logo Image Size on an Invoice in PrestaShop 1.5
Although the shipping invoice printed by PrestaShop 1.5 uses a PDF file that cannot be edited, one of the images placed on the invoice can be altered by a few simple changes within the template files used by PrestaShop. The specific image in this case is the company logo that is printed on the invoice. Here's an example where the graphic for the logo used in the PDF is expanded beyond the actual size of the image:![]()
You can see that the image looks pixelated and jagged - not a very clear image. This is due to the fact that the actual logo size was designed to be smaller. The display of this logo is affected by the code in the PrestaShop template. This can be easily fixed using an editor available within the Cpanel File manager. The following article explains how to manipulate the size of the invoice by editing the code found in the header template file of PrestaShop 1.5.
Manipulating the Invoice Logo Size in PrestaShop 1.5
- Login to your Cpanel. If you require further instruction on using the Cpanel File manager, please see Using the File Manager in cPanel.
- When you login into Cpanel, click on FILE MANAGER in order to launch the application. You will see the following when you first open it:
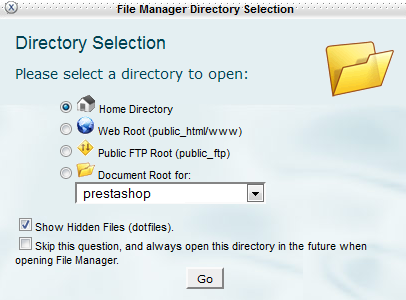
You will need to select the root directory for your PrestaShop installation. In the screenshot above, the directory is called PRESTASHOP. If you are unsure, simply select the WEB ROOT, and then search for your PrestaShop installation folders and files using the file manager. If you're unfamiliar with the file structures, you may need to consult with the individual who installed it for you, or you can look for and open several of the PHP files (file name will end in the extension PHP - e.g. index.php) that are in the folder you are searching. In order to verify that you're in the right folder, look for and then click on any of the PHP files in the "supposed" PrestaShop folder. Once you have selected file, click on EDIT in the menu bar (in the top middle of the file manager) and you will open the file and display the text within. DO NOT CHANGE THE CONTENTS OF THE FILE, but simply read it. If you're in the correct location, you'll see most (if not all) of the php files starting with these lines of text:
* 2007-2012 PrestaShop
*
* NOTICE OF LICENSE - Once you have determined that you're in the right directory for PresatShop, click on the PDF folder in the Prestashop root directory to open it and you'll see the following:
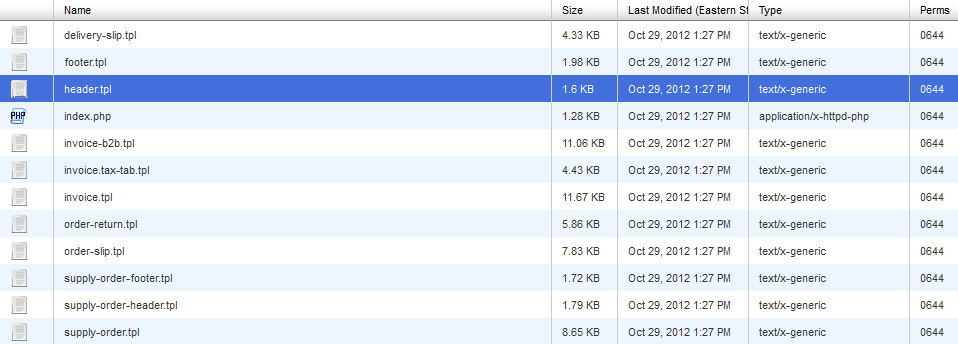
Select the header.tpl file as per the screenshot above, then click on CODE EDITOR in the center of the menu bar for the File Manager. - When you open the file in the CODE EDITOR the file contents will be listed with a set of numbered lines. This might vary per theme, but you should be looking for the following:
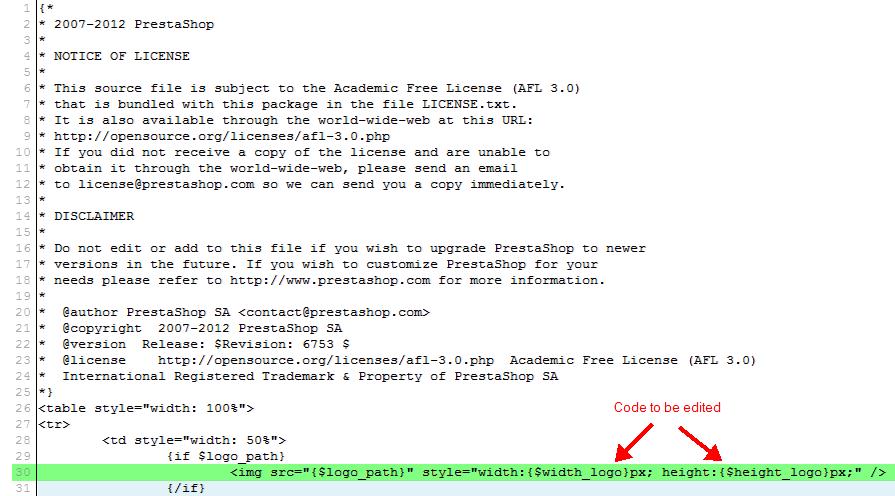
The highlighted code on line 30 has the code which controls the size of the invoice logo! You can manipulate the size of the logo by using the division ('/') and multiplication ('*') signs in the code. If you wish to reduce the size you would simply add the division sign and then a number after the word "logo". For example, if you wish to reduce the size by 50%, then you would use a '/2'. If you're trying to expand it, then you would use the multiplication symbol and the number of times you want to expand it. We want to shrink it in order for the sample logo (displayed at the beginning of this article) to appear much clearer. Here's how the code should be changed:
Note the position of the '/2' for each dimension (width and height). - Once you have these changes in place, click on SAVE CHANGES in the top right hand corner of the screen.
This completes the alteration of the size of the invoice logo. It will appear at half the size when printed on the invoice at this point. Remember that you can manipulate the image size in either direction depending on your needs. Here's the end result of the change for the sample logo:
(click on each image to see size before and after it was altered)
| Original size | Altered size |
|---|---|
| |
|
Did you find this article helpful?
Tweet
Comments

Help Center Login
Themes and Appearance in PrestaShop 1.5
Related Questions
Here are a few questions related to this article that our customers have asked:
Ooops! It looks like there are no questions about this page.
Would you like to ask a question about this page? If so, click the button below!

We value your feedback!
There is a step or detail missing from the instructions.
The information is incorrect or out-of-date.
It does not resolve the question/problem I have.
new! - Enter your name and email address above and we will post your feedback in the comments on this page!