How to Add Countries in PrestaShop 1.5
The details used when adding countries in PrestaShop involve more than just the country name and the currency used by the country. They also include the Zip code format, address formatting, tax identification and other details. The following tutorial will explain the details involved in adding countries with PrestaShop 1.5.
Adding New Countries in PrestaShop 1.5
- Log in to the PrestaShop Admin Dashboard as an Administrator
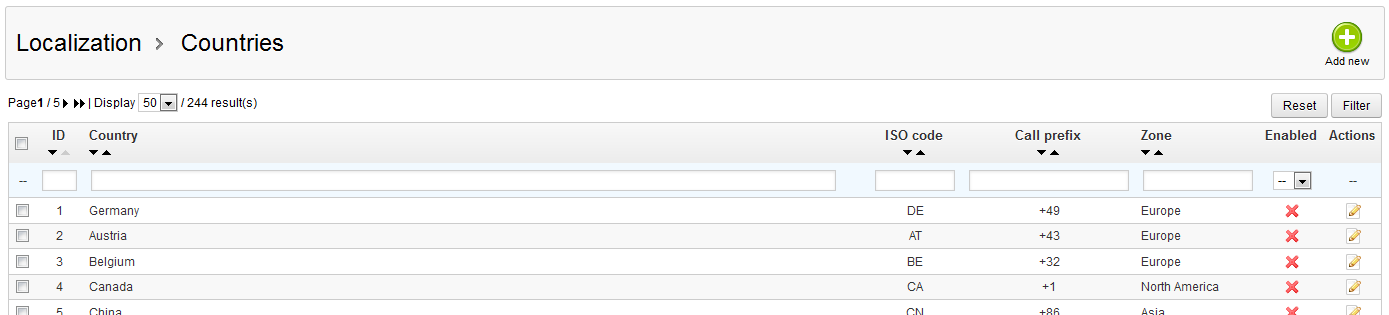
- Hover over the menu bar where it is labeled LOCALIZATION. Click on COUNTRIES when it appears. For general information on defining countries for your PrestaShop, go to Defining Countries in Prestashop 1.5. You will a screen similar to the following:
- Click on the green ADD NEW button in the top corner of the screen. You will see a blank template for adding a country as per below:
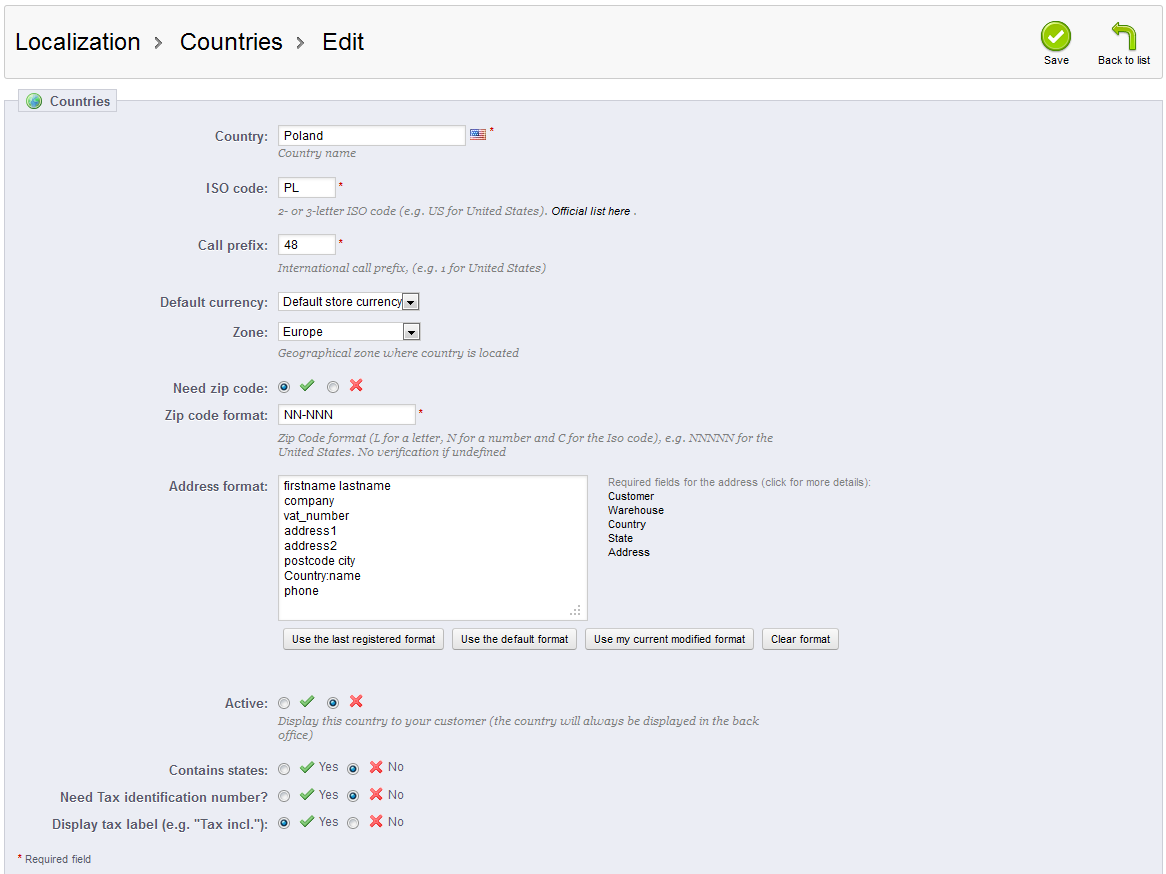
The following fields are mandatory and need a value entered before you can save the country:
COUNTRY: The COUNTRY name is straightforward. Click on the field and type in the name of the country. Note, that if you have multiple languages, you will need to fill out the name of the country per the languages installed to your store.
ISO CODE - Per the International Organization for Standardization, countries in the world have a standard definition. If you do not know it, you can find the country abbreviation here: ISO - Countries list.
CALL PREFIX - definition for International Call prefixes. You can find a list of these prefixes here: List of Country Calling Codes.
ZIP Code Format - If you leave the field blank, then no verification of the zip code is required. Otherwise, the format for the zip code should be as follows: L for a letter, N for a number and C for the ISO code. Example: NNNNN for the United States.
Once these fields are filled, you may save the country added with the SAVE button in the top right hand corner of the screen. However, there are many other fields involved in defining the country. - Defining the default currency of the store is as simple as clicking on the drop down arrow as per the screenshot below:
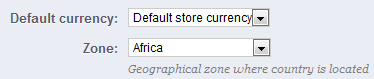
If you do not see the country currency listed you will need to define the currency. For more information on this procedure go to How to Add Currencies to PrestaShop 1.5.
Directly below DEFAULT CURRENCY is the ZONE definition. Click on the drop down area to define the zone to which your country belongs. For further information on defining Zones, go to Setting Zones for Shipping in PrestaShop 1.5. - The next option is called NEED ZIP CODE - click on the radial button next to the green check to enable, or click on the radial button next to the red 'X' to disable. If enabled, you will need to define the Zip Code format as per step 3 above.
- ADDRESS FORMAT can be defined as per the screenshot below:
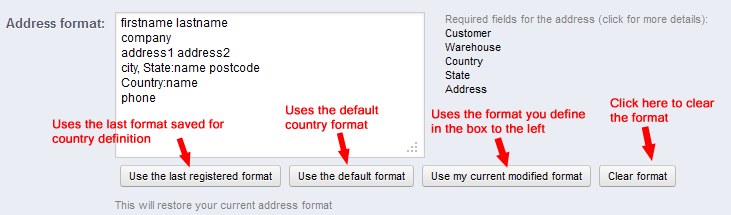
The address format option has several different functions that you can choose. You can actually click in the white field to define the required address format, or you can click on the buttons to change or clear the format. Refer to the screenshot above for further details. - The last 4 options use radial buttons that you can select to determine if the option will be active or not:
ACTIVE - allows the country to be displayed to the customer in the storefront (note that the country will always appear in the back office)
CONTAINS STATES - activate if country contains states
NEEDS TAX IDENTIFICATION NUMBER - activate if the country requires the tax identification number
DISPLAY TAX LABEL - activate if you wish to display tax labels such as "tax included" or "tax excluded"
Select the appropriate radial button for each option as per your country definition - Click on SAVE in the top right hand corner in order to save your entries.
The details for each country can widely differ and may be mandatory by their laws. Be sure to verify all your settings for your country definition so that your store properly meets the country's requirements for your products to be properly sold.
Did you find this article helpful?
Tweet
Help Center Login
Setting up Shipping in PrestaShop 1.5
Related Questions
Here are a few questions related to this article that our customers have asked:
Ooops! It looks like there are no questions about this page.
Would you like to ask a question about this page? If so, click the button below!

We value your feedback!
There is a step or detail missing from the instructions.
The information is incorrect or out-of-date.
It does not resolve the question/problem I have.
new! - Enter your name and email address above and we will post your feedback in the comments on this page!