Managing Member Groups in Contao
The front end users in Contao are termed as "members" per their documentation. The members can be organized into groups that can be then assigned to specific areas of a Contao website. The following article explains how to manage member groups within the Contao CMS back end interface.
Creating Member Groups
- Login to the Contao Back End interface
- In the left hand part of the screen, in the section labeled Back end modules, click on MEMBER GROUPS.
- This will immediately show a list of any existing groups. The screenshot below displays the sample group data that is part of the Contao default installation:
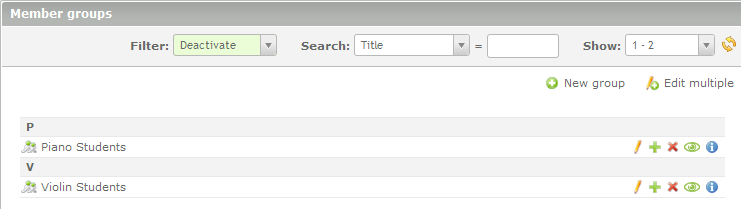
The interface will list the first letter of each created group and then actual group in alphabetical order by default. You can see this in the screenshot above. There are also several options within the interface that will be detailed in the table below:

The filter option allows you to filter by the option labeled "Deactivate". Click on the drop-down menu to select YES or NO for groups that are enabled or not. 
The search option lets you search specifically by the title of the group. Type in the blank field to specify the group 
The show option allows you to select groups based on the numbers of groups. You can select a range to show. 
Refresh icon - click on this icon in order to refresh the results after you changed your search, filter, or show criteria 
Add New Group option - select this option create a new group 
Edit Multiple - lets you modify multiple groups fields in one interface 
Edit icon - allows you to edit a specific group 
Duplicate icon - click on this icon to duplicate the record of the group that you have selected; will require a unique name 
Delete icon - delete the group; will ask to confirm deletion 
Activate/Deactivate - enables or disables the group 
Show Details - shows all of the details of group in a list format
Click on NEW GROUP in order to proceed. - When creating a new group, you will see a form appear that requires a TITLE in order to be saved. Each section of the form is detailed below the screenshot:
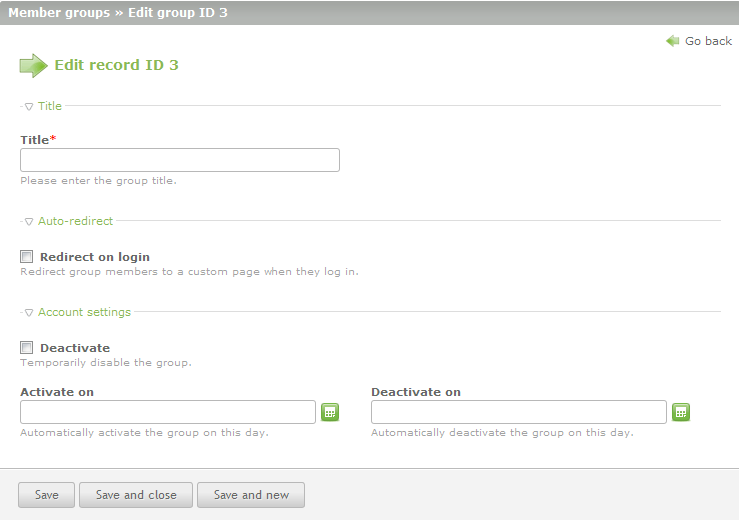
Title Required to create new group - this is the name of the group Redirect on login Allows you to set a specific page that a member would be directed to upon login Deactivate Disables the group if selected Activate/Deactivate time and date Date and time that you can enable and disable the group
Fill in each field in order for the new group that you are creating. Do not select or do not fill in the option if you do not wish to redirect, deactivate or set a time range where the member group can be used. - Click on a SAVE option in order to save your entries.
Remember that your member groups are assigned to view the front end of your Contao website. Assign their permissions accordingly, and be careful to separate your members per your organization requirements. To assign members to the member groups, go to Managing Members in Contao.
Did you find this article helpful?
Tweet
« Prev
Managing Members in Contao
Next »
Managing Users in Contao
Help Center Login
Member and User Administration in Contao
| 1. | Managing Members in Contao |
| 2. | Managing Member Groups in Contao |
| 3. | Managing Users in Contao |
| 4. | Managing User Groups in Contao |
Related Questions
Here are a few questions related to this article that our customers have asked:
Ooops! It looks like there are no questions about this page.
Would you like to ask a question about this page? If so, click the button below!

We value your feedback!
There is a step or detail missing from the instructions.
The information is incorrect or out-of-date.
It does not resolve the question/problem I have.
new! - Enter your name and email address above and we will post your feedback in the comments on this page!