Managing Users in Contao
Contao differentiates between members and users when managing people who have access to the content management system. Members can access the front end website displayed by Contao, but users are typically back end administrators who will manage different parts of the system. Users can be granted rights to see specific parts of the back end. They can also be added to groups so that roles can be defined for multiple users. User permissions are additive which means that they inherit permissions based on the user groups. This means that if they are in more than one group, then they will inherit all of the rights for all groups to which they belong. The following article explains how to understand the User management interface in the Contao CMS.
Describing the Contao Backend for Managing Users
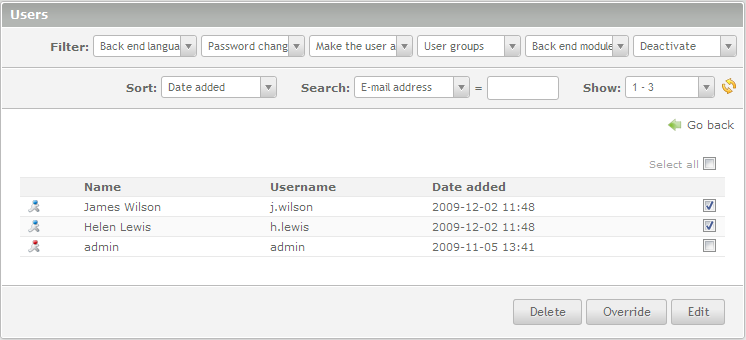
When you first arrive in the Contao Back end, it can be a little confusing because the documentation is sparse and you are not given directions on how each section works or what each icon represents. If you're not the inquisitive type and you're not taking your mouse pointer and rolling over each section or icon, you will not know how the interface operates. We will first familiarize you with the interface and describe each section so that you have a working knowledge of each icon and each section of the user management interface. When you click on USERS under the Account Manager menu (in the left hand column) you will see a screen similar to the following: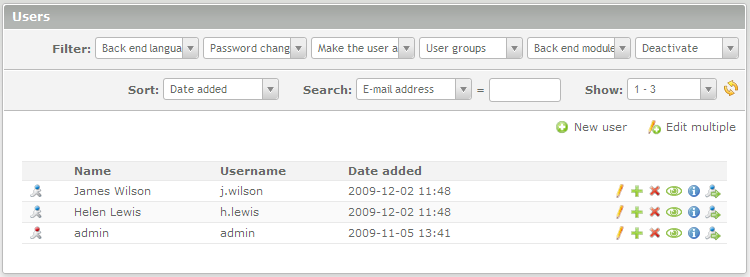
Here's a quick break down of each section of the USERS with screen shots highlighting the relevant sections: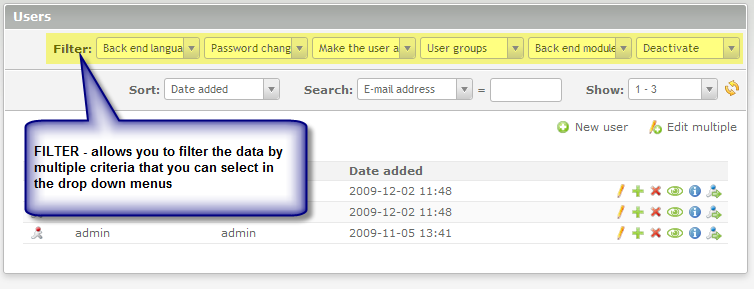
FILTER - allows you to filter your user list using six different filter criteria including: back end language, password change required, make the user an administrator, user groups, back end modules, and deactivate fields.
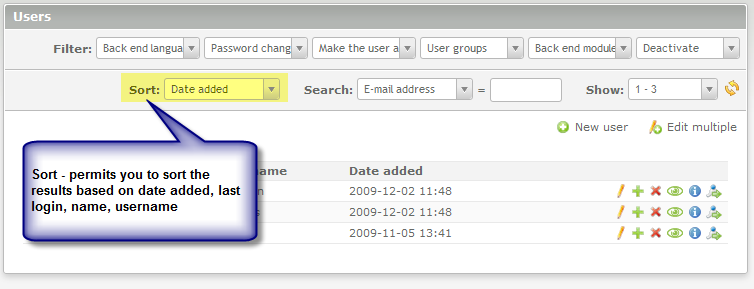
SORT - allows you to sort your list based on the drop-down menu

SEARCH - Search for specific email addresses, names or user names within the user list.
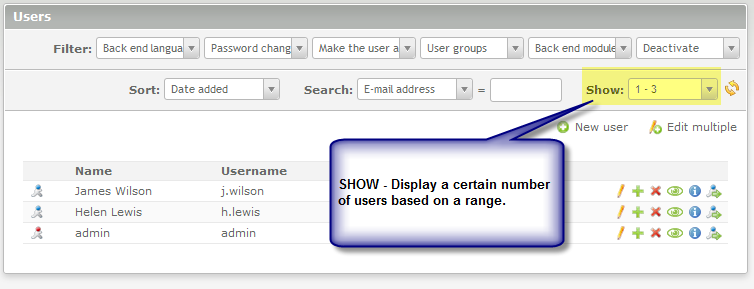
SHOW - lets you narrow down the users on display based on a number range.
![]()
REFRESH - Use this button when you need to refresh the list of users so that a filter, sort, or search will take effect.
Immediately below the menu bar for the FILTER, SORT, SEARCH and SHOW options will be the options to add new users or edit multiple users. These options appear as per the screenshot below:![]()
Understanding the User Icons
Many of the options that you have within the User Management interface are represented by icons. The following table describes each icon as you see them for managing Users in the Contao back end:
| Icon represents a user within the user list | |
| Icon represents an Admin user | |
| Edit the selected user - form that appears is the same as with a new user, but with the information of the user that you have selected available for editing. | |
| Duplicate the selected user - creates a duplicate of the user you have chosen, but the user name and password have to be added | |
| Delete the selected user - a confirmation window will appear before you can delete the user | |
| Activate or Deactivate the selected user - will deactivate or activate the user if selected. If the user is deactivated you will see the icon shown at the bottom of the illustration at left. Note that making this change will immediately deactivate a user when made in the USERS table view. There is no confirmation or save required for this change to take effect. | |
| Show the details of the selected user. Depicts the information in a list instead of the forms shown during the new user and edit pages | |
| |
The icon allows you to switch to the user that you have selected so that you see the back end in that user's viewpoint. To verify that you have switched, other than the menu changes, you will see the user id displayed at the top of the screen. |
Administering Users in the Contao Back end
Managing the users in a typical application involves adding, editing, and deleting users as part of the administrative duties. The Contao back end also includes the option to duplicate and deactivate a user. Now that you have had the user interface described to you, we will first review the process of adding a user.
Adding a User
The process for adding a user involves filling the new user form. We will break down each section of the form in the steps below:
- Login to the Contao Back end
- In the left hand column menus, scroll down until you see the section labeled ACCOUNT MANAGER. If the tree menu is collapsed and you see a '+' sign to the left of the Account Manager label, click on the plus sign in order to expand the menu. Click on USERS to see the USERS window appear to the right.
- Look for the NEW USER icon (as described above). You should see it in the right hand side of the USERS window. Click on it to open the new user form. The first section you will see is the Name and Email section:

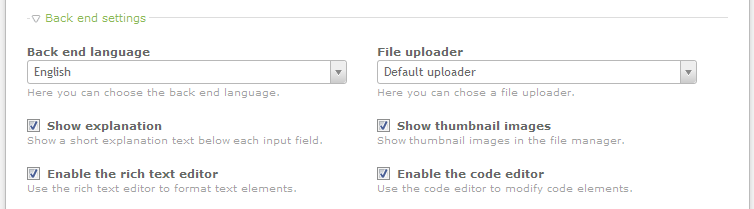
Required items (to save the user) are depicted with a red asterisk. Note that each field also includes a description in small gray text. You can also user you mouse pointer to get a pop-up description by hovering over the gray text for each field (note that this option is valid for all the gray description text in this form). Fill in each field to begin the process of adding your new user. - The next section is labeled as Back End Settings. Each of these options can be modified by using a drop-down menu or clicking on a check box to enable or disable the option. Here's what you will see:
For clarity, each option above is described in the table below:
Back end language This option lets you determine the language being used in the back end interface Show explanation Let's you enable or disable the description text below each input field Enable the rich text editor Allows you to enable a text editor with formatting options for text elements that the user can edit File uploader Allows you to determine a specific file uploader (by default only the default uploader is available) Show thumbnail images Enables the display of the thumbnail images in the file manager Enable the code editor Enables a code editor when editing programming code related elements
Select the options you want enabled for the back end settings, then scroll down to the next section labeled Back End Theme. - By default, there is only a single default theme loaded for the back end. You will need download others if you wish to change this option. When themes are loaded, then the theme option would be available in the drop-down menu:

- The Password Settings settings section can force the user to change the password upon next login and also provides a blank field for a password and its confirmation. Note that this is a required field for the user to be saved.
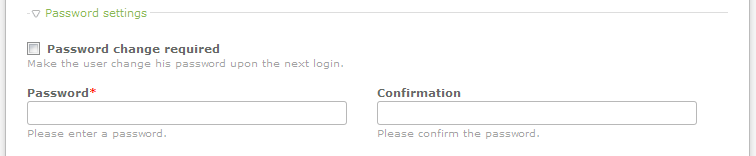
Select the option for the password change requirement and enter a password and its confirmation in the fields provided. - The section following the Password Settings is simply labeled as Administrator. This allows you to designate the user as an Administrator of the Contao CMS. Granting this access will give access to all portions of the website and the CMS back end.

Check the box to make the user an administrator, or scroll down to the next section labeled User Groups. - The User Groups section allows you to assign the user to a pre-defined user group. User Groups allow you define roles that are bascially a set of permissions for a specific group of users. See Managing User Groups for further information. There are basically two main sections in the interface for the user groups: User Groups and Permission Inheritance. The User Groups section allows you to select all or a select number of groups to which the user can belong. The green up and down arrows next to the checkboxes for each group allow you to move the groups up or down so that you can more easily organize the groups if there are many defined. The Permission Inheritance section allows the administrator to determine how the group permissions will be inherited. They can be set to allow only the group settings, allow both group and individual settings, or allow only the individual rights to be inherited. Here's a screenshot of this section:
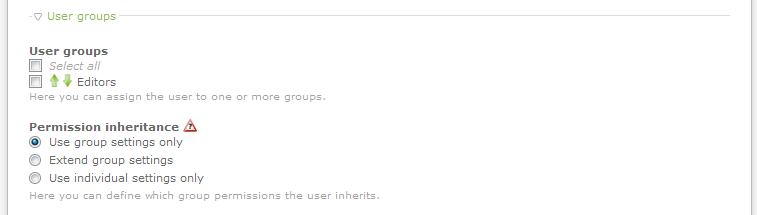
Select a user group(s) for the user and determine how permissions will be inherited by clicking on the radial button. - The last part of the new user form is called the Account Settings section. You will see the following:
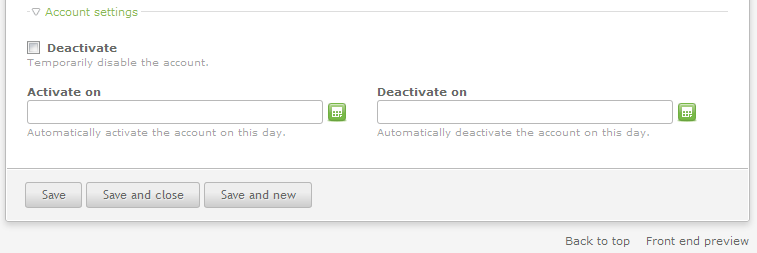
You can use this section to deactivate a user (without deleting them). You can also set the date and time that the account will be activated and/or deactivated. Select the DEACTIVATE check box to deactivate the user, or set a Activate on or Deactivate date and time. You can easily select the date and time by clicking on the green icons next to each blank input field. - At the bottom of the form are several SAVE options. Click on either SAVE (to save the form but stay on the same page), SAVE AND CLOSE (to save and then close the form), or SAVE AND NEW (to save and then open a new blank new user form).
If you have themes loaded and want to select a different one from the default, click on the drop-down menu for the selection. Otherwise, scroll down to the next section labeled Password Settings.
Duplicating a User
Duplicating a user is a form creating a user based on an existing user. Basically, you are taking an existing user and duplicating all of the settings for that user except for the user name and password. The DUPLICATION icon is the green plus sign. Here's a quick summary of the steps to duplicate a user:
- In the Users window, click on the green plus sign for user you want to duplicate. Here's a an screenshot of where you would click:

- After you click on this icon, you will see the same form as was described in the ADD user section except most of it will already be filled. You will need to fill in a unique user name and password in order to save the user. Fill in the User Name, Password and Password confirmation fields.
- Click on a SAVE option at the bottom of the screen to save the new user.
Editing a User
Editing a user means that you will be making a change to an information field or option for an existing user. When you are making a change to the user you will be viewing the same form used when you added the user.
- Click on the icon that resembles a pencil to edit the user as per the screenshot below:

- Apply the changes to the user form.
- Click on one of the SAVE options at the bottom of the screen to save your changes.
Editing Multiple Users
One of the editing functions includes the option to delete, override, and edit users in its interface. If you need to delete multiple users, simply click on Edit Multiple [users] and then select the users you wish to delete and click OK in the confirmation window that appears. Override, is an option that will replace existing values for multiple users using a single entry point. Editing multiple users will provide an entry window for each user that you select to edit. The following steps show how to use the EDIT MULTIPLE users option:
- Go to the USERS window and then click on EDIT MULTIPLE
- At this point you will need to select the users that you wish to edit.
- After you have selected the users you wish to edit, select the option you wish to use: DELETE, OVERRIDE, EDIT. As described earlier in this section, DELETE will simply request a confirmation of the deletion. OVERRIDE and DELETE will show a screen called EDIT SELECTED RECORDS OF TABLE TL_USER as per the following screenshot:
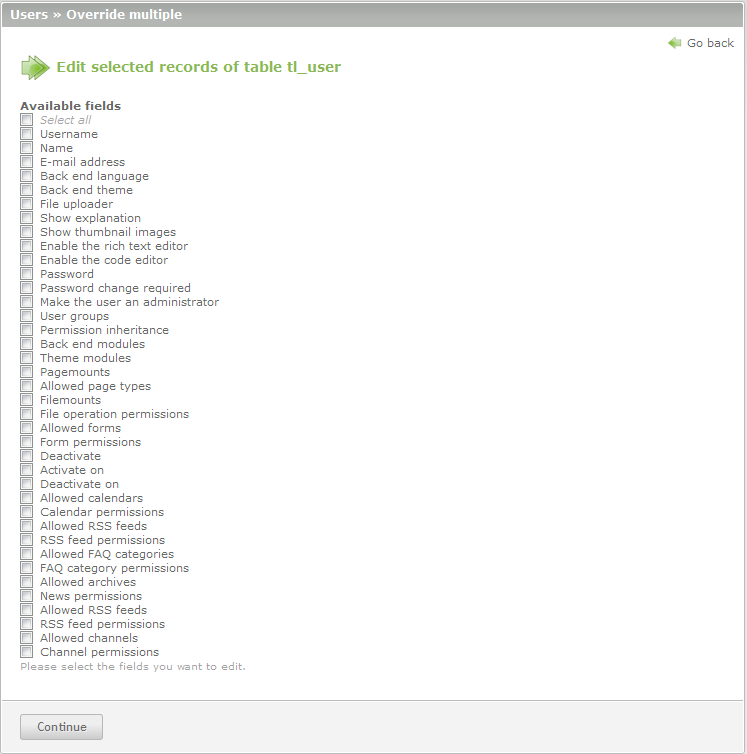
Select the records you wish to edit for the users, then click on CONTINUE to proceed to the next step. - The next step will differ depending on whether you have selected OVERRIDE or EDIT. Note that editing certain fields that MUST be unique cannot be filled with the same entry when using OVERRIDE. For example, if you select USERNAME, you will still see multiple entry points per the number of users because the username is required to be unique. In the following screen, the two users in the demo Contao website have been selected using the EDIT MULTIPLE -EDIT option. Note that there are entry fields for each user that was selected:
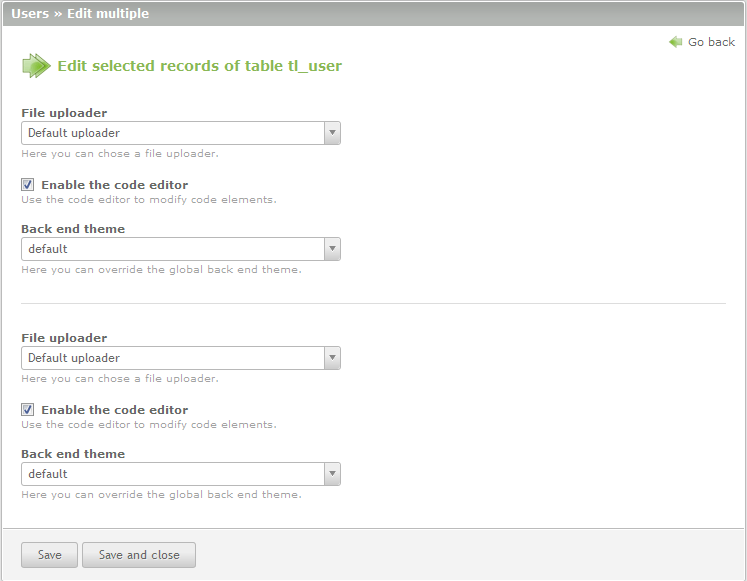
The number of entry points will be the same as the number of users that you are editing. Caution should be taken if you're going to be editing a large group of users because you can easily lose track of the users for which you are making changes. Also, note that if you select an ADMINISTRATOR user to make changes, you will not see an edit section for that user because they have total access to the CMS.
In contrast the EDIT option for multiple users, when selecting the EDIT MULTIPLE- OVERRIDE option you will see a single entry point for the options to be changed: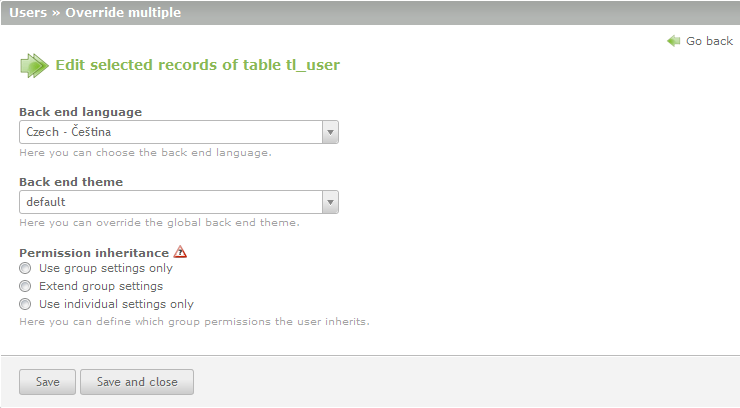
- Click on SAVE or SAVEAND CLOSE to save the changes using OVERRIDE or EDIT.
Deactivating (or Activating) a User
One of the of user options allows you to deactivate (or activate) a user. This allows you disable access for a user or users without having to delete them.
- Go to the main users list and click on the green eyeball icon in line with user you wish to activate/deactivate. If the eyeball is green, the user is activated, if it's got an 'x' in the middle of the eyeball icon, then it's deactivated. The graphic below shows how the icon looks for either state:
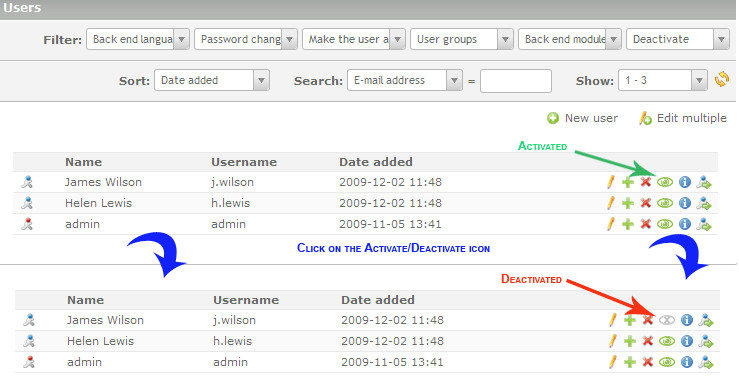
- Note that you do not have to save the change because it is automatically changed when changing the user active state in the table view. However, if you are making the change in the form view (using the EDIT option), then you will need to click on a SAVE option at the bottom of the screen to save that change.
Deleting a User
As an administrator,you may often need to remove users from your list. The Contao interface allows you to do this quickly through the Users interface.
- Go to the Users window and then find the user or users you need to delete.
- Click on the red 'X' in order to delete a specific user.
- Confirm the deletion by selecting OK.
Did you find this article helpful?
Tweet
Comments

n/a Points
|
2015-07-25 10:03 am
Great Article. Thanks for the info. Does anyone know where I can find a blank form to fill out? |

Staff 12,339 Points
|
2015-07-27 4:18 pm
Hello elie,
Thank you for contacting us. We do not have a blank form for Contao, but we do have a helpful guide on Creating a Contact Us Page with the Contao Form Generator. Thank you, John-Paul |
Help Center Login
Member and User Administration in Contao
| 1. | Managing Members in Contao |
| 2. | Managing Member Groups in Contao |
| 3. | Managing Users in Contao |
| 4. | Managing User Groups in Contao |
Related Questions
Here are a few questions related to this article that our customers have asked:
Ooops! It looks like there are no questions about this page.
Would you like to ask a question about this page? If so, click the button below!

We value your feedback!
There is a step or detail missing from the instructions.
The information is incorrect or out-of-date.
It does not resolve the question/problem I have.
new! - Enter your name and email address above and we will post your feedback in the comments on this page!