Managing Members in Contao
Members of a Contao website are managed within the Contao backend and are different from the back end users who will typically administer the site. Members are users who have access to see the front end of the Contao website. For the sake of clarity, Contao uses the terminology of members (for front end access) and users (for backend access). Administrators can use the backend interface to setup members so that they can see specific pages as determined by the organization needs. The backend users can also be organized in the same way but are setup as separate items within the Contao backend. The following article shows you how to manage members within the Contao backend interface.
Adding Members to Contao
Contao designates "members" as users of the front-end website that is displayed by the Contao CMS. The following steps show you how to add members using the Contao backend interface.
- Login to the Contao Backend
- When you first login to the Backend you will see something similar to the following:
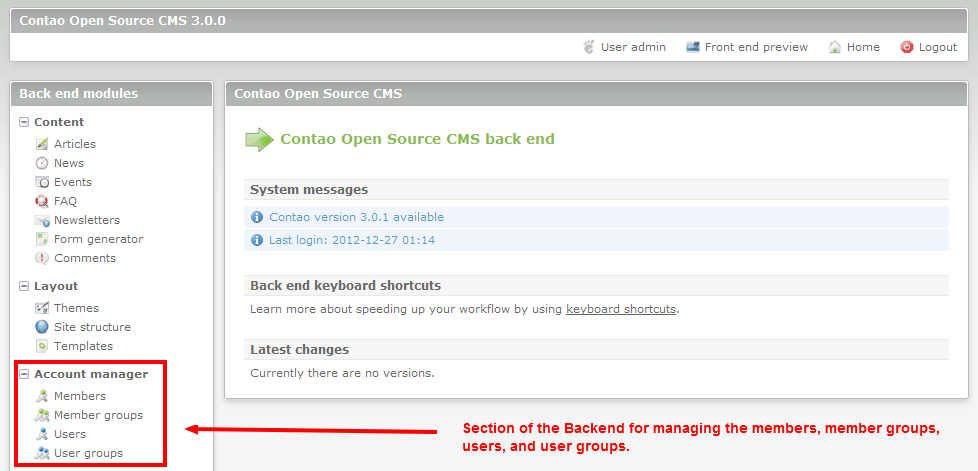
Click on MEMBERS in order to continue. - The Members section will start with a screen that will typically look like the following screenshot:
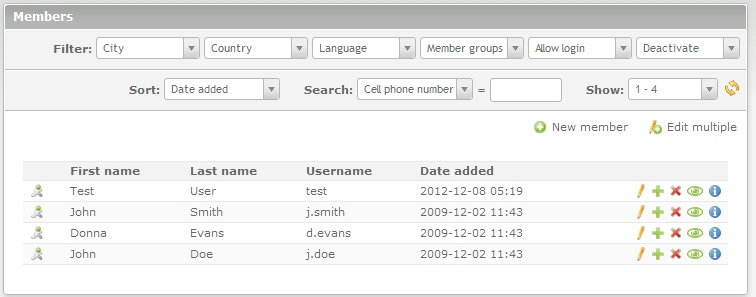
Each section is described in the table below:
Filter Allows you to filter the results by city, coutnry, language, member groups, allow login fields and deactivate field Sort Allows you to order the data by city, company, country, date added, first name, last login, last name, state, username Search Allows you to search by specific cell phone number, city, company, email, fax number, first name, last name, phone number, postal code, street, user name and website Show Show records based on number Refresh icon Two yellow arrows configured into a circle (next to the SHOW section); clicking on this icon refreshes the list of members being shown. Click on this icon only after - Click on NEW MEMBER in order to create a new user. The following illustration breaks down each section:
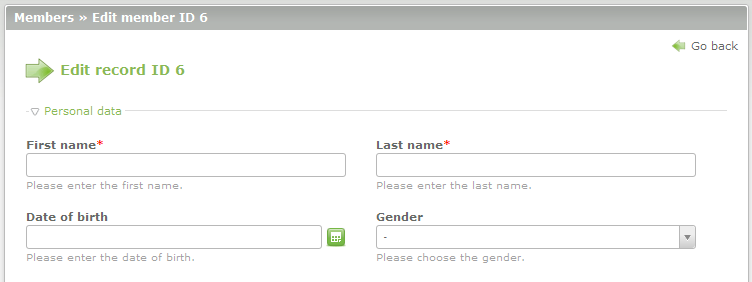
As you go through the form for new member you will see that each field is described by Contao. The red asterisks indicate a mandatory field in order to save the Member. Fill in each field for your new user. Click on the icon beside the Date of Birth field to see a calendar to select a specific date and click on the the drop-down arrow to select a gender for the gender field. Scroll down to the next section.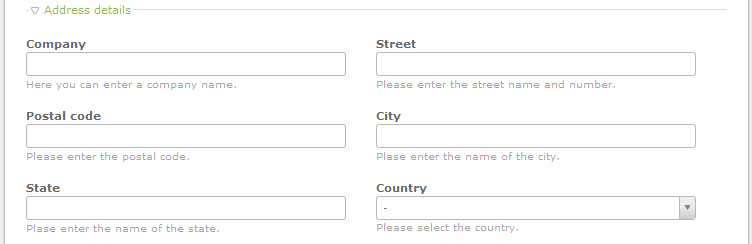
The Address Details section include the Company, Street, postal code, city, state, and country. Fill in each field and then proceed to the next section - Contact Details.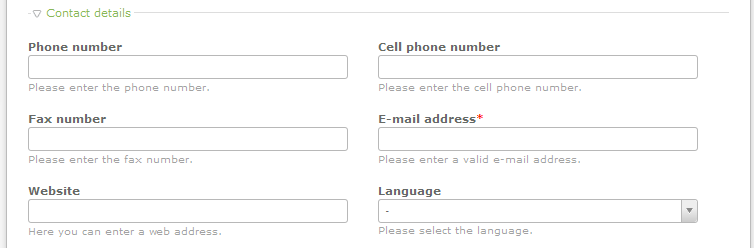
Contact Details include your phone number, cell phone number, fax number, email address (required), website, and language. Note tha the email address is required in order for the user entry to be saved. Fill in each field and then scroll down to the next section of the form - User Groups.
- The User Groups section will include an option to select all of the groups (Select All) at the beginning of the list. Then after that you will see a list of the Member groups that have been collected. Beside each name you will also see an up and down arrow that will move the group in either direction. This is useful for organizing multiple groups so that you can easily see if you have selected all of the groups that you needed. Select a group to assign or move on to the Login Details section.
- The Login Details is a simple section containing a checkbox to permit a user to login to the front end or not. It also includes the Username, Password, and password confirmation fields. This section appears like this:
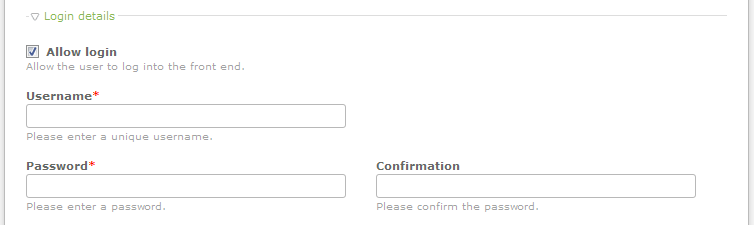
Click on Allow Login, fill in the Username, Password and the Confirmation, or move to the next section called Set Home Directory. - The Set Home Directory section will appear as follows when the check box is NOT selected:

Click on the check box in order to select the home directory and you will see the following appear: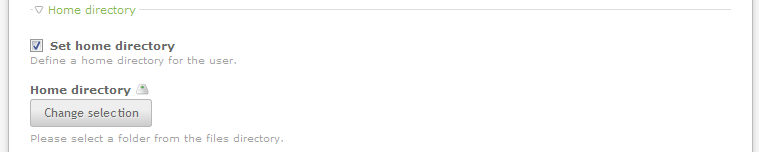
You can then click on the CHANGE SELECTION button in order to move select the directory that you need. Once you have set the home directory for the member, move on to the Subscriptions section. - The Subscriptions section allows you to manage member subscriptions to Newsletters that you may have created within Contao. If you have no newsletters you will see the following:

Otherwise, you will see checkboxes that allow you to select the newsletter that you wish to send to the member. Scroll down to the next section and you will see Account Settings. - The Account Settings section includes a checkbox to temporarily disable an account, and also two fields that allow you to limit a user's access based on a date and time. To easily enter a date and time, simply click on the icon to the right of the ACTIVATE ON or DEACTIVATE ON fields. When you click on the icon, you will see the following:
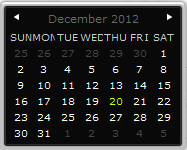
Clicking on the calendar icon allows you to designate the date simply by clicking on a date displayed in the calendar. You can cycle through the months by clicking on the left and right arrows beside the month label.
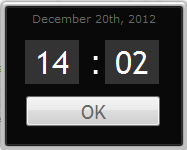
After clicking on the date in the calendar, you will next see a digital display of the time displayed in 24-hour format. Use your mouse in order to scroll through the times and select the one that meets your needs for your user or users.
Select the date and time for both the Activate On and Deactivate On fields in order complete entries for this section. - Click on SAVE, SAVE AND CLOSE, or SAVE AND NEW to save your new member.
Editing Members in Contao
Making changes to user options is relatively simple in the Contao Backend. Each User has an array of icons beside it in the table view. These icons are key to making changes or viewing information on that particular user. Additionally, you have option called EDIT MULTIPLE if you need to apply a change across multiple users. Let's familiarize ourselves with each individual icon. If you forget something, remember that you can always hover over the icon and a popup description will appear.
The first thing you will see when looking at a list of user will be something like this:![]()
Note the colorful icons at the far right. Each of them have a function. Here's a list describing the functions of each:
| Edit icon - used to edit your member information | |
| Duplicate member icon - duplicates the member that you have selected | |
| Delete member icon - deletes the member that you have selected | |
| Activate/Deactivate member icon - will enable or disable the member you have selected | |
| Show details icon - show the details of this member in a list format |
Managing Members with the Contao Back End
Note that clicking on each icon will bring up a form or confirmation for an action that you have selected. Here's a quick summary of each function used to manage your members:
EDIT MEMBER
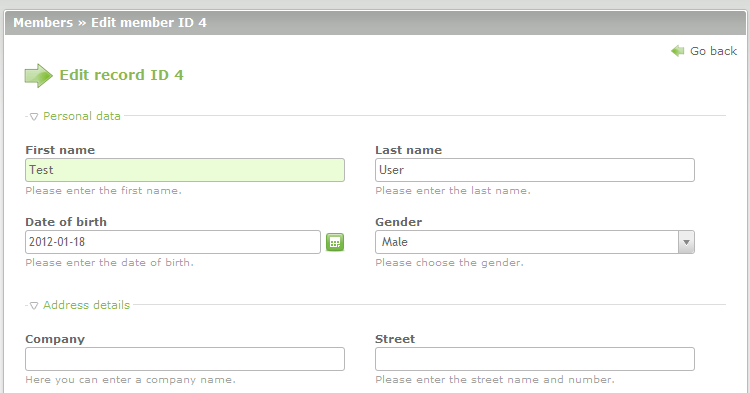
- Click on the EDIT MEMBER icon- this will show the form that was displayed when creating a new user. The only difference will be that it will have the current information of the user you have selected. Here's a partial screenshot of what you may see:
- Edit the information in the user that you have chosen.
- Save your changes by clicking on one of the SAVE options at the bottom of the screen.
DUPLICATE MEMBER
- Click on the DUPLICATE MEMBER icon and it will open the same edit screen as you saw in EDIT MEMBER screen, except that it will be a duplicate of the member you have selected.
- Note that you are creatng an exact duplicate of a member except that you will be required to fill in a different user name and password. This is an easy way to rapidly create members within a group. Fill in a different user name and password for the user.
- Click on one of the SAVE options at the bottom of the screen in order to save your entries.
DELETE MEMBER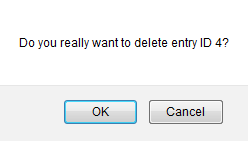
- Click on the DELETE MEMBER icon - this will delete the member that you have selected.
- Confirm your deletion by clicking on OK or select CANCEL in order to stop the deletion of the user you have selected.
ACTIVATE OR DEACTIVATE MEMBER
![]()
- Click on the ACTIVATE/DEACTIVATE icon - this will enable or disable the user. Additionally, you will see an graphic that you have not yet seen. The eyeball will be replaced by a gray icon with an 'X' similar to the one depicted in the screenshot to the right.
- Note that when you click on this icon, you do not need to save anything in order for the change to apply. Clicking on the icon in the list will change its appearance and deactivate the user immediately.
SHOW DETAILS
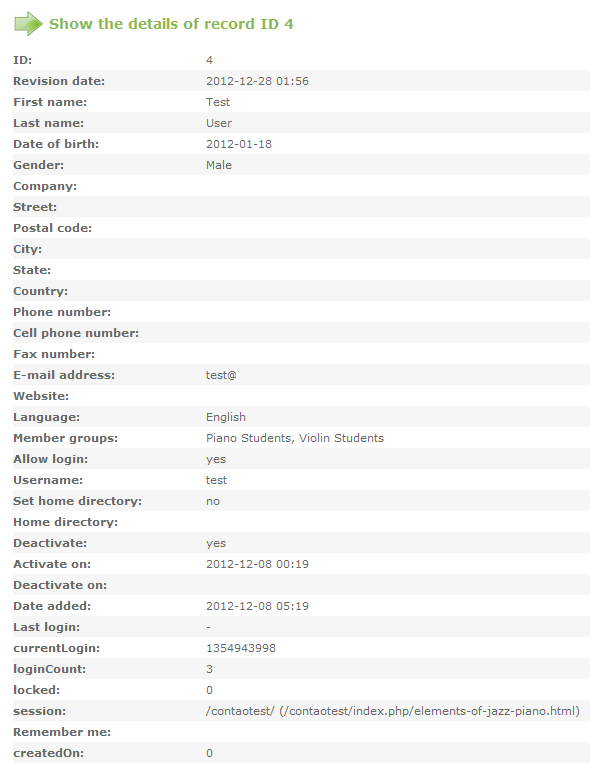
- Click on the SHOW DETAILS icon - information on the user that you have selected will be displayed. It will be the same form information that you see when creating a new user, or editing a user, but instead of a form, all of the information will be listed in text. The screenshot below shows an example of how the list will appear:
- This is a vew option only, so there is nothing to save. However, in order to return to your previous screen, click on the GO BACK option in the top right hand corner of the screen.
As you can see, the Contao Backend interface provides a wealth of options for you to be able to manage your members for access to the front end of the website. Provide access to this interface with care in order to protect the information of your users while keeping all of the data well-organized and up-to-date.
Did you find this article helpful?
Tweet
Help Center Login
Member and User Administration in Contao
| 1. | Managing Members in Contao |
| 2. | Managing Member Groups in Contao |
| 3. | Managing Users in Contao |
| 4. | Managing User Groups in Contao |
Related Questions
Here are a few questions related to this article that our customers have asked:
Ooops! It looks like there are no questions about this page.
Would you like to ask a question about this page? If so, click the button below!

We value your feedback!
There is a step or detail missing from the instructions.
The information is incorrect or out-of-date.
It does not resolve the question/problem I have.
new! - Enter your name and email address above and we will post your feedback in the comments on this page!