Manual Modx Installation
The manual installation of Modx Revolution will require that you be able to access the server files and database utilities. This tutorial will use the Cpanel File Manager and phpMyadmin in order to meet these needs. Please go to Using the File Manager in Cpanel and Managing Databases through phphMyAdmin if you require further information on these tools. The following tutorial will instruct you on how to manually install Modx onto your server.
Manually Setting Up Modx on Your Server
In order to start the process of manually installing Modx, you will need to obtain the installation files from Modx. Go to their home page at http://modx.com in order to obtain the file. Look for the following: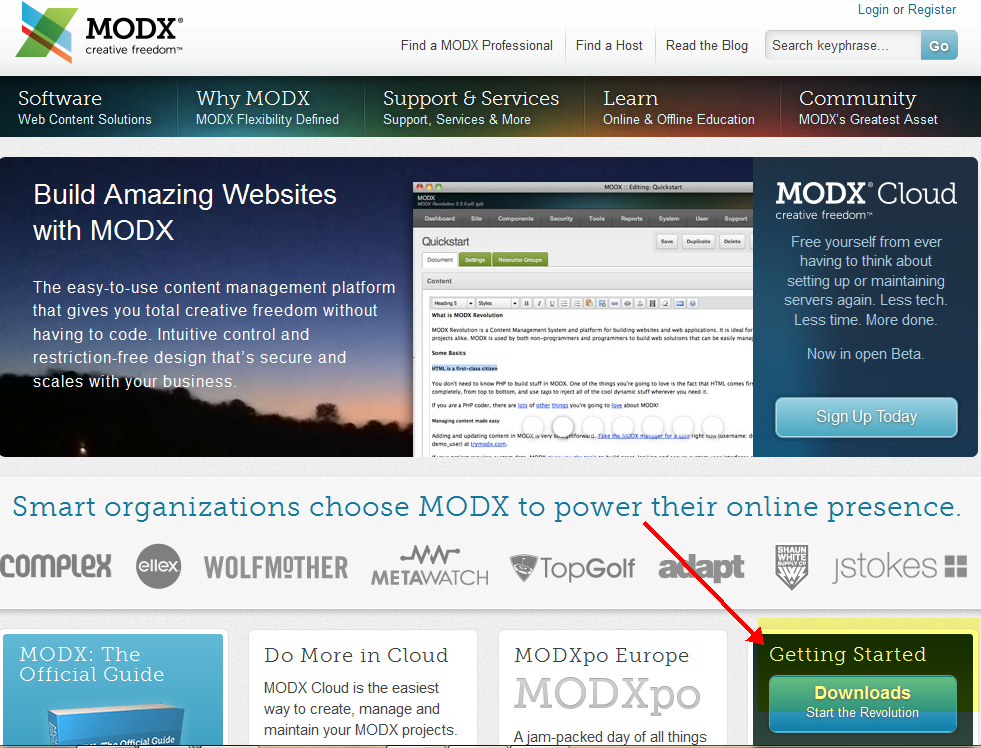
The screenshot above shows a red arrow pointing to the Download section (and it's also highlighted to help identify it). Note the GETTING STARTED section in the bottom right hand corner. Click on that link and you'll get the following screen: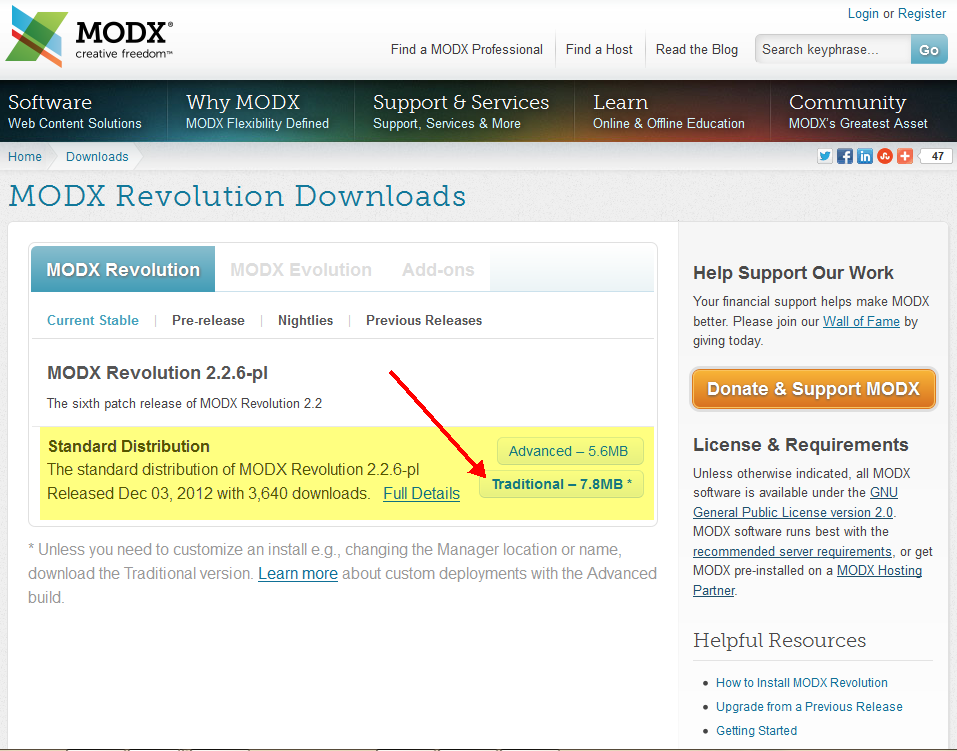
Make sure to click on the TRADITIONAL (7.8 MB) button for the Standard Distribution of MODX REVOLUTION. The installation process described below uses that file for installation.
Once you have downloaded the file, the next step will be to get that ZIP file uploaded onto your server. The next steps use the Cpanel File manager in order to upload the file and extract it.
- Login to Cpanel
- Go into File manager (select Web root directory, show hidden files and click on go when the pop-up window shows). Note that all of your installed files should be going into the PUBLIC_HTML folder, otherwise known as the web root folder.
- In the File Manager click on the upload button and you'll see the following dialog window appear:
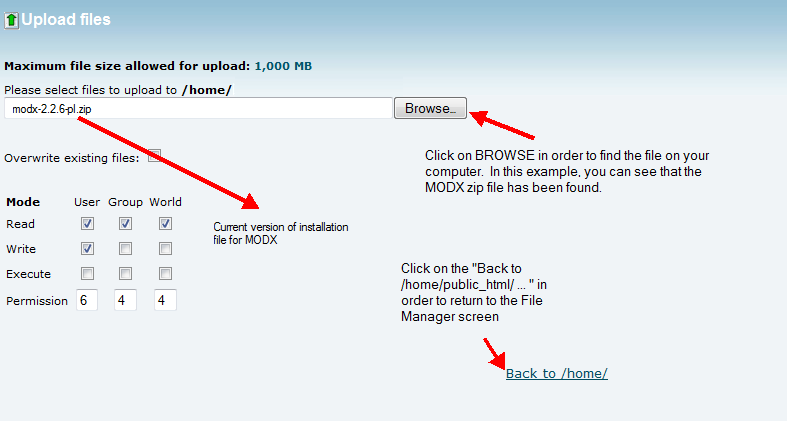
Click on BROWSE to find the MODX installation Zip file on your computer. When you have selected the file, it will begin uploading immediately. Note the version number and make sure it's the version you want to load. Once you have completed the process of uploading the file, click on BACK to /home... at the bottom of the upload screen. - When you have returned to the File Manager, the zip file will have been uploaded to the location in the folder. Click on the uploaded file, then select EXTRACT. The dialog interface for uncompressing the file will look as follows:
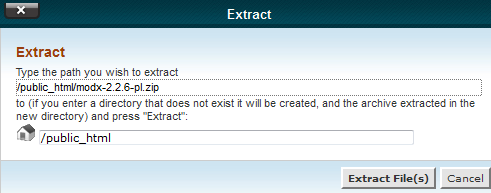
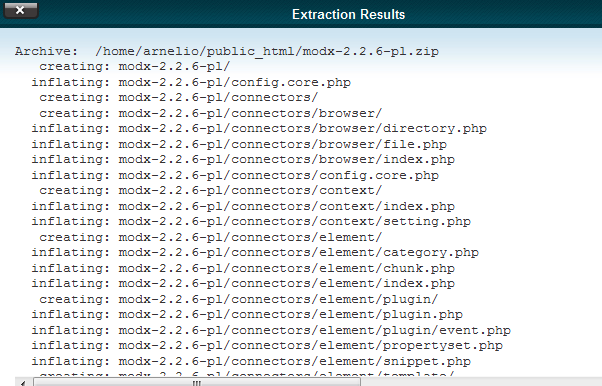
If you are installing the files to the root, then destination (the second line above) will read as it is shown: /public_html/ - Click on EXTRACT File(s) in order to proceed with unzipping file files they convey. When the process has finished, you'll see a summary of the extraction process:
When it is complete you will have a new modx folder in your public_html folder. - You will need to go into your browser for this next step. Type in the domain name and then followed by the installation path and then the word "setup". For example, the path may look like this, in the browser:
http://domainname.com/modx-2.2.6-pl/setup
Click on ENTER to continue and you will see the following screen appear: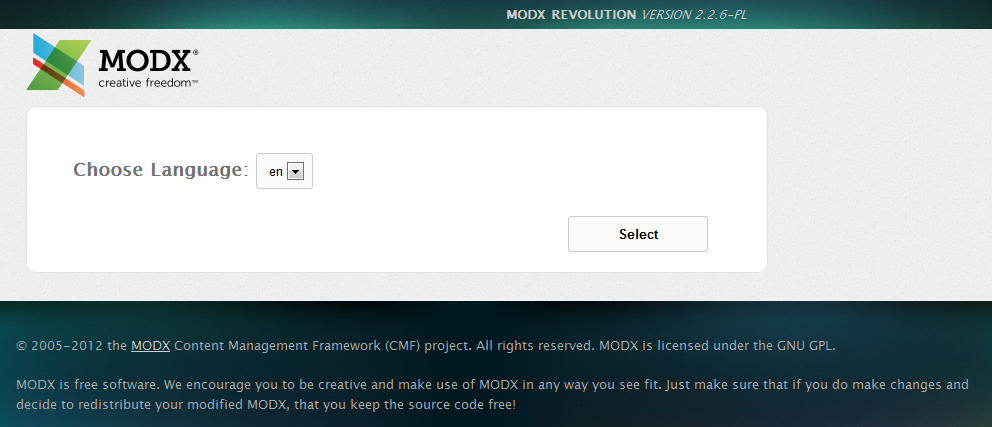
Select the correct language you wish to work in , then click on SELECT in the bottom right of the screen.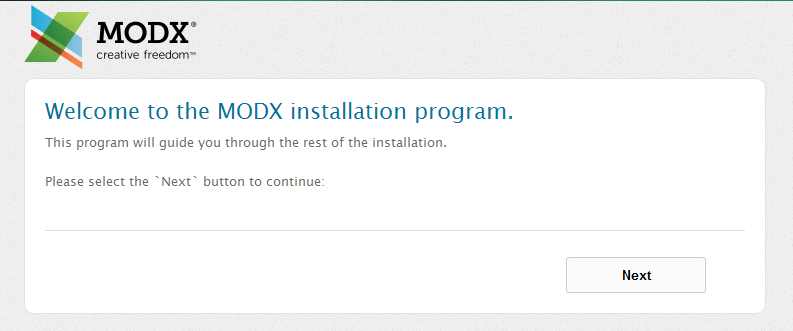
Click on NEXT to continue. - You will see the following dialog screen. Make sure to select the correct installation options.
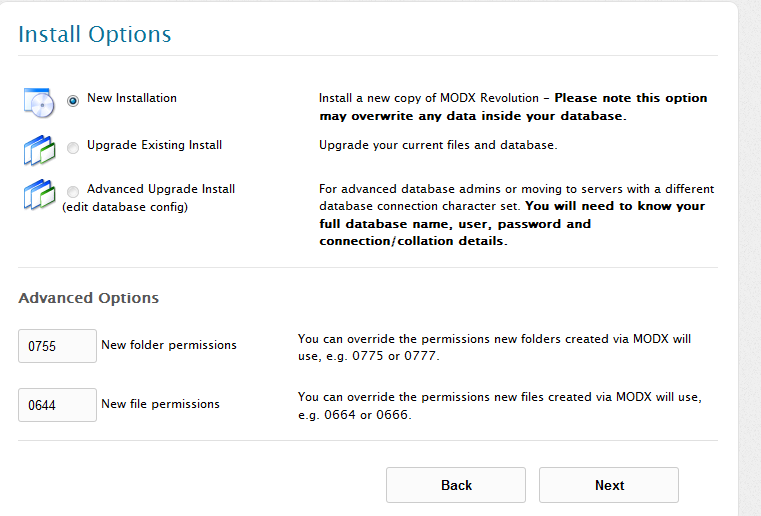
Click on NEXT in order to proceed with the installation. This will bring up the DATABASE CONNECTION dialog screen. Note: The screenshot for this section is displayed at Step 9. - Once all of the MYSQL steps are complete (creating database, creating user, assigning user to database, setting database user database privileges), then you can proceed with the setting up the MODX database section:
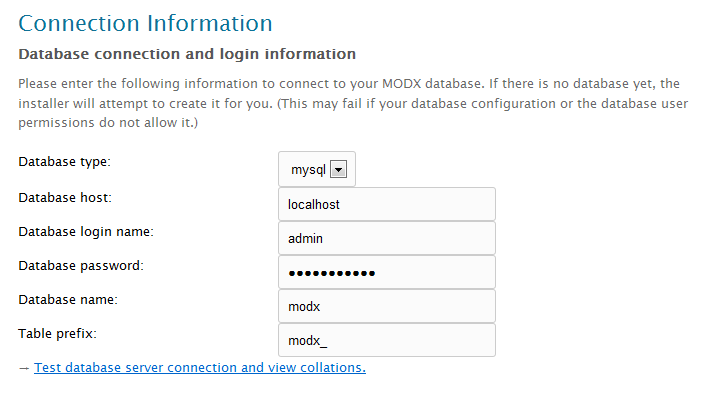
This section uses the database information that you created in the steps above:
Database type mysql Database host locahost Database login name database user name you created Database password database password for the user you created Database name Database name created (make sure to include user prefix) Table Prefix table prefix you set - Click on Test Database server connection and view collations. If you placed the correct settings from above, then you will see the following:
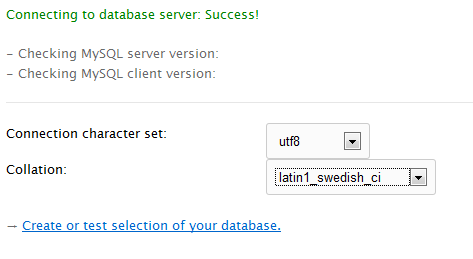
- You will need to set the Connection character set and collation. If you are not sure what they should be, then you can leave the default. To find more information on this topic, you can go to the MySQL Reference for Character Sets and Collations.
Click on CREATE OR TEST SELECTION OF YOUR DATABASE to proceed.
If all is well you will see the following message and the next portion of the installation: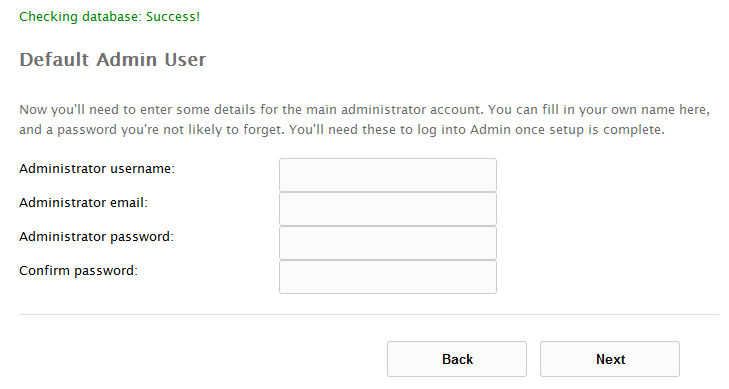
- Add a login user name, password and valid email address for your Administration pages. Click NEXT after adding this information, and you will get a variety of summary information for the installation. You will also finally see an INSTALL button at the bottom right of the screen. Click on this button to proceed with the installation.
- Installation Summary - after the installation above, you will see a screen labeled "Installation Summary" as per below:
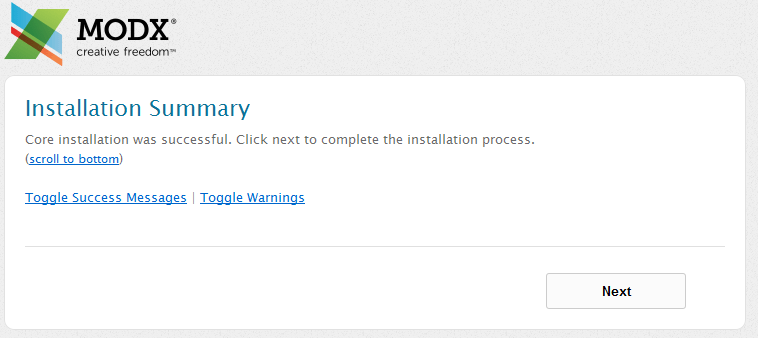
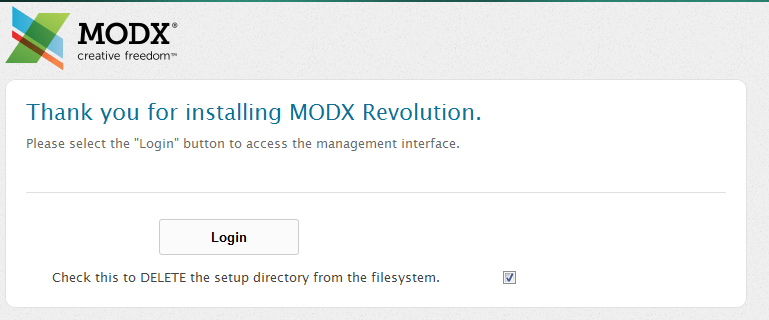
If you wish to check for success messages andwarnings, then click on the Toggle options. If there are any problems they will be listed in the Toggle Warnings section. - Notice the text (at long last) finally says Click NEXT to complete the installation process! You will see the following screen indicating the completion of the installation process. It also gives you the option to delete the installation directory and offers a login screen to get into the administrator. Make sure you login AND delete the setup directory.
Before you can fill this section out, you will need to take a step back. This database section will require that you open a second screen in Cpanel and create a database in MySQL.
Here's a quick summary:
A) Go to MYSQL DATABASES in the Cpanel, select CREATE NEW DATABASE. You will see the screenshot below:
.
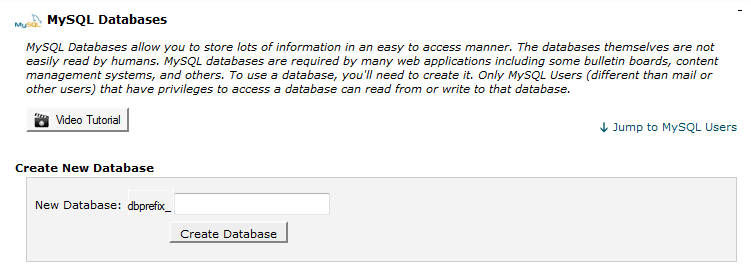
B) The database will begin with a prefix based on your Cpanel user name. As per the example above, the prefix might be "dbprefix_" followed by the database name. Fill in a database name. So the entire database name would become: dbprefix_databasename
C) The next part will be to create a database user and then assign it to the database you just created. The dialog for this part of the process is immediately below where you created the database:

Add a user name and password, then click on CREATE USER. Make sure you record this information for future reference. You will need it in the MODX installation steps.
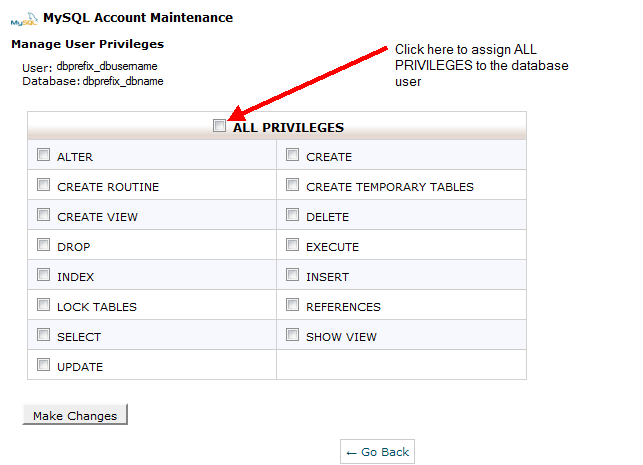
D) Assign the database user you just created to the database you just created. The interface for this is immediately below where you created to the database user name:

E) Note the instructions in the screenshot above. As part of assigning the user, you will also need to assign the user privileges to the database. This is the screen you will see (click on ALL PRIVILEGES):
Did you find this article helpful?
Tweet
Category
Beginning Modx
Comments

n/a Points
|
2014-06-03 9:52 am
Hi, I was followed all above steps accourding to this tutorial but I'm troubling when i going to open my website it's showing me cpanel me Cpanel details. i don't know what's wrong with this...please help me soon. |

Staff 2,342 Points
|
2014-06-03 3:20 pm
Could you clarify exactly what you see? Possibly the domain that you are trying to access?
|
Help Center Login
Beginning Modx
Related Questions
Here are a few questions related to this article that our customers have asked:
Ooops! It looks like there are no questions about this page.
Would you like to ask a question about this page? If so, click the button below!

We value your feedback!
There is a step or detail missing from the instructions.
The information is incorrect or out-of-date.
It does not resolve the question/problem I have.
new! - Enter your name and email address above and we will post your feedback in the comments on this page!