Setting Languages in PrestaShop 1.5
Prestashop allows you use more than a single language for your customers to view your store. This helps to support your customers who may require a different language regardless of their region. The following tutorial shows how to add another language in PrestaShop 1.5.
Using Multiple Languages within your PrestaShop 1.5 Shop
- Log in to the PrestaShop Admin Dashboard as an Administrator
- Hover over the menu bar where it is labeled LOCALIZATION. Click on LANGUAGES when it appears. You will a screen similar to the following:
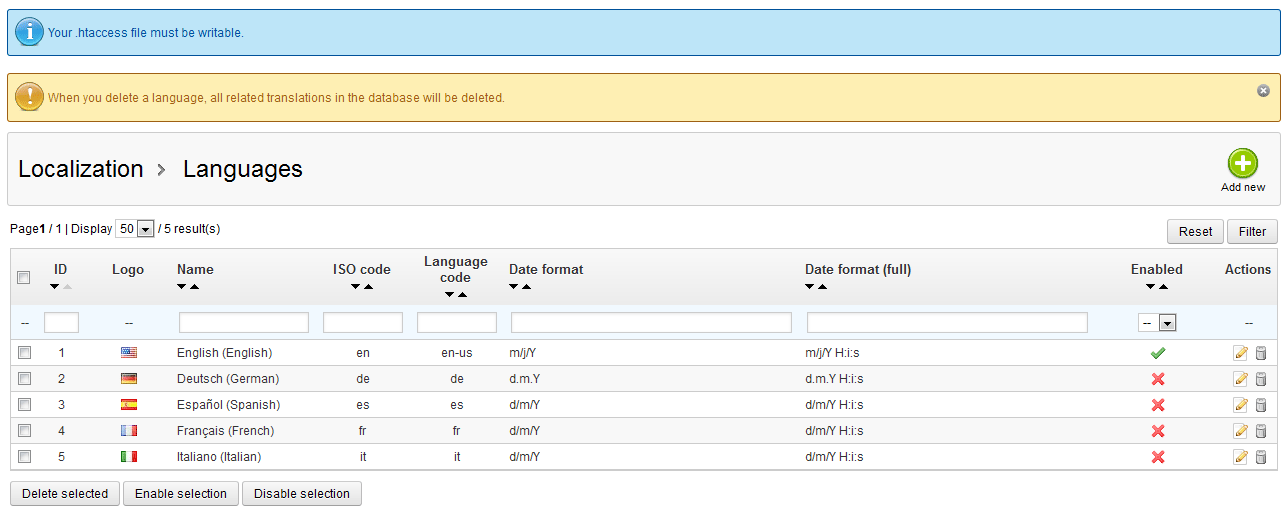
In order to set multiple languages, you must first set the .HTACCESS so that it is writeable (see Editing the .HTACCESS file - note that this information is based on hosting with Web Hosting Hub). Also be aware of the warning (at the top of the screenshot in yellow) that if you have multiple translations already set, you would be deleting them if you delete the language that they are using.
Here's a break down of the table shown above:
ID Number representing the languages added Logo Flag of the country for the language added Name Name of the language ISO Code International Standards Organization code 2-letter code for the language
Language Code Full language code Date format Short date format Date format (full) Full date format Enabled Indicates if language is enabled or not enabled Actions The options to edit or delete the language - In order add a language click on the green ADD NEW button in the top right hand corner. If you do not intend to add a new language skip down to STEP 5 below. When you click on the ADD NEW button, you will see a screen as per the one below:
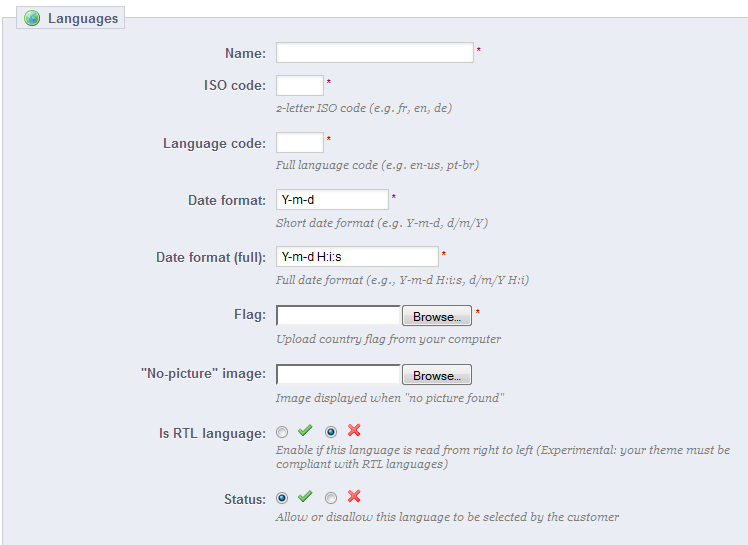
Note that each of these fields are defined in the above table, but there are also a few other options:
NO PICTURE FOUND - image displayed when there is no picture found (error message icon)
IS RTL LANGUAGE - This is for languages read from right to left
Define the language you wish to add by filling at least the first six fields -as these are mandatory for the language to be saved. Note that the STATUS option allows you to determine if the language is selectable by a customer. Select the option for the language you have added in order to proceed. - Once you've finished adding a new language, click on the green SAVE button in the top right hand corner. Note that if you want to set the language as the default language go to Setting the Regional Configuration in PrestaShop 1.5.
- If you need to EDIT a language setting, go to the ACTION column and click on the EDIT icon. You will see the same screen as the blank screenshot above, but it will be filled with the current language settings. Make any necessary changes and then select the SAVE button in order to save your changes.
- If you intend to remove, enable or disable a language from the list of languages loaded for your site, then click on the check box to the left, and then at the bottom of the table select the corresponding button:
DELETE SELECTED
ENABLE SELECTION
DISABLE SELECTION
Languages are a vital portion for your website in serving your customers. You are able to select more than one so that a customer can select more another language for your store. Here are two screenshots that show this option in action. The administrator screen displays settings for having both American English and German languages enabled. The second screenshot shows where the customer can select the language: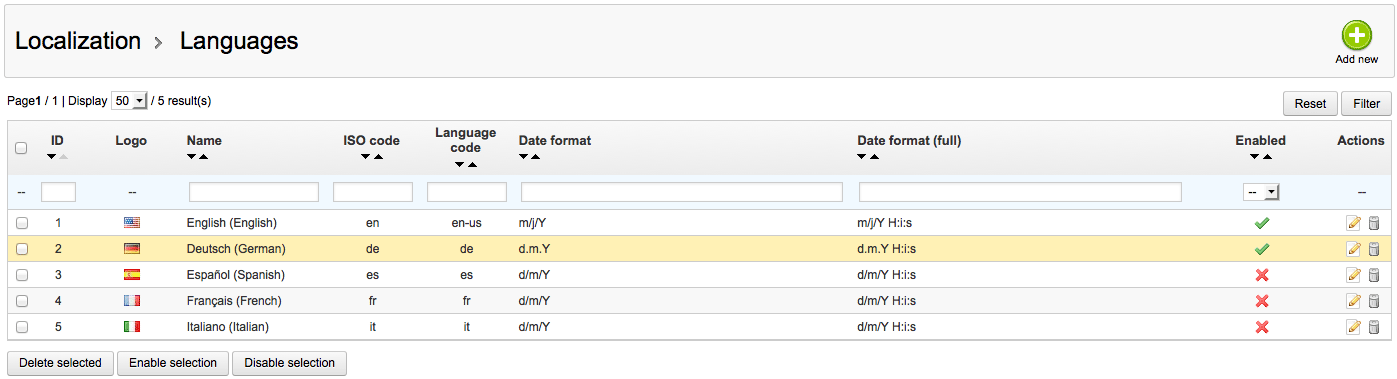
For this this theme, you can select the language to display the store in the top right hand corner using the country flags:
Did you find this article helpful?
Tweet
Category
Getting Started with Prestashop 1.5
Help Center Login
Getting Started with Prestashop 1.5
Related Questions
Here are a few questions related to this article that our customers have asked:
Ooops! It looks like there are no questions about this page.
Would you like to ask a question about this page? If so, click the button below!

We value your feedback!
There is a step or detail missing from the instructions.
The information is incorrect or out-of-date.
It does not resolve the question/problem I have.
new! - Enter your name and email address above and we will post your feedback in the comments on this page!