Creating a New Article ID in the Contao CMS
Articles are one of the sections within Contao that allow you to add a page or pages of information that you can share with your users. This page is basically a webpage that you can create and then make accessible to your users. The process of creating the articles involves:
- Creating the Article Identification (ID) information
- Adding the actual article content
This is the first part in a two-part document explaining how to create new articles within the Contao CMS. You can jump to the second part of the process by going to Creating New Content Elements in the Contao CMS.
Part I: Adding an Article ID using Contao
Adding new articles within Contao can be very confusing because of the terminology used. When you click on NEW ARTICLE, it appears that you are creating a new article (e.g. a web page, or some type of page with content), but you're actually creating an article ID. Article IDs are created because you can actually have multiple pages of content. Each article ID provides the information describing the content, linking to it, and sometimes even providing a snippet of the content (called a teaser). The following steps describe how to create the article ID:
- Login to the Contao Back end
- In the lefthand column scroll down until you see ARTICLES (near the top of the menu) and click on it to open the Article management section of Contao. You will see something similar to the following:
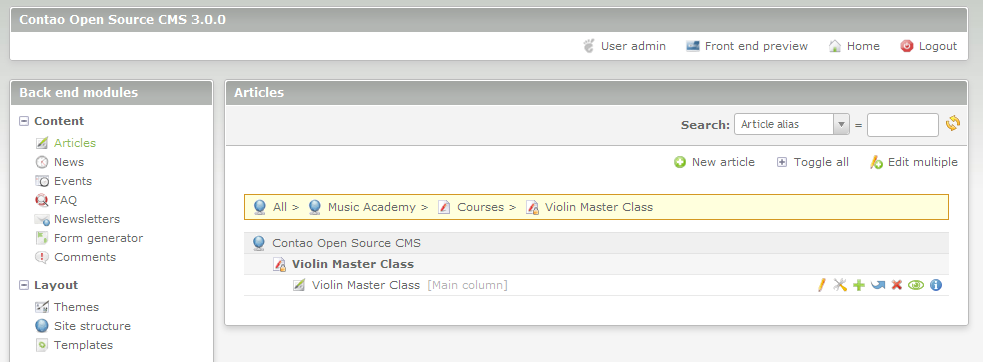
The Articles menu includes the following options:
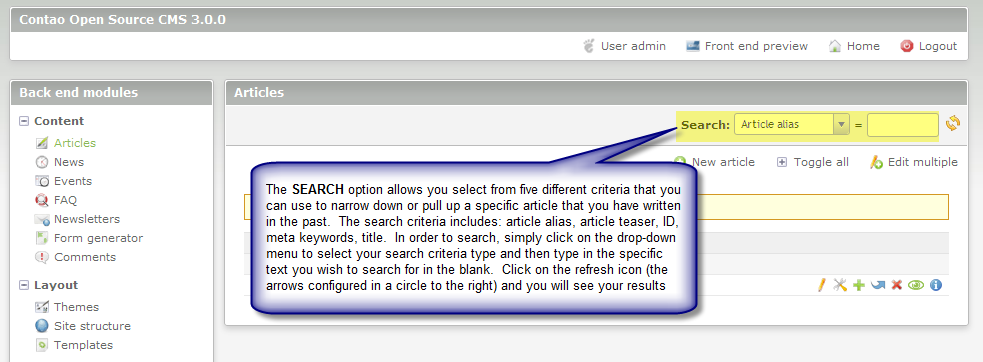
SEARCH - use the Search option to search for specific articles. The table below summarizes the different drop-down menu options:
Article Alias This is a unique identifier for the article that you have written Article Teaser A specific snippet of your article that you can create when writing the article ID ID used to identify article Meta Keywords keywords used to identify article Title Title of the article The table following the screenshot below describes each numbered item:
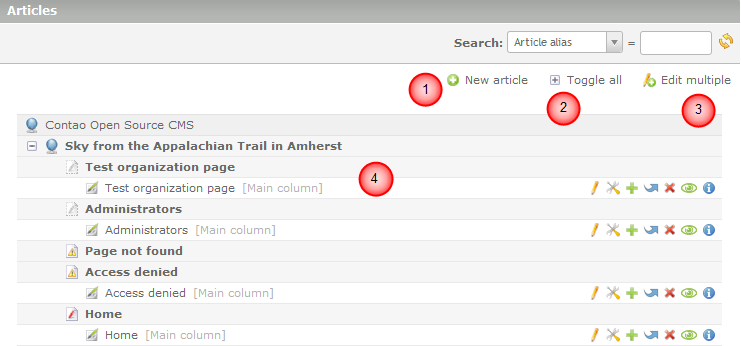
1 New Article - adds new article when selected 2 Allows you to expand or collapse the tree view of the articles 3 Allows you to edit multipel article options in a list 4 shows how the articles are displayed in a tree view - Creating a NEW ARTICLE starts with first determining where the new element will be placed. You will generally have Articles, News, Events, FAQ, Newsletters, and Comments that are used to organized your various web pages.
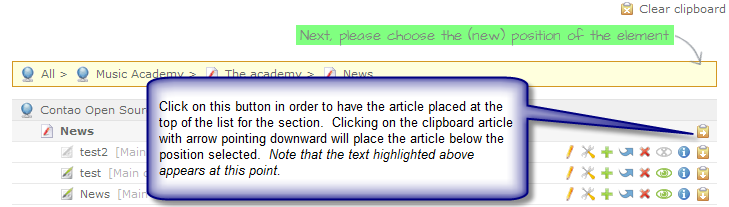
Placement of the article is done by clicking on the clipboard icon at the far right as identified above. It will determine if the article appears at the top of the section, or if the article will appear below the article you have selected. Click on the clipboard to position your article.
- After you have positioned your article, you will see a blank form for the new article to be inserted. The following screenshots break down each section of the form:
Title and Author
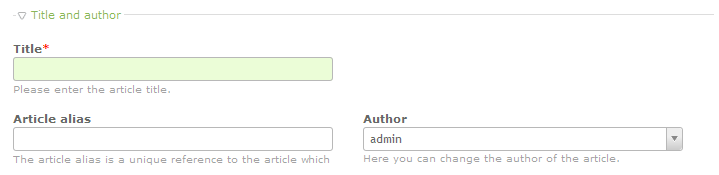
Fill in the title and author section of the new article. Note that the TITLE is mandatory for the article to be saved. You can also click on the drop-down menu to choose the author. The only selectable authors are users within the Contao CMS. For information on Users, please go to Managing Users in the Conto CMS.
- Section and Keywords
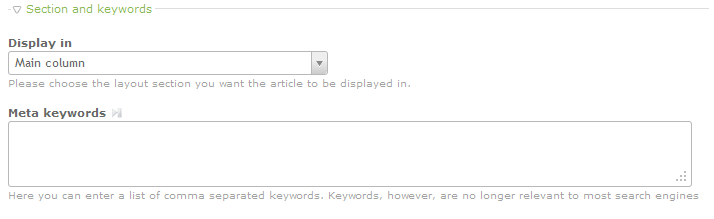
The DISPLAY IN drop-down menu lets you select the position of the article. You can place it in main column, left column, or header. META KEYWORDS - allows you to set keywords used to identify your article through search engines. Note that Contao states that they are not as relevant as they once were, but they can still be useful as search terms within the Contao CMS. Select where you wish to display the article and then type in some relevant keywords for the article.
- Article Teaser
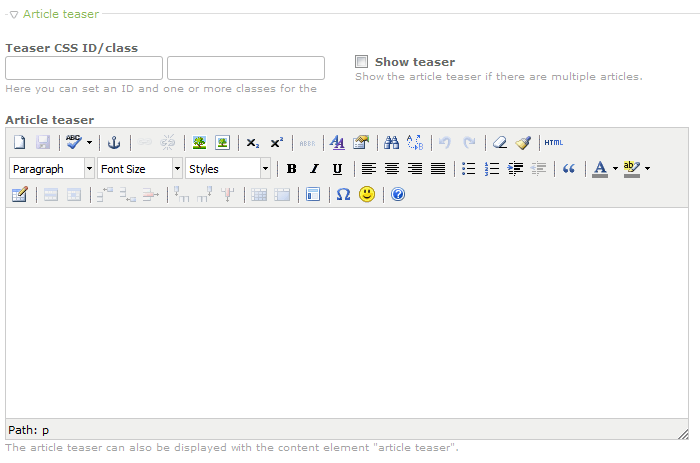
TEASER CSS ID/class - allows you to add a CSS ID or CSS class for the teaser element. The SHOW TEASER option works when there are multiple articles. You can show snippets of the articles based on what you create in the teaser. The editor screen for the Article Teaser appears below these options and allows you to enter the text and graphics that you want to show in the teaser. Click on the blank field to add the CSS ID or CSS class, then click on the check box to show the teaser (if you have more than one article). Create the teaser in editor provided.
- Expert Settings
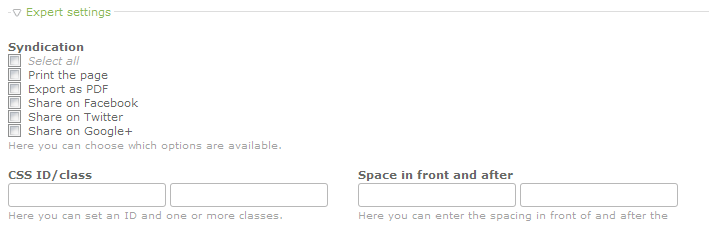
The EXPERT SETTINGS section starts off with a group of checkboxes called Syndication. The syndication section allows you give the option for people who read the article to print the page, export as PDF, share on Facebook, share on Twitter, share on Google+, or all of the above. The next option then allows you to set a CSS ID/class for the article. This is similar to the teaser option, but this ID is specifically for the article. The last option in this section allows you to add a space before and after the article based on numbers of pixels. For example, if you place 100 in the first and second fields of this section, then there will be a 100 pixel space before and after the article. Though Contao provides this option, they also suggest that you actually make the spacing in a style sheet. Select the Syndication options, add a CSS ID/class for the article, and then add spacing (if needed) in the fields provided.
- Publish Settings

The PUBLISHING SETTINGS allow you to make the article available for viewing in the website. You can set the SHOW FROM and SHOW UNTIL options to display an article for a finite period of time as determined by the fields above. Click on the green icon to the right of each field to easily set a date and time. Click on the checkbox to immediately publish the article, or set a date and time when the article will appear and/or be removed from access.
- Click on a SAVE option at the bottom of the screen in order to save all of your entries.
The Article Identification information is important in that it allows you to provide identifying information for the article content which might simply be a single text article, or a series of pages of HTML content or other types of content elements. The article ID allows you to sort and save information such as the teaser, syndication and publishing information in the database separate from the actual content. This structure allows Contao to quickly display the article without actually loading all of the content files, resulting in a speedier performance of the application. It also aids in providing header information to assign values such as viewing permissions for security, CSS identification to help in formatting, and other identification information to help in searches for the article. To proceed to the next part of creating a new article go to Creating New Article Elements in the Contao CMS.
Did you find this article helpful?
Tweet
Category
Creating Content with Contao
Help Center Login
Creating Content with Contao
Related Questions
Here are a few questions related to this article that our customers have asked:
Ooops! It looks like there are no questions about this page.
Would you like to ask a question about this page? If so, click the button below!

We value your feedback!
There is a step or detail missing from the instructions.
The information is incorrect or out-of-date.
It does not resolve the question/problem I have.
new! - Enter your name and email address above and we will post your feedback in the comments on this page!