Using Quick Redirects to create 301 Redirects in WordPress
301 redirects are used to bring users to the new location of a website URL when it has been changed. This helps search engines understand that there has been a change of location for a website or its pages. There are two quick ways to add a 301 re-direct in WordPress. One of them is to use the redirects option in the cPanel. This requires that you know both the old path and the new destination where you are sending your users. If you're using WordPress, then there is a much easier option - using a plugin. For the purposes of this tutorial we will be using the Quick Redirects plugin. Make sure that if you choose a different plugin, that the author/developer is updating the plugin to match WordPress updates. The plugin has many options, but we are focusing on its basic usage to create quick and easy 301 redirects.
How to use the Quick Redirects Plugin for WordPress
Install the Quick Redirects Plugin
- Login to the WordPress Administrator
- Go to Plugins
- Click on Add New and search for "Quick Redirects"
- Choose to install it, then click on the Activate button when the installation is complete
How to create Redirects using Quick Redirects
If you need to create a 301 redirect, the Quick Redirects plugin makes it very easy. You simply need to know the old URL and the new one. Quick Redirects calls the old URL the "Request URL". The new URL is the "Destination URL".
- Login to the WordPress Administrator
-
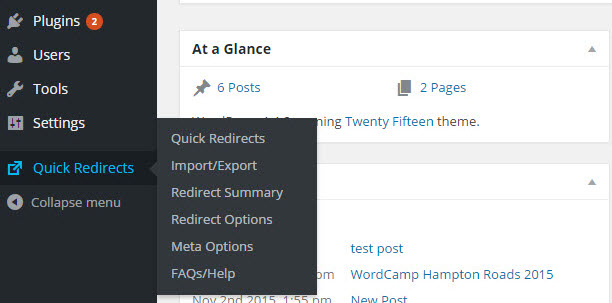
Click on Quick Redirects in the menu at left. This will bring up the Quick Redirects main screen. You will see the blanks where you can Add New Redirects
-
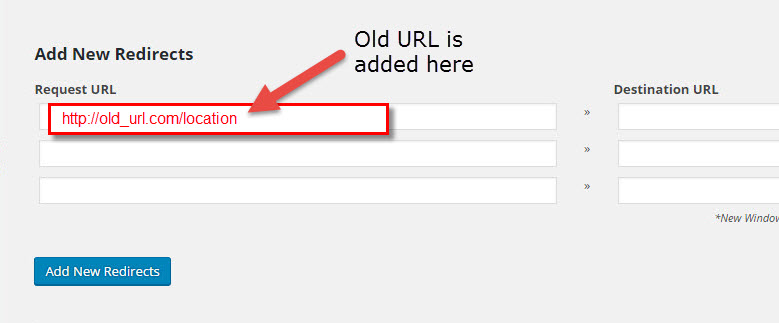
To add a new redirect, click in the blank under Request URL, then type in the old URL
-
Next, to the immediate right of where you typed the old URL, click on the blank under Destination URL. Type in the destination that you want to use for your redirect
- Optionally, if you want the redirect to open a new window, click on the check box under NW. If you want add the No Follow attribute to the link, then click on the check box for NF.
- Click on the Add New Redirects button to save your new redirects
Did you find this article helpful?
Tweet
Help Center Login
WordPress Plugins
Related Questions
Here are a few questions related to this article that our customers have asked:
Ooops! It looks like there are no questions about this page.
Would you like to ask a question about this page? If so, click the button below!

We value your feedback!
There is a step or detail missing from the instructions.
The information is incorrect or out-of-date.
It does not resolve the question/problem I have.
new! - Enter your name and email address above and we will post your feedback in the comments on this page!