Part I: Managing Users Groups in Modx
Modx defines User Groups as a collection of Users, but they also play a critical role in defining access to your website. You will see how to create the user groups within the Modx backend and determine how to assign policies. Access for the users in the user group is controlled by these policies through assignments to context access tabs, resource groups, or element categories. Additionally, users can also be granted specific Roles within each user group. Roles allow a Modx administrator to specifically assign permissions to any user and determine how permissions are inherited when multiple access policies are applied to the same user group. Managing User Groups is divided into two sections:
| Part I: | Creating user groups, Adding User groups, Editing User groups, and Managing Roles for Modx |
| Part II: | Managing Access Policies and Policy Templates |
Part I: Creating User Groups
This is the primary organization unit for your membership. You can create multiple user groups that can then have roles and access policies applied. The following section will cover creating a new user group, adding a user to a group, and updating an existing user.
Creating a New User Group
- Login to the Modx Backend
- Hover over the menu bar where it is labeled SECURITY, then click on ACCESS CONTROLS when it appears in the drop down menu. We will be focusing on the in the righthand portion of the screen. The overall section is labeled ACCESS CONTROLS, but there should be a tab labeled User Groups. Click on the User Groups tab and you should see the following:
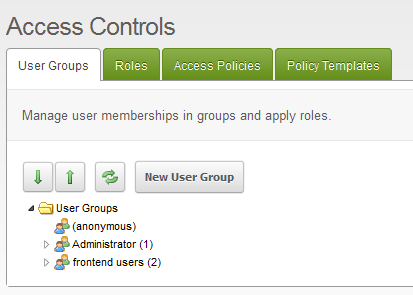
Here you can see the different existing groups that have already been created. If you are working with a new Modx installation you will generally only see the Anonymous and Administrator groups. - Click on the NEW USER GROUP button and you will see the following:
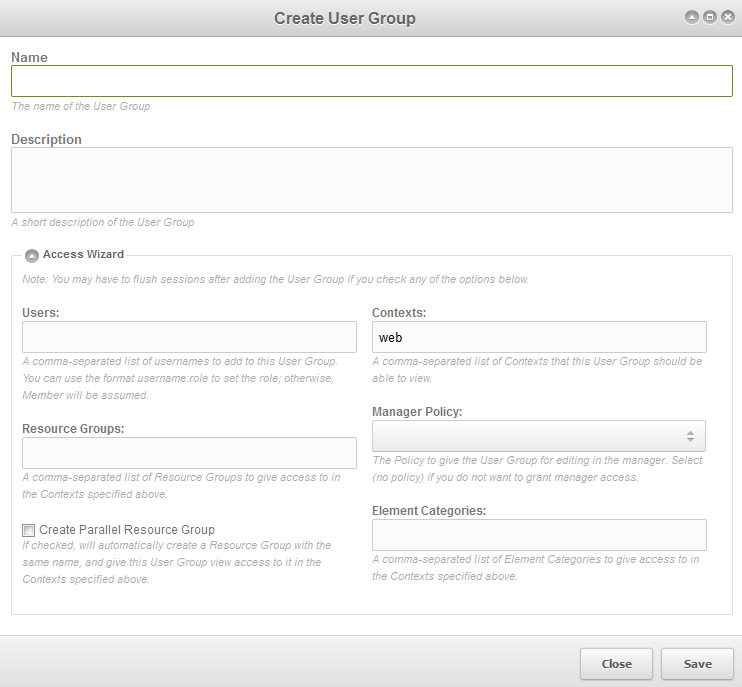
One of the nice things about the current Modx Revolution release is that most EVERYTHING is labeled with a definition in their forms. For clarity, you will see these same terms in the table below:
Name Name of the User group being created Description Description of the User group being created Access Wizard Note: This section may require that you flush sessions after adding a User group after filling the following options. This is necessary in order to properly the changed access policies to the users. You can find the Flush Sessions option at the bottom of the SECURITY menu. Users This is the access control list - basically list of users separated by commas; by default Member is the role applied to the user Resource Group List of Resource Groups that can be accessed on the Modx website Create Parallel Resource Group Creates a resource group that can be isolated to members-only. This is a way to segregate your admin users from your front-end users. That way, you can have two different groups without having front-end users mixed with administrators. Contexts Describes where the rules will apply (typically set to Web as it is a policy for the website) Manager Policy Policy defined for managers. If you do not want the user to have manager access, then pick "no policy" Element Categories List of Element Categories that can be accessed - Fill in the form with the appropriate values you wish to use for your users.
- Click on SAVE in the bottom right hand corner in order to save your entries.
Adding a User Group
- Login to the Modx Backend
- Hover over the menu bar where it is labeled SECURITY, click on ACCESS CONTROLS when it appears in the drop down menu. We will be focusing on the in the righthand portion of the screen. This section has a tab labeled User Groups. When you click on the tab, in order to ADD a User to a Group use your mouse and RIGHT-CLICK on one of the existing groups where you wish to add a user. You should see a menu similar to the following:
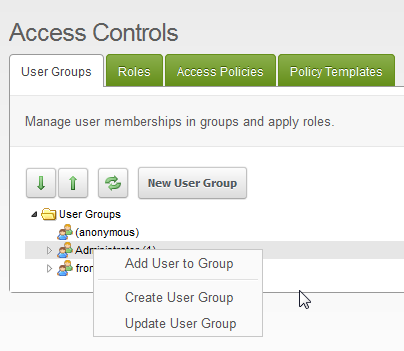
- Click on the option that says ADD USER TO GROUP. You will see the following screen:
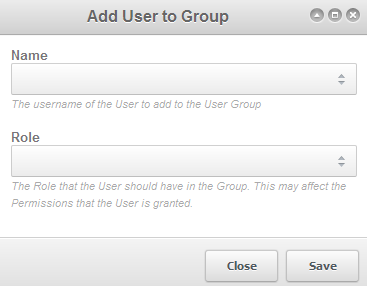
NAME - This is the name of a user that has already been added to Modx. Clicking on the field will give you a choice from the existing user base.
ROLE - Role of the user as defined in the ROLES tab. Clicking on the field will give you a list of roles from which you can select. - When you have finished selecting the name and the role of the user, click on SAVE in order to save your selections.
Updating the User Group
The final menu selection when right-clicking on a user group is the option to UPDATE a user group. When you click on this option, you'll see five different tabs open up that let you update the user group. Here's a screenshot of what you will see: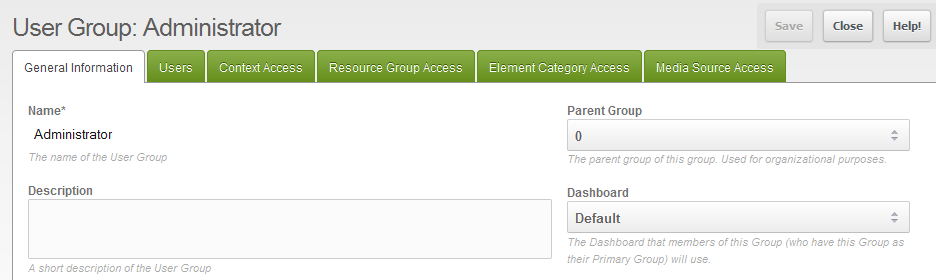
- The first tab is the General Information tab which includes three different areas that you can edit:
Description The description of the User group Parent Group Parent group to which this user group belongs Dashboard Dashboard that is assigned to this group. This dashboard is seen only if this is the primary group defined for the members.
Click on each field that you need to update then click on the USERS tab to proceed.
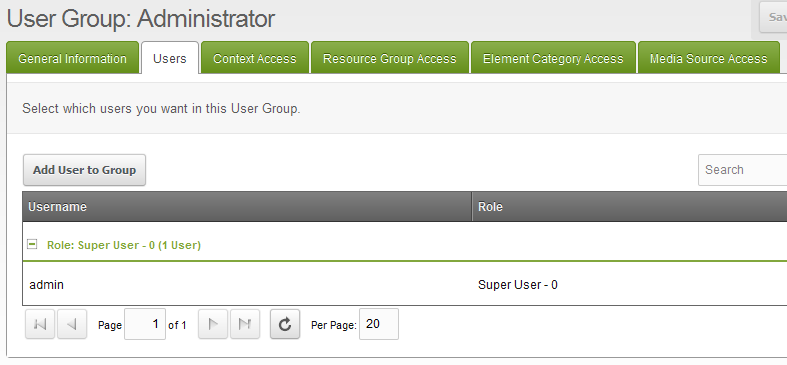
- The Users section allows you to simply add users to the user group. Click on the user that you wish to add as per the screenshot below:
- After adding the User, click on Context Access. You will see the following screen:
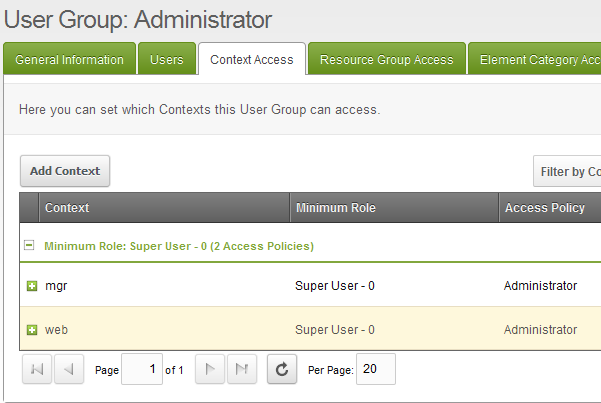
Context specifies the area to which the policy applies to. You can create contexts and then assign them. For example, you might create a context called Blog, and then assign policies to that section that would all apply to managing the blog. Click on ADD CONTEXT and you will see the following: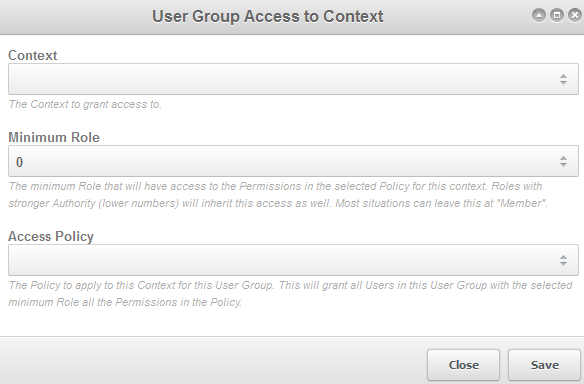
The following items are defined as per the screenshot above:
Context Select the Context that you are defining Minimum role Typically left as Member, but it allows you to set a role possibly higher than a member (usually the lowest ranked role) if needed Access Policy Select the policy to apply the designated context
Click on SAVE when you have completed defining the Context Access. - The next tab is labeled Resource Group Access. Click on this tab and you will see the following:
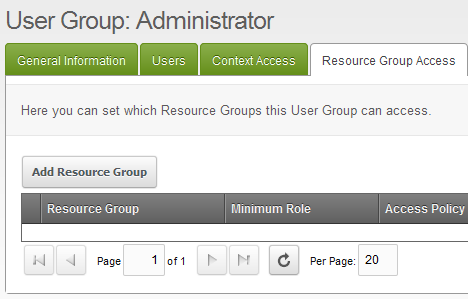
This section allows you to select the resource groups that have been defined in the Modx backend. You can also add new resource group as the screenshot below illustrates. This selection permits you to restrict specific resource groups to your users.
Definitions for the dialog interface above are also detailed below for further clarity:
Resource Group Name of the resource group; select from pre-defined groups Context Context for which the resource groups apply Minimum Role Typically left as Member, but it allows you to set a role possibly higher than a member (usually the lowest ranked role) if needed Access Policy Select a defined Access Policy for the Resource in the Resources group. Note that permissions in the policy apply to all Users in the user Group
Click on SAVE after you have completed updating the Resource Group Access fields. - The next two tabs -Element Category Access and Media Source Access- will be identical to the Resource Groups tab, except for the areas of Modx for which they apply. These areas define assets for which the User Group will have access. The basic steps are the same if you are adding access for a resource group/element category/media source:
a) Select the pre-defined group for which the user group will be given access
b) Define the context
c) Determine the minimum role
d) Select an Access Policy
Note: Each of these fields require a selection before you can save.
When you have completed your update make sure to select the SAVE button in the bottom right-hand corner if you are adding a new option for each resource tab. When you have finished updating these last tabs, select the SAVE button in the top right hand corner to save your updated User Group.
Updating the User Group can be a longer and more tedious process than actually creating a new User Group, but the level control over managing the access levels can be controlled with great detail. As with any access control, update with care to prevent any possible security issues for your website.
Roles for Modx Users
As in a play or a movie, roles are positions where people are given the responsibility to play a part. Like a role in a play, they may be only have access to parts of the entire story (which represents your website). Modx allows you to create roles so that you can then apply them to users. These roles can be hierarchical in nature - meaning that you can rank them so that they have a position within a user group. This is done by assigning what Modx defines as authority to each role. Authority is given an integer value and is "inheritable downward." For example, if you give a group admin user an authority of 10 and then have another role called group moderator with an authority of 15, the group admin user would inherit all of the roles assigned to the group moderator. And if there was a Super Admin group that had an authority of 1, then they would inherit of all of the roles ranked lower. The lower the authority number, the higher the authority of the user.
- Click on the tab labeled ROLES and you will see something to following:
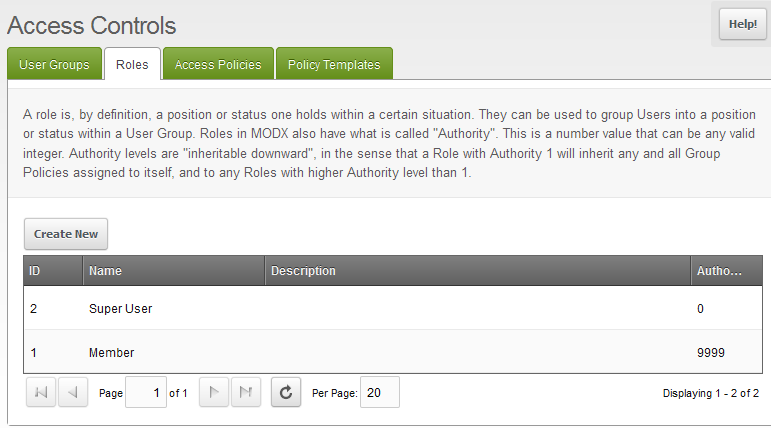
As per the definition for the authority levels for the role described above, you can see a Super User and a Member that show in the screenshot above. Note that the authority of the super user is set to '0'. The member has an authority of 9999. In this case, Modx has given you a lot of room to create roles that fit in between the super user and the member. - Click on CREATE NEW in order to create a new role. You should see a form like one below:
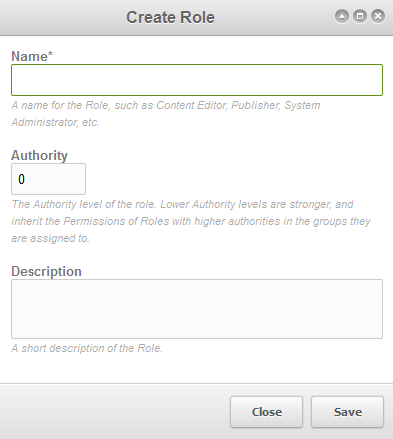
When each role is created you have to define three fields:
Name A meaningful name for the role; make sure to give the role a name that easily identifies its purpose so that you can correctly assign your users. For example: Blog Moderator, Graphics Designers, or Blog Administrator. Authority The lower the integer applied, the higher the authority the role is given. As explained above, higher authority roles will inherit the permissions for roles that are also part of the usergroup definition. Description This is an explanation of the role that you are creating (as per the form at left) - Fill in the form with the appropriate information for the role that you are creating for your users.
- Click on SAVE at the bottom right hand corner of the screen to save your entries.
User Groups allow you specify the overall access policies and roles that you will be applying to the users of your Modx website. Using Roles help you to further define how your users will be able to interact with your site. Additionally, you can clearly set the authority levels and make sure that inherited permissions have been applied correctly. Proceed to Part II of Managing Modx Users Groups to learn about Access Policies and Policy Templates.
Did you find this article helpful?
Tweet
Comments

n/a Points
|
2014-07-04 5:47 pm
I want to make it possible for a user to be able to login to the backend through www.mysite.com/manager and make necessary changes. I have tried editing the user permissions but when I enter the details it just accepts my parameters but does not load into the backend. What am i doing wrong? |

Staff 3,713 Points
|
2014-07-04 8:41 pm
Hello Kolawole,
Have you followed the instructions in this guide and made sure that you've added the user to your Administrator group? Are you able to login successfully with the user, but just not access the admin backend with them? - Jacob |
Help Center Login
Managing Modx
Related Questions
Here are a few questions related to this article that our customers have asked:
Ooops! It looks like there are no questions about this page.
Would you like to ask a question about this page? If so, click the button below!

We value your feedback!
There is a step or detail missing from the instructions.
The information is incorrect or out-of-date.
It does not resolve the question/problem I have.
new! - Enter your name and email address above and we will post your feedback in the comments on this page!