Part I: Setting Up Friendly URLs for MODX- HTACCESS file changes
How do you define "friendly URLs"? Friendly URLs are basically website addresses that are called "friendly" because they provide a more readable URL that can help both users and search engines. To see the difference of using a friendly URL, review the URLs in the table below:
| Non-friendly URL | Friendly URL |
|---|---|
| http://website_name.com/123509&432.php | http://website_name.com/productpage.php |
A friendly URL is much easier to remember as opposed to the "unfriendly" URL that may often contain hard-to-remember numbers, symbols and letters. Additionally, the use of more readable links helps to index the site pages into identifiable groups that help users and search engines in searching the website. These links are also often called search-engine friendly links.
The following tutorial is the first part in a two-part series required to setup friendly URLs in MODX Revolution. We will first walk through the steps to use the MODX version of the .htaccess file.
If you have completed this portion of the preparation, please continue to the second part named Part II: Making Template and System Setting Changes to Enable Friendly URLs.
Part I: Setting up Friendly URLs in MODX- Preparing the .htaccess file
Rename the original .htaccess file
The following steps re-names your current .htaccess file so that you can replace it with the MODX-provided file.
- Use a FTP client or your hosting interface to access the directory to your current .htaccess file. Web Hub Hosting Hub uses the Cpanel File Manager for access to the files on the web server. Go to Using the File Manager in Cpanel, or if you want more information on using a FTP client, go to Getting Started with FTP the for further details.
- Using the interface provided by your host - such as the Cpanel File Manager - rename the current .htaccess file to htaccess-old. For instructions on renaming using the Cpanel interface, go to Renaming files with the Cpanel File Manager.
Editing the MODX version of the .htaccess file
MODX provides a version of the .htaccess file in its default installation. However, you will need to edit the file before uploading the file into your hosting server files to use it.
NOTE: MODX provides the instructions on what you should change in the .htaccess file, but you should carefully review any entries that you make. These entries must be correct or there will be errors generated and the website may not work.
- Open a separate browser window and then login to the Modx Administrator Dashboard.
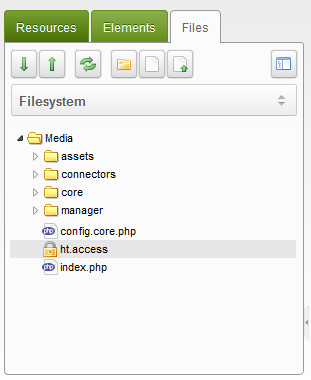
- In the Resource Tree at left of the screen, click on the FILES tab. For a default installation, you may see a file listing as the screenshot at right (this list may differ depending on what you have loaded).
- Right-click on the highlighted file (as per the screenshot at right) named ht.access.
- Next we need to edit the file so that the correct URL is being used. Click on the EDIT FILE option. This will open the MODX ht.access file in a text editor. PLEASE REVIEW ALL OF THE INSTRUCTIONS THAT MODX HAS PLACED IN THE COMMENTS. Comments in the MODX ht.access file begin with the "#" sign at the beginning of the line. The main change that you must make involves the following area of the ht.access file:
RewriteEngine On
The "Rewrite Base /" should include the directory name for the location of your MODX installation. If you installed it directly at your webroot, then it should be blank and no entries made. If you installed MODX in a folder called "modx", then the text following the "RewriteBase /" should be "modx". For example:
RewriteBase /
RewriteBase /modx
- When you have completed your changes, click on SAVE in the top right-hand corner.
- Now we need to move the edited file onto the web server with the rest of your MODX installation files. Right-click on the ht.access file in the tree view of the Resource Tree. Click on DOWNLOAD FILE. Make sure to take note of where you download the file.
- Go back to the host interface that you used earlier to rename the original .htaccess file. Upload the newly edited ht.access file into the same directory as your previous .htaccess file. Note that this directory should be the location of your Modx installation.
- Use your host interface or FTP client and RENAME the ht.access file to .htaccess file. The location of the period is an important part of the file name. Files with the period in front of the name are considered "hidden."
This concludes the first part of setting up friendly URLs for MODX websites. In order to enable friendly URLS in MODX, all of the changes noted in the 2-part series are required. To complete the process, please go to Part II: Making Template and System Setting Changes to Enable Friendly URLs in MODX.
Did you find this article helpful?
Tweet
Category
Managing Modx
Help Center Login
Managing Modx
Related Questions
Here are a few questions related to this article that our customers have asked:
Ooops! It looks like there are no questions about this page.
Would you like to ask a question about this page? If so, click the button below!

We value your feedback!
There is a step or detail missing from the instructions.
The information is incorrect or out-of-date.
It does not resolve the question/problem I have.
new! - Enter your name and email address above and we will post your feedback in the comments on this page!