How to modify your hosts file in Windows
What is a hosts file modification?
A hosts file modification is a change you can make to Windows that will resolve domain names to specific IP addresses. This is useful when migrating your site to our servers and you haven't yet updated your nameservers. You can keep your domain's nameservers pointing to your previous host while you fully test your website on our servers, preventing any disruption of your site for your visitors while you test your site on your new server. It may sound complicated, but it really is not. Your hosts file is a just a text file that you can edit in notepad.
This article covers the steps for making this modification if you are running the Windows operating system. If you use a Mac, please see our article How to modify your hosts file on a Mac.
Run Notepad as an administrator
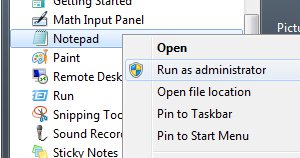
Because your hosts file is a system file, you'll need to run Notepad as an administrator when you edit it. Doing this is quite easy. Find Notepad in your start menu (usually in the accessories), right click on in, and then click "Run as administrator".
Open your hosts file
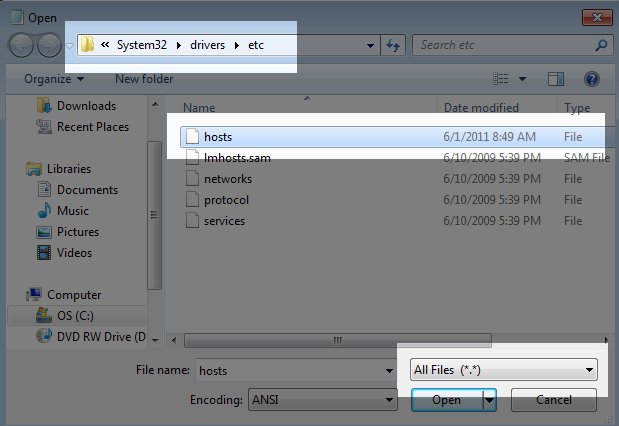
Before you can edit your hosts file, you need to find it. Not all versions of Windows store it in the same place, but in our experience it's usually located in c:\windows\system32\drivers\etc\hosts Other possible locations include:
- Windows 95/98/Me c:\windows\hosts
- Windows NT/2000/XP Pro c:\winnt\system32\drivers\etc\hosts
- Windows XP Home/Vista/Windows 7 c:\windows\system32\drivers\etc\hosts
- Windows 10 c:\windows\system32\drivers\etc\hosts
We now need to open the hosts file:
- In Notepad click "File" and then "Open.."
- Find the drop down next to "File name". It by default says "Text Documents (*.txt). Change this to "All Files(*.*)"
- Navigate to the folder where your hosts file is located
- Double Click hosts to open it
With your hosts file now in Notepad, it should look similar to the below:
#
# This is a sample HOSTS file used by Microsoft TCP/IP for Windows.
#
# This file contains the mappings of IP addresses to host names. Each
# entry should be kept on an individual line. The IP address should
# be placed in the first column followed by the corresponding host name.
# The IP address and the host name should be separated by at least one
# space.
#
# Additionally, comments (such as these) may be inserted on individual
# lines or following the machine name denoted by a '#' symbol.
#
# For example:
#
# 102.54.94.97 rhino.acme.com # source server
# 38.25.63.10 x.acme.com # x client host
127.0.0.1 localhost
Note on making changes to the Hosts file in Windows 10
You will be required to be logged in to Windows as an administrator level user in order to make changes to the hosts file. Windows make provide a login prompt for the administrator user when making changes to the hosts file.
Be Cautious and make a backup
We recommend that you back up the host file before making any modifications to it. To do this:
- In Notepad click "File" and then "Save As..."
- For the "File name:" value, enter something different, such as hosts_backup_2011.05.31
- Click "Save"
Determine your Web Hosting Hub Server's IP address
As always, this is not as hard as it sounds. We need to determine your Web Hosting Hub Server's IP address, and we'll enter this into the hosts file.
To view your IP:
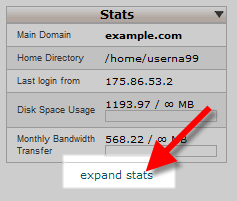
- Login to your cPanel.
- On the left if you see the Expand Stats option, click it.

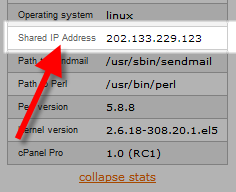
If you do not see it, it is most likely expanded already. - Navigate down to where the Shared IP is listed.

Using this information, add the following lines to the bottom of your hosts file:
202.133.229.123 my-wordpress-site.com
202.133.229.123 www.my-wordpress-site.com
Notice that we enter two lines, one with our domain, and another with our domain including the "www". If you are testing your site on any other subdomain, such as blog, be sure to enter it as well, as in:
202.133.229.123 blog.my-wordpress-site.com
After making this change, we'll need to save the file. Earlier, we asked that you save a copy of your hosts file as a backup. If you click "File" - "Save" in Notepad, you're going to save these changes to the backup file, not the original file. What you'll need to do is:
- Click "File" - "Save As".
- Enter "hosts" as the "File name"
- Choose "All Files (*.*)" as the "Save as type".
- Then click "Save".
Congratulations, you've just updated your hosts file! For some users, there is one more step, flushing their DNS.
How to Flush your DNS
You're website's IP address may be saved in your computer's cache, so we'll need to clear this temporary data so that the IP address you just entered into your hosts file will take effect. To do so:
- Click your Start Menu
- Navigate to "Accessories" and click "Command Prompt"
- In the command line, run the following command by typing it and then hitting enter:
ipconfig /flushdns - The output should be similar to:
C:\Users\username>ipconfig /flushdns
Windows IP Configuration
Successfully flushed the DNS Resolver Cache.
If you have any browser's open, close them and then open them again. You should now be able to successfully test your website on your new server.
How do I know the hosts file modification is working?
This is a very good question! If your website was migrated successfully, then it should look exactly the same on both servers. An easy way to test is to upload a file to your Web Hosting Hub server and call it something similar to "hosts_test.html", and in the file type something such as "You are on the new server". You can then visit yourdomain.com/hosts_test.html. If you see the message you just typed in, then you test has worked successfully. If you do not see the test, we recommend restarting your computer and then testing again.
After your testing is complete, be sure to undo the changes you made by repeating the steps above and instead remove the entries in your hosts file that you added today.
Comments
|
11 Points
|
2013-04-26 11:00 pm
This is so very very technical and tedious!
I just want to start designing! |

3 Points
|
2013-08-08 12:03 pm
A kind request to WHH support team - please update this article so that users could correctly modify their hosts files!
Instead of using IP address from whub##.webhostinghub.com ping request, users should use their Shared IP Address found in Cpanel under the Stats tab (you may need to expand it first). I had to spend several hours trying to make the hosts file work following the directions in this article before I finally figured out that I was using wrong IP addresses in my hosts file... |
|
Staff 12,339 Points
|
2013-08-08 7:20 pm
Hello nickname,
I like your username by the way. Thank you for letting us know, you are absolutely correct. I have updated the article to the correct steps. If you have any further questions, feel free to post them below. Thank you, -John-Paul |


We value your feedback!
There is a step or detail missing from the instructions.
The information is incorrect or out-of-date.
It does not resolve the question/problem I have.
new! - Enter your name and email address above and we will post your feedback in the comments on this page!