Change DNS to host email, website is hosted elsewhere
Navigation
In most cases, most web services like email are run under one hosting provider. However, in some cases there might be a need to split up the services between multiple hosts. The services normally involved in the split are the web server and the email server. This tutorial will walk you through the process to modify your domain's DNS records so that you can set your email service to be hosted at Web Hosting Hub while your domain is hosted with a third party host.
The following steps will require that your domain name is set to use Web Hosting Hub's name servers. This allows you to make DNS changes in the cPanel that will determine the location of your mail service.
Host a Website on a different host while using Web Hosting Hub for Email Services
A common situation that occurs is when you create a website with a hosting company that uses a proprietary website building program, but does not include email service. You may then decide that you want to have email service and the website hosted in one location - Web Hosting Hub. The transition process may require some time, but you may want to have access to the email service. This means that you will need your website hosted on your old host while the email service is active with Web Hosting Hub.
DNS Changes Using the Advanced DNS Editor
- Login to your cPanel.
 Click on the Advanced DNS Editor icon in the Domains section.
-

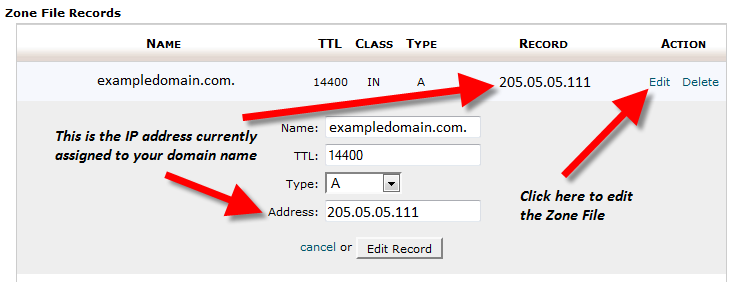
Scroll down and look at the Zone File Records section. Look for your primary domain name (the domain name you registered the account with) and click on the Edit button. This will open the record and show the IP address that is currently assigned to the A record for the domain. By default, this will be the IP address assigned to the Web Hosting Hub server.
-

By default, the A record is assigned to the IP address used by the Web Hosting Hub server. You will be modifying the A record so that it points to your old host. Click in the field and remove the existing IP address by putting the cursor at the end of the address and backspacing over it until it's no longer in the field.
-

In order to direct your website traffic to your other host, you will need to know the IP address of the website. You can find your website IP address through your other host if you do not know the current setting. Type in the IP address of your remote website host, in the Address field, then click on Edit Record to save your entry.
-

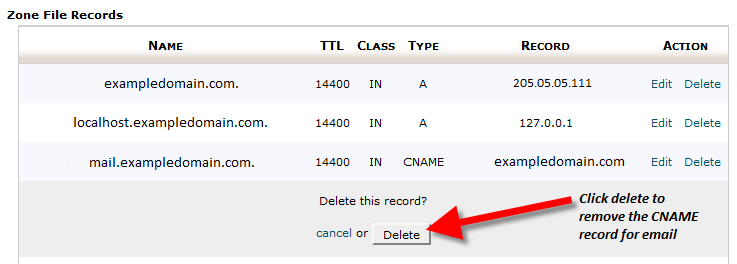
You should now see the new A record you updated. Now click on Delete beside the CNAME record for mail.exampledomain.com.
-

Scroll up to the Add a record section. Type in the following to re-create the mail record you deleted, but this time as an A record:
Name Fill in the domain starting with mail. For example, mail.exampledomain.com. Note: Make sure to include the period after the entry. TTL This is called time to live and is a internal server value. Enter the value as 14400. Type Type of record - by default this is set to an A record. This is the record type that is needed, so do not change the setting Address The address is the IP address of your shared server The address record points to the Web Hosting Hub server IP address. You can always find your IP address in cPanel.
Anytime you make DNS changes, it can take between 24-48 hours for those DNS settings to fully propagate. This delay is known as DNS propagation.
Modify the MX Record
The second part of modifying the DNS for hosting email at the Web Hosting Hub server while directing website traffic to another host requires a change with the MX record.
-

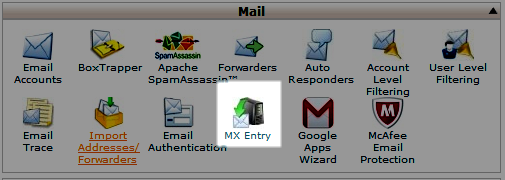
At the main cPanel page, go to the Mail section and click on MX Entry.
-

Scroll down until you find the MX Records section. There should be a destination setting with your domain name. Click on Edit to the right of it.
-

Now type in mail. in front of your domain to relate your MX record with the local A record we previously created.
Once the changes have been completed, it should take no longer than a few hours for the changes to take effect. Mail that comes into your account before the changes take effect will simply go to your old email hosting server. If they are unable to be delivered, an error message will be generated from the server sending the email and sent to the person sending you the email. When propagation completes, you will see email arrive in your email client. To host your website locally while hosting the email on a third party service, see Change DNS to host website, email is hosted elsewhere.

We value your feedback!
There is a step or detail missing from the instructions.
The information is incorrect or out-of-date.
It does not resolve the question/problem I have.
new! - Enter your name and email address above and we will post your feedback in the comments on this page!